CSS Coding Course
CSS 101
Part 8c. Text & Fonts
Google Fonts
Ah yes, finally we are getting into some good stuff! As you already know, there are some fairly decent choices in system fonts for serif font-families, sans-serif font-families, and monospace font-families, especially if you use the three font choice system we showed you in the past. An example of this is font-family: Arial, Helvetica, sans-serif;. But even for font-families as basic as sans-serif, the free Google Fonts library can vastly expand your choices for font-families. And yet, you will recall that choices for cursive and fantasy system fonts, and their associated fallback fonts, were appallingly incompatible with each other across operating systems and browsers. This is the real strength of using webfont libraries like Google Fonts because all fonts, including the cursive or fantasy fonts you choose to import from Google Fonts will be 100% compatible with virtually all operating systems and web browsers used by your target audience. At last, your CSS prayers have been answered!
So, let's dive into the free Google Fonts library, and take a look around, shall we? First of all, let's look at some of the buttons and controls we find when we first open this web page.
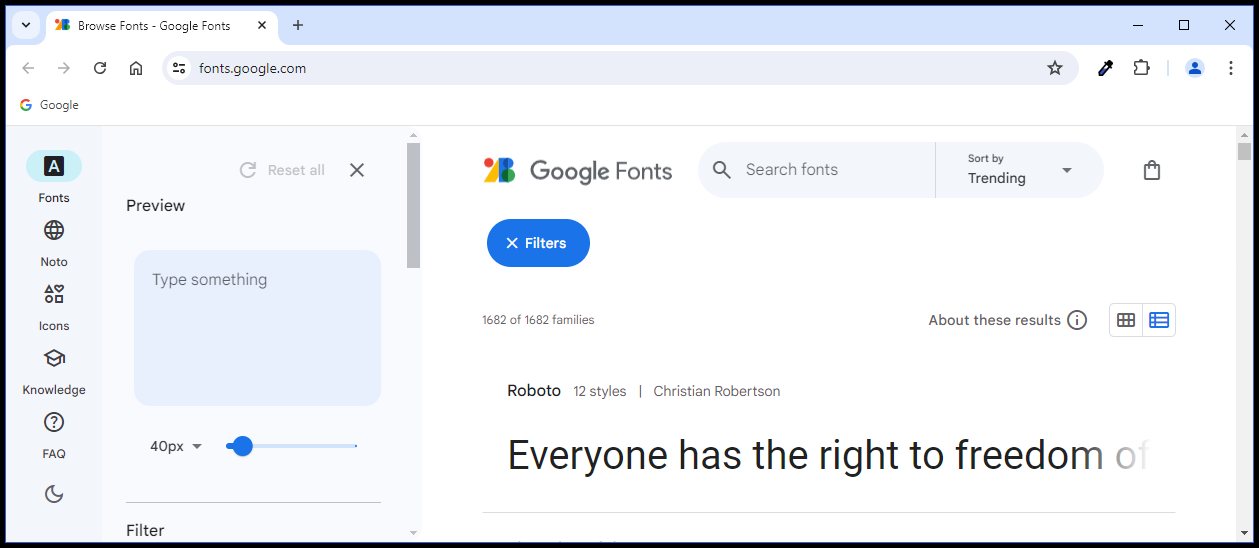
There are several areas of interest here. On the left side we see a column of navbar icons with the Fonts icon selected by default. To the right of that column is another much wider column of Filter options. At the top of that column, we see the word Preview. We will dive deeper into these filters later. But the main area of interest is the column to the right of that which takes up most of the web page. It has the Google Fonts logo and label in the upper left-hand corner of the column. To the right of that, we see a Search fonts search bar. To the right of Search, we see a Sort by pulldown menu (with Trending selected by default). And to the far right of that, we see an icon of a shopping bag where we will find the free font families we have selected. On the second row, we see a big blue Filters button. And below that, we see the number of possible fonts that are available to us. When this screenshot was taken, there were 1682 possible font families to choose from. And that number of possible fonts seems to increase almost daily. Surely one of those possible fonts will work well for us! And below that, we see a preview of the Roboto font-family, the fastest trending font today.
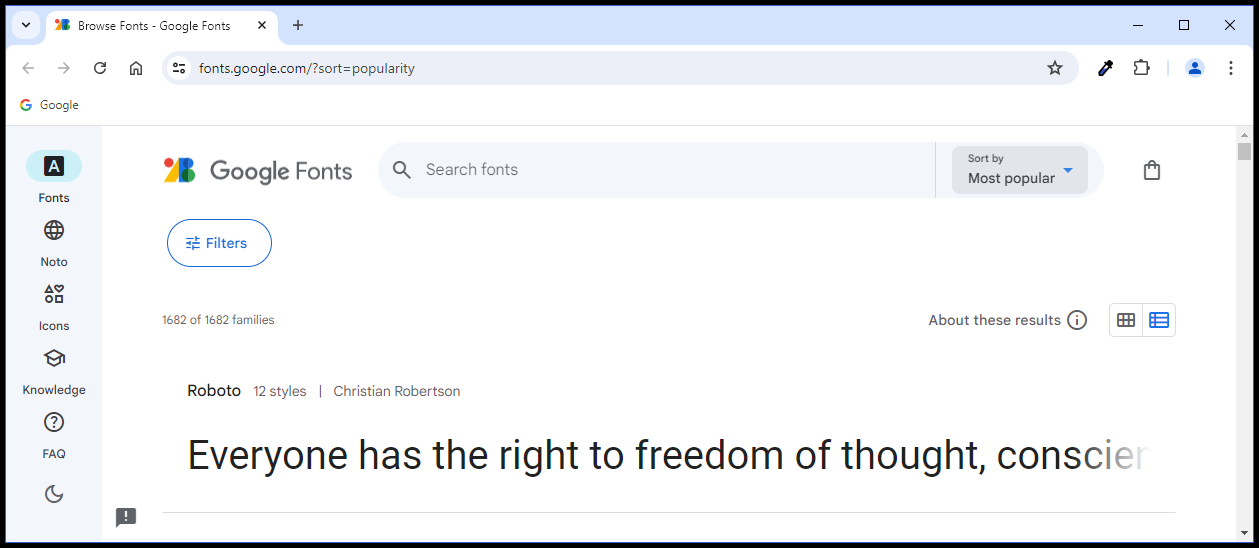
There is so much information available here that it is hard to decide what to do next. For that reason alone, we will simplify this interface slightly. Let's click on the big blue Filters button, and that will close the Filter options column for now, so that the word Preview will disappear. Next, let's select Most popular from the Sort by pulldown menu, and then we will get web page that looks more like the one below. And if you scroll down that web page, you will find a list of the most popular Google fonts, sorted by their current popularity.
The Google Fonts Navigation Bar
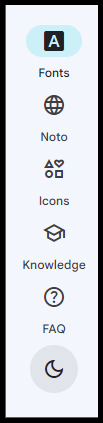
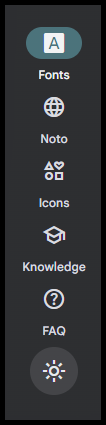
If you click on the icon at the bottom of the Google Fonts navbar, the web page screen will switch to Dark Theme if it is already in Light Theme. It is often helpful to see how a font will look against a dark background. And as you already know, it is best practice to use light-colored text against a dark-colored background. And vice versa: it is best practice to use dark-colored text against a light-colored background. If you click on the icon at the bottom of the Google Fonts navbar, the web page screen will switch to Light Theme if it is already in Dark Theme. That's a very handy button because it allows us to toggle between these two themes.
The second icon from the top allows us to view just the Noto fonts. This is very useful especially if you will be doing web pages that support languages other than English. After you click on that Noto icon, scroll down the page, and click on the Browse all Noto fonts button. Then, you will see a plethora of fonts in alphabets that you quite possibly never knew existed previously. For instance, what if you are building a website for a client in South India who wants you to have buttons that switch the text from English to Tamil or Telugu? Amazingly enough, there are fonts available that support both of these languages. And since our client will supply us with the translated text, all we have to do is copy and paste their translated text into our HTML document, and then link it to these font-families through CSS: a process we will learn more about later.
The Google Fonts Filters Menu
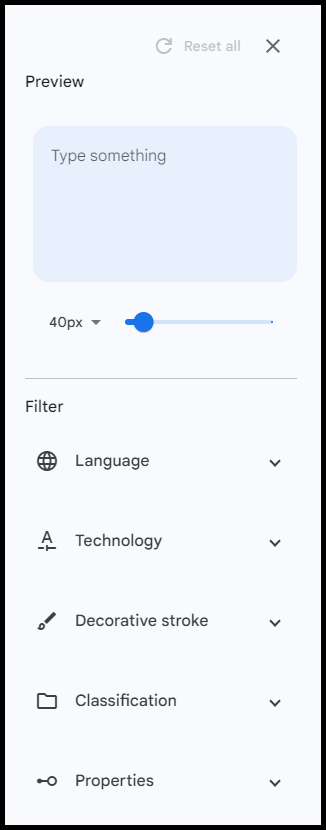
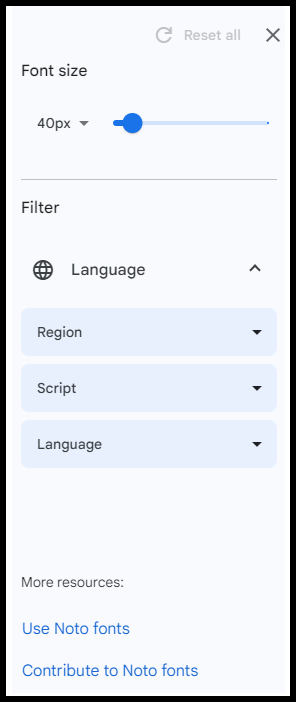
Now might be a good time to test out some of those filters. If you click on the Filters button at the top of the page, the Filters menu opens up again. One of the options listed is Language. If you click on that search button, it expands to show you three other buttons: Region, Script, and Language. Let's click on the Region search button to see all of the options available to us. And there are many. Let's scroll down to select India. Wow! Look what just happened! We narrowed down the number of available Noto font families. In our case (and at the time of this writing), we narrowed it down from 208 to only 83. Who knew there were 83 free Google fonts available to the Indian subcontinent? But we can be even more specific. Now let's click on the Language search button at the bottom of these three options to see what else is available to us. Ah! If we scroll down through the long list of recognized languages in India, we can select Tamil, which narrows the number of fonts down to three, of which, two look completely usable: Noto Sans Tamil and Noto Serif Tamil. We can also do the same scrolling exercise to select Telugu, which yields the Noto Sans Telugu and Noto Serif Telugu fonts. Amazing!
But getting back to the Google Fonts navbar, there are a few more icons to explore. Google now has a massive library of Icons for you to use. Sometimes you just need a few symbols to illustrate something, and this is your free ticket to using these symbols on your websites. Also, there is a Knowledge icon that links to many great tutorials about fonts. And there is an FAQ icon that links to information about using Google Fonts, just in case you didn't believe us when we told you that there is no cost or legal ramifications for using Google Fonts.
At this point, we could spend a lot more time explaining all the various options that are available, but these long explanations can get rather boring, and we would rather that you spend your time working with new projects to help you understand all of this better. We will leave most of the deep explorations of the Google Fonts website up to you for now.
Why You Need Google Fonts
Once you learn how useful it is to use Google Fonts, you will enter into a whole new world of web development. Remember when you learned that you actually have 16,777,216 colors to choose from, with 256 levels of transparency or opacity for each color? Well, this epiphany will be similar that that one.
We've already learned a ton of information about font-families, font-sizes, units of font measurements, font-weights, and font-styles, but Google Fonts will expand your font choices dramatically. As of this writing, there are 1,682 font-families for you to choose from that are completely free to use both personally and commercially. And since fonts are actually raster images, they are all very high-quality and resizable. And many of these fonts come in different font-styles and variable font-weights that allow you can specify a range of font-weights from 100 to 900, giving you 800 different levels of font-weights for the same font-family. And we will see that in the next upcoming lesson.
One of the main reasons why we chose the Roboto Slab TrueType font here is because it has 9 different static font weights and 800 different possible variable font weights. And it does not have the italic font style. Google Fonts that have both italic and regular font styles have 18 different fonts to deal with, and we wanted to make this lesson as easy as possible. Whether or not Roboto Slab TrueType font becomes your favorite font-family in the future is not the point of this exercise. Learning the different ways you can specify and use Google Fonts is.
Now we are going to learn five different ways to use Google Fonts. We will learn how to download Google Fonts and how to use embed code which lets you use a font without the need to download it and store it locally. All five of the projects below use the Roboto Slab TrueType font in a different way. And yet, all five project web pages look the same. You can open all five web pages in separate tabs on your web browser and compare them side-by-side. Check it out!
- Downloaded Static Font Weights
- Downloaded Variable Font Weights
- Embedded Code Linked
- Embedded Code Imported #1
- Embedded Code Imported #2
Project 1 – Downloading & Using Static Font Weights
The first thing we need to do is download the first project called Downloaded Static Font Weights. The zip file you will be downloading is called font-tester-download-static.zip. All of the code required to test these nine different static font weights is provided, but the actual font itself is not. At this point, the files inside your Downloaded Static Font Weights project will resemble the folder illustrated below.
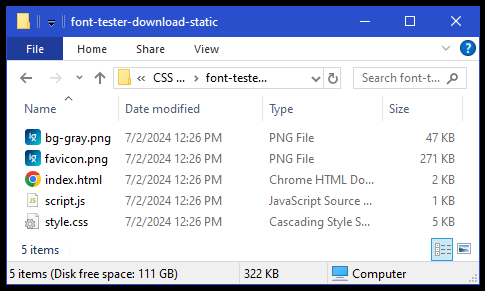
In fact, if you open this project in VS Code after unzipping it, and view it in your browser with live server, you will see only two different font weights of the default serif font. The first five lines default to normal font weight and the last four lines default to bold font weight. Remember that we always try to include a fallback font in case our preferred font fails to load for some reason. Since Roboto Slab is a type of serif font, it makes sense to use serif as our fallback font. It is also important to know that most fallback fonts do have two font weights by default: font-weight: normal; font is actually font-weight: 400; by default. And font-weight: bold; font is actually font-weight: 700; by default. That is why your browser chose those two serif font weights since it could not find Roboto Slab font in any of those nine static fonts specified. And if you open this project as is side-by-side with the Downloaded Static Font Weights project we showed up above, you will see what a difference it makes to have a font-family with nine different static font weights to choose from.
So now, let's get this party started by downloading the Google Font called Roboto Slab. And the easiest way to find it is by using the Search font tool, and by typing in Roboto Slab. That font will appear below the search bar and all the other font-families will be hidden.
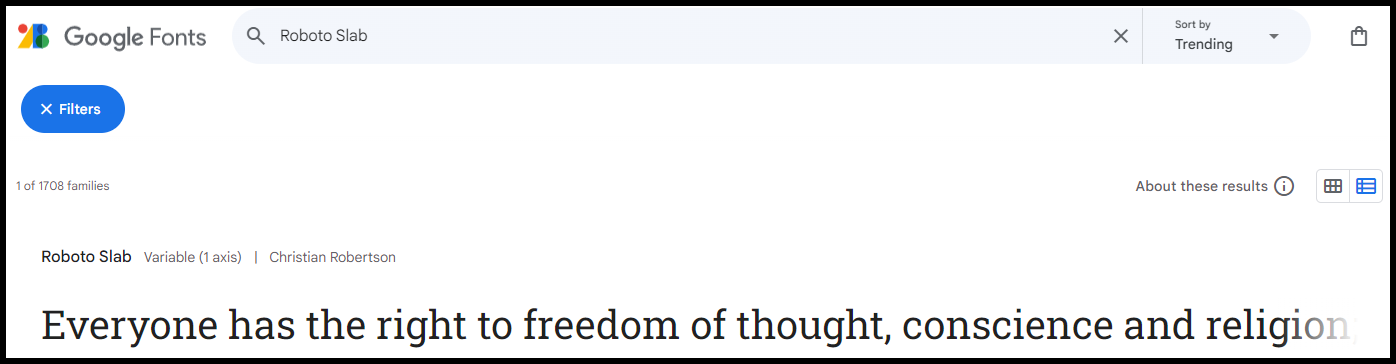
Now let's click on it to select that font. A new web page opens that displays this font only. And if you scroll down, you will see that we have nine different font-weights available to us, ranging from weight 100 to 900. Nice! So now, you can click on the big blue button in the top right corner of the that says Get font. Now another page will open that looks like the one below (without the red arrows).
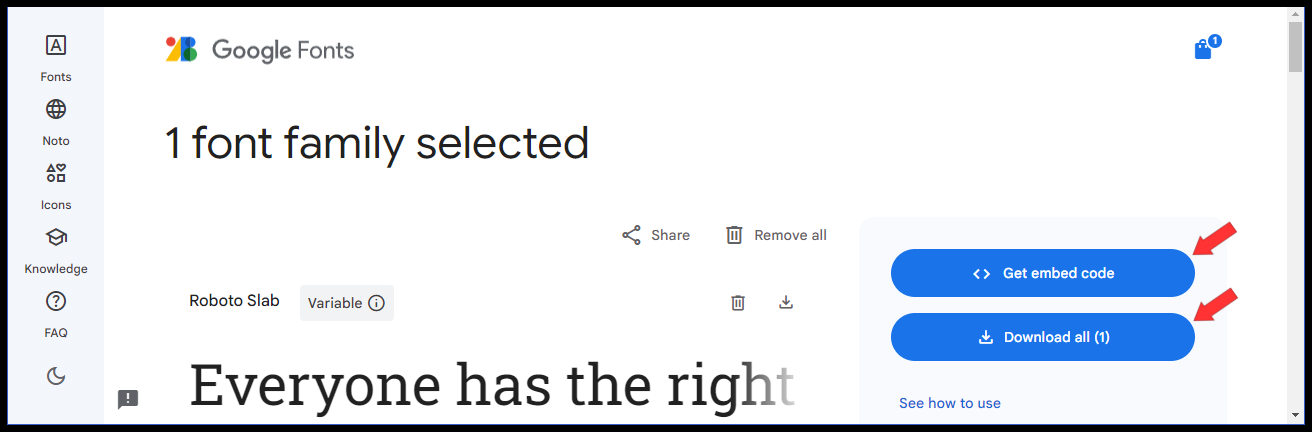
The red arrows are there to point out four areas of interest. In the upper right, you'll see the shopping bag that is now blue with a number 1 on it. The text below that informs you 1 font family selected, and we know what the name of that font family is, right? There are also two big blue buttons. The one on top says Get embed code and the one below it says Download all (1). There is also a download icon to the left of that button, plus some other controls that you may find helpful someday.
For now, we will ignore the Get embed code button, but we wanted you to know that it is here, because eventually, we will learn how to embed code, which can oftentimes be a much easier process than downloading an entire font family. For our learning purposes right now, we will learn how to download and use a font family.
To do that, we will simply click on the big blue Download all (1) button. A download dialog box will appear allowing you to download a zip file called Roboto_Slab.zip. You might as well download it to your computer's Downloads folder and unzip it there because we will be use this resulting Roboto Slab folder more than once.
You might have forgotten how to extract the font files from the Roboto_Slab.zip file. If you are using Windows, simply right-click on the zip file, and then select and left-click on Extract All... from the pull-down menu. Then the files will be extracted to a folder called Roboto_Slab. However if you are using a Mac, simply right-click on the zip file, and then select Open With > and Archive Utility.app (default) and click on it, and then the files will be extracted to a folder called Roboto_Slab. Now copy and paste the Roboto Slab folder into your Downloaded Static Font Weights project folder, and it will look something like the folder below.
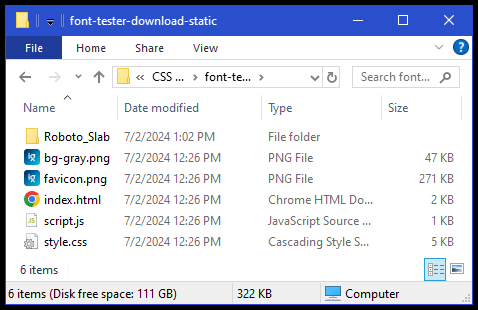
Now let's double-click on the Roboto_Slab folder to open it so we can see what is inside.
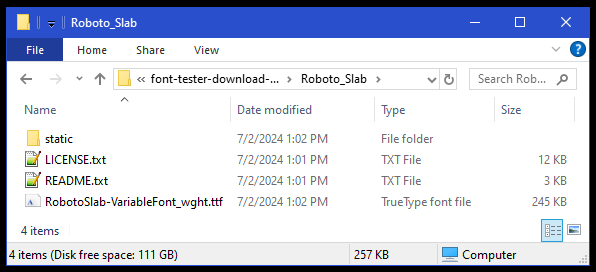
Ah! There are two text files here that tell us more about this font-family. There is also a TrueType font file called RobotoSlab-VariableFont_wght.ttf, and there is another folder called static. OK, so let's open that static folder to see what it inside of that folder as well.
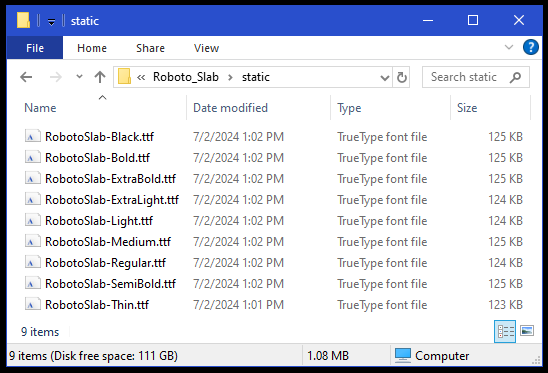
So now that the desired nine static font-weights for the Roboto Slab font-family have been downloaded, we can once again open this project with Live Server and we should see that font-family displayed in all nine font-weights, and it should look like this. And if not, you'll need to retrace the steps you took to see what went wrong.
Understanding Project 1 Code
So now, let's briefly look at the code in this project. The index.html file is easy enough to easily understand. We have a container div with nine paragraphs inside the container. Each paragraph is given a class name that describes the weight of the font used in that paragraph.

However, the real magic happens in the style.css file. In the top part of that file we see nine different @font-face CSS rules: one for each of the nine static font-weights. Notice that the first line in each definition defines the font-family name, followed by a comment to tell you the font-weight of that font-family. The second line points to the source file for that font-family which resides in the static folder inside the Roboto_Slab folder. This image above shows lines 7-10 which defines the font-family for the Roboto Slab Thin font that has a font-weight of 100.
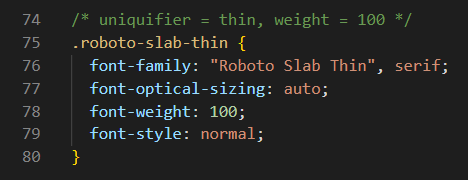
But there is another part of the style.css file that uses the nine font-family names as defined above to create nine different classes for the nine different font-weights used in the nine paragraphs in the index.html file. So... you may be asking, "What is a uniquifier anyway?" Well, it's just a unique name we give to each font-family to distinguish from the others. in lines 74-80, we are identifying the thin version of Roboto Slab which has font-weight of 100. None of this CSS code should look much different than code you've seen before, with the exception of line 77, that is. We have not talked about font-optical-sizing yet. In this case, we are setting the value for that property to auto, because on line 78, we are defining this static font-weight to 100. If we were working with a variable font-weight, then we could set the font-optical-sizing to any number we wanted between 100 and 900, inclusive. And that should be a good lead-in to the next project.
Project 2 – Downloading & Using Variable Font Weights
This project will go much faster because we already downloaded the entire Roboto Slab font-family. So now, let's download the second project called Downloaded Variable Font Weights. And as usual, you will need to unzip the file in the CSS Coding Course folder before opening it in VS Code. Otherwise, and similarly to what we did it Project 1, if you run this code using Live Server before you copy the Roboto Slab folder into this project, then you will see only two different font-weights (default normal 400 and default bold 700) for the default fallback serif font. At this point, your new project folder should look similar to the one below.
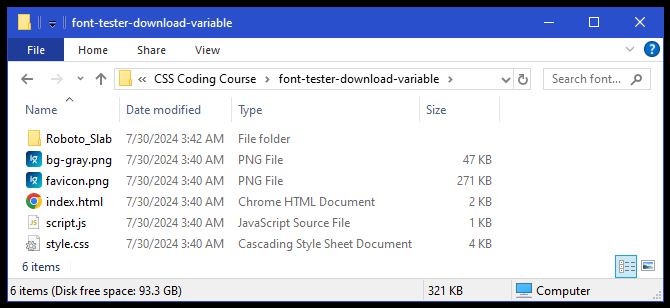
And when you run it using Live Server, it should look like this. If not, then review the steps you took to get to this point and try again.
Understanding Project 2 Code
Amazingly enough, the result of running the Project 2 should create a web page that looks absolutely identical to Project 1. However, the way we coded it is completely different. Granted the index.html code will be identical to the code we used in the first project, but look at how much simpler the code is in this style.css file.

In the Project 2 style.css file, we only needed to have one @font-face CSS rule instead of nine because we are using the variable font-weight file and that does not require nine different @font-face CSS rules for each of the nine static font-weights. In Project 2, lines 7-10 assigns a variable font-family for Roboto Slab and that one file can define all of the other possible font-weights that we might desire from 100 to 900, inclusive.
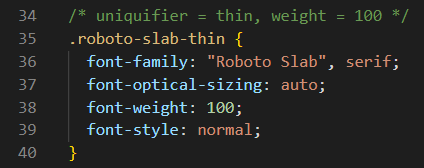
Yes, it is true that we used the same nine font-weight definitions that we used in Project 1. But notice that we are defining the thin version of Roboto Slab which has a font-weight of 100 on lines 34-40 instead of on lines 74-80 like we did in Project 1, and that is a huge reduction in the number of lines of code required to prodcuce the same result. And since we are using font-optical-sizing, we could have set the font-weight to any number we wanted between 100 and 900, inclusive. In this way, we could have created a uniquifier called not-so-thin and a class called .roboto-slab-not-so-thin with a font-weight: 155; and that is the beauty of using a variable font-weight instead of a static font-weight.
Now that we've learned two different ways to download and use Google Fonts, let's discover how to use embed code which does not require downloading fonts at all. Of course there are still times when you might prefer to download a font-family, so it is important to learn all five of the ways we can use Google Fonts, or any other font for that matter. And that's the main purpose behind these lessons.
Projects 3, 4, and 5 – Linking & Importing Google Fonts into CSS
Now we are going to learn three different ways to implement Google Fonts without downloading them. But before we go much further, let's download and unzip the three remaining projects into our CSS Coding Course folder:
When you are done, you should have three project folders called:
- font-tester-embed-linked
- font-tester-embed-import-1
- font-tester-embed-import-2
And obviously, the titles for these three projects are:
- Font Tester Embed Linked
- Font Tester Embed Import 1
- Font Tester Embed Import 2
And these descriptions help to explain the titles of these projects much better:
- In Project 3, the embed code is linked in the head of the index.html file.
- In Project 4, the embed code is imported through style tags in the head of the index.html file.
- In Project 5, the embed code is importedthrough pure CSS at the very top of the style.css file.
So now, let's rewind back to the point where we had just selected the Roboto Slab font, and we had a web page that looked something like the one below (without the red arrows).
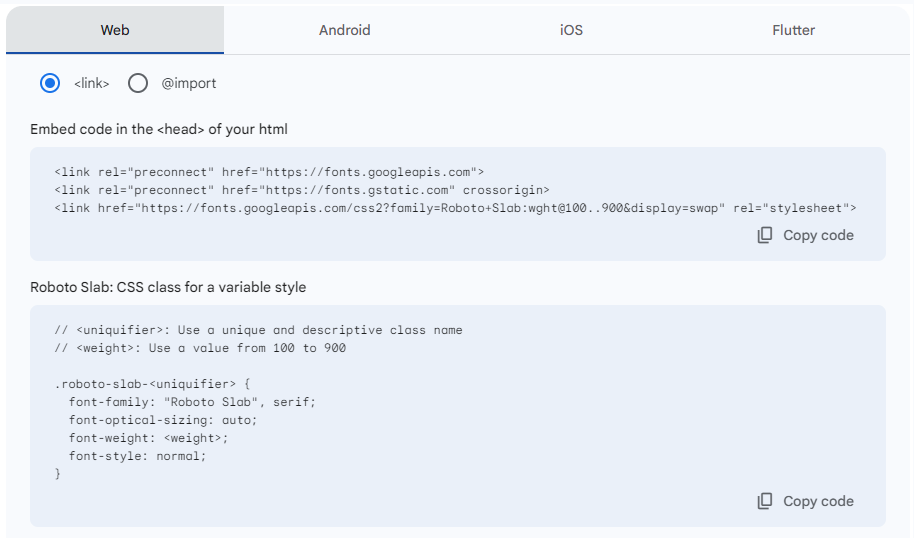
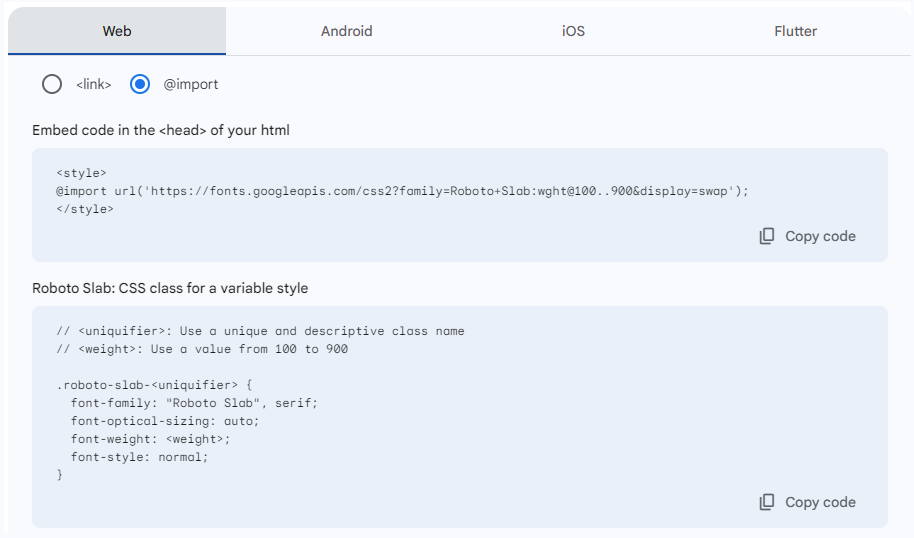
If we choose to click on the Get embed code button, rather than clicking on the Download all (1) button, we would instead get a web page that had options on the right side of the screen like the ones below. As you can see, there are two radio buttons to select from: one for <link>, and one for @import.
If we leave <link> selected, the screen will look like the one below.
However, if we select @import, the screen will change to look like this screen.
Understanding Project 3 Code
Now it's time to open the font-tester-embed-linked folder with VS Code. And so far, the index.html files have been identical in all projects. But beginning with this project, that all starts to change. For this project, we did exactly what they told us to do in the <link> instructions above. They told us to "Embed code in the <head> of your html" and so we did that, as illustrated below. As best practice, we linked these fonts on lines 9-11 before we linked our external CSS stylesheet on line 12, because the web browser always reads code from the top to the bottom, and we wanted it to link the font before it actually started to use it, right?

As for the code in the style.css file, here again we did what they told us to do. Except that we know better than to use <uniquifier> and <weight> in our CSS code. We actually already talked about this. A uniquifier is a unique class name we give to each font to help distinguish it from the other Roboto Slab fonts (like .roboto-slab-thin). And of course, weight is a measurement of the thickness of a font-weight in the range of 100 to 900, inclusive. Please feel free to explore this project's style.css file, but you will not find anything new that wasn't already explained elsewhere.
Understanding Project 4 Code
Now let's open the font-tester-embed-imported-1 folder with VS Code to see how it differs from the Project 3 files. And amazingly enough, the only difference is how we import embed code through CSS rather than linking it through HTML. If you look at the @import instructions, you will see that once again, we did what they told us to do. They told us to "Embed code in the <head> of your html" and so we did that.

See what we did here? Instead of using three HTML link tags on lines 9, 10, and 11, we instead created a tiny internal CSS stylesheet by using opening and closing style tags, and then placing the @import code between them. Isn't this much simpler than linking embed code to your project?
But wait! Why would you create an internal CSS stylesheet when you already have an external CSS stylesheet that you could use for your @import code? And that brings us to Project 5.
Understanding Project 5 Code
Now let's open the font-tester-embed-imported-2 folder with VS Code to see how it differs from the Project 4 files. If you look at the code in the document head of your Project 5 index.html file, there is only one HTML link tag that points to our external CSS stylesheet called style.css. So let's look at that file.

Gee, that was even simpler than what we did in Project 4. In Project 5, we imported the font directly into the stylesheet so that we could start using it immediately, and that only required one line of code! OK, so if this is the easiest and most preferred way to import Google Fonts, then why were we forced to jump through hoops in these other 4 projects? Actually, it was because we will use all of these techniques in the next section. Some fonts have embed code that can be linked. Some fonts have embed code that can be imported. But there are also fonts that must be downloaded. So learning all of these various methods was not a huge waste of time, as you will see in the very next lesson.
Summary
In the next part, we do eight different fun projects as we learn how to download all of the different types of font-families and how to use them. We will learn where to go to find more free fonts besides using only Google Fonts. And we will find some great alternatives for cursive and fantasy fonts that are compatible with all operating systems and web browsers. And we will learn about Google Font Effects, and all about using the free Font Awesome icons library, and how to include special characters, and everything you ever wanted to know about the Unicode Standards but were afraid to ask. It's all coming up in the next part.