CSS Coding Course
CSS 101
Part 1. An Introduction to CSS
A Quick History Lesson
HTML stands for HyperText Markup Language. HTML is the coding language that allows us to place content on our web pages. But the world of HTML would be a very boring place without the ability to style it. You might say that CSS makes the HTML world go around. In the earliest days of the World Wide Web (WWW), there was no CSS. All web pages were styled inline, or not styled at all. And it was difficult to distinguish HTML elements and tags from the elements of style which we now refer to as Cascading Style Sheets, or CSS for short.
The World's First Web Page (click here) looked like this when it was created back on August 6, 1991. We've come a very long way in the past 35+ years. But one of the most significant changes was the introduction of style through a separate coding language called CSS. This did not happen overnight. Much debate and bickering took place before CSS was born and accepted as a legitimate birth. And just as HTML is now on version 5 and called HTML5, CSS is now on version 3 and called CSS3. The histories of the Internet, the World Wide Web, the coding languages of HTML, CSS, and JavaScript, are all fascinating topics, but beyond the scope of this lesson. And yet, we recommend that you read about them on Wikipedia.
The Idea Behind Cascading Style Sheets
In the HTML Crash Course, we said to think of HTML as a structure like a house. And inside the house lives a guy named Mark Up, who has a head and who also has a body. In this lesson, we are going to talk about CSS which stands for Cascading Style Sheets. With CSS, it's all about style!
Mark Up, our hero who lives in our HTML house, is all about style as well. Mark Up is very picky about the way he looks. He cares how his hair is cut, and about the clothes and shoes he wears. He likes to have a neat, clean, uncluttered appearance. And Mark Up's house is no different. Mark Up likes the way his house looks on the outside, and on the inside as well. He likes everything inside his house to be modern and stylish, and he often changes the furniture and wall coverings to keep it looking that way. Similarly, he changes his own appearance as fashion trends change as well.
Think of CSS as the styles that Mark Up wears, and the styles that he implements all over his gorgeous house. In the HTML Crash Course, all the websites we created were somewhat dull and boring. We used only default fonts in default font sizes and default font weights for our heading and paragraph texts. We used horizontal rule tags to separate different areas of our website. We used the default background color of white and our text was always the default text color of black. And all of our web content was aligned along the left side of each web page. Pretty boring, eh?
Priorities, Priorities
One of the most important things to know about both the HTML document and the CSS stylesheet is that both are read and processed by the web browser from top to bottom. This means that elements in your HTML document are displayed in the order that they were discovered by the browser. The same is true of the CSS stylesheet. As each element in the HTML document is discovered, the browser checks with CSS to learn what CSS rules are required to display it. And in the event that multiple rules are found for the same element, it will use the last rule it found listed for that same element. In other words, if line 7 of your CSS stylesheet body { } rules said color: red;, but on line 10, it said color: blue;, then all of the text in the document body will appear in blue text. This is the main policy of priorities that CSS uses to prevent conflict and confusion, but there are others as we will learn next.
The Three Types of CSS
The projects we create here will employ CSS in one of three ways or types. We will either use:
- Inline CSS — the highest priority
- Internal CSS — the second highest priority
- External CSS — the third highest priority
And amazingly enough, the three ways to style are prioritized exactly as they are numbered above, with inline styles getting the highest priority, internal styles getting the second highest priority, and external styles getting the third highest priority. In other words, an element that is styled with all three methods above will always default to the inline style specified because it has the highest priority over the other two methods. As a strange paradox to the style prioritizations mentioned above, we will most often use External CSS because we can always override that with one of the other styling methods. We will dive deeper into that in later lessons.
Our First CSS Project
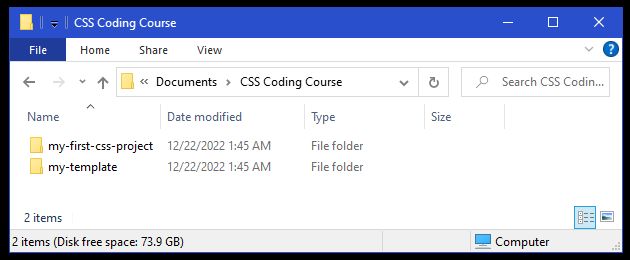
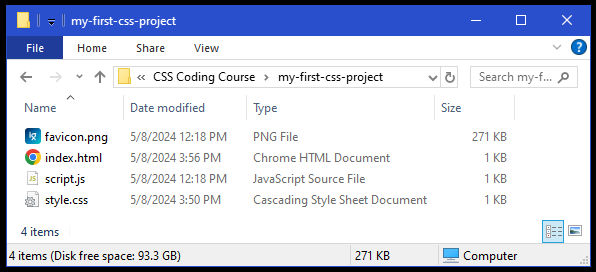
The best way to understand the three types of CSS and their priorities is by coding a new project. Let's do this by first creating a new folder in Documents called CSS Coding Course. Then let's copy the my-template folder from the HTML Crash Course folder and paste it into our newly-created CSS Coding Course folder in Documents. Now we can make a copy of the my-template folder and rename it to my-first-css-project. There will now be two folders in the CSS Coding Course folder. And the folder should resemble the folder shown below in its Details view.
The my-first-css-project folder has 4 files in it as illustrated below.
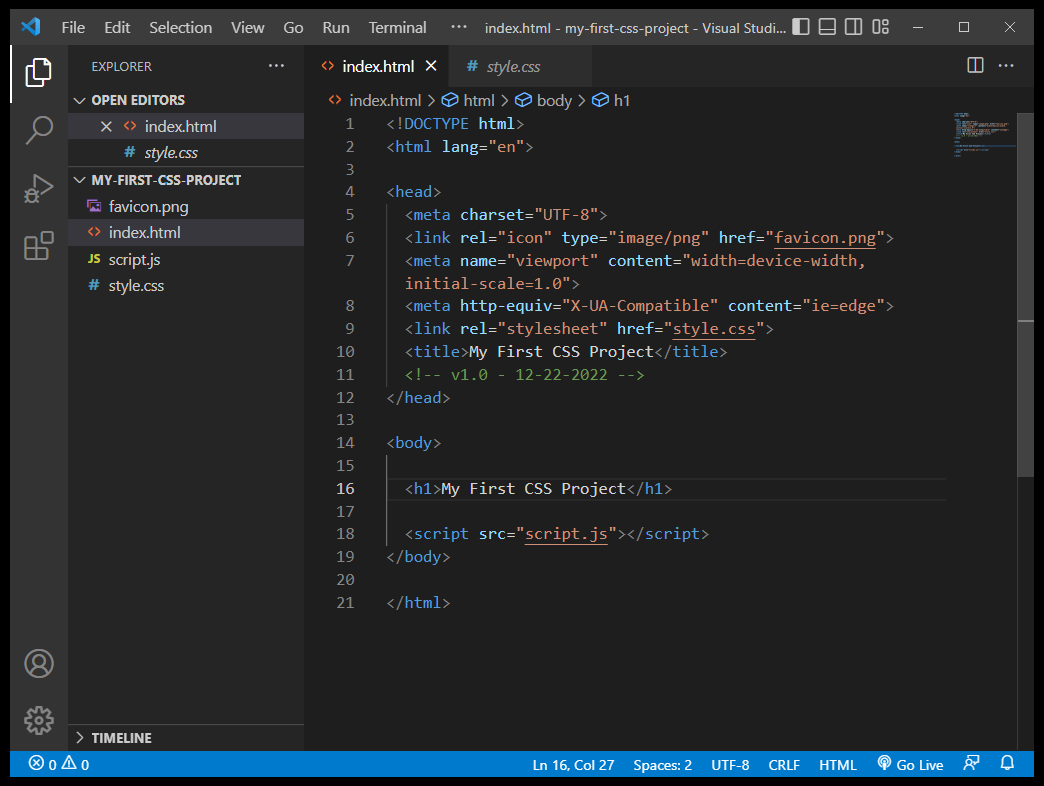
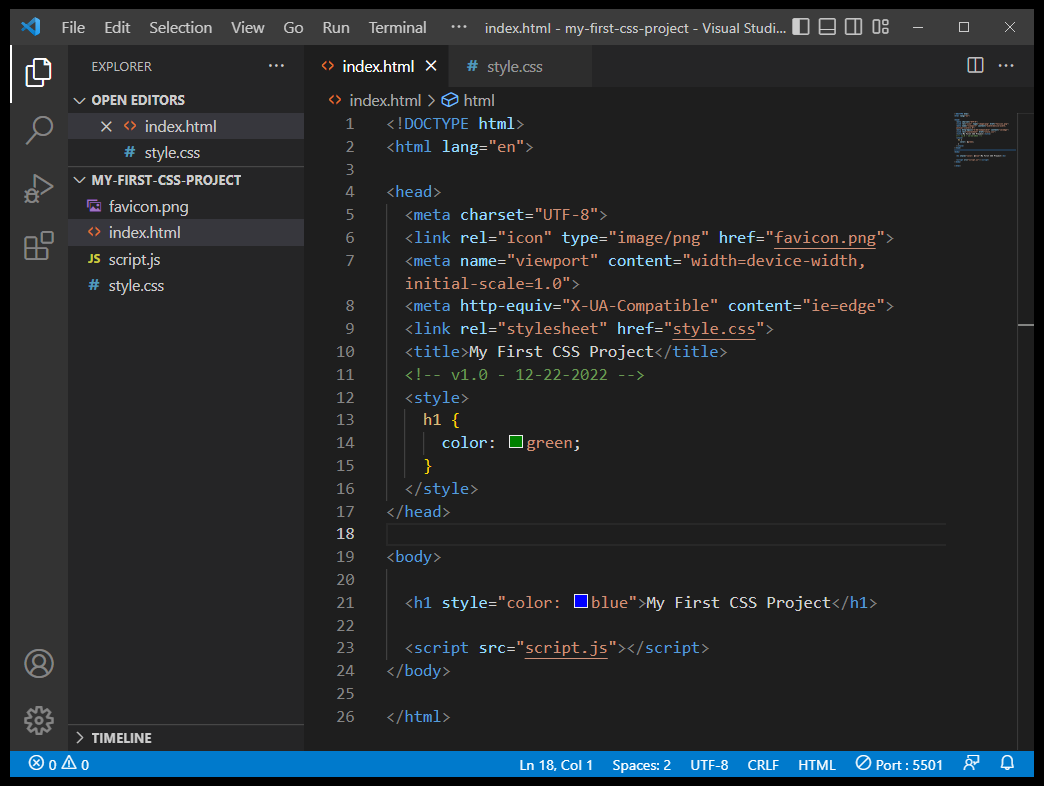
Now let's open the folder called my-first-css-project with VS Code and begin coding. If we click on the index.html file, it will open in the pane on the right, and we can begin changing the code in this file. (You can always click on the image below to zoom in and get a better look at it.) But before we do that, look at line 9 of the code. This line of code provides a link to the external CSS stylesheet called style.css. Remember that external CSS always takes a lower priority than internal or inline CSS. Another line we will want to edit is the title on line 10. Let's change the text between the opening and closing title tags to My First CSS Project. And we might as well give the comment on line 11 today's date as well. But the most important line that we need to add is inside the document body which appears below as line 16. This is an <h1> tag, and we will be testing our ability to change the color of that tag using CSS. So let's change the text between the opening and closing h1 tags to My First CSS Project as well. When you are done editing the index.html file, it should look something like the one below.
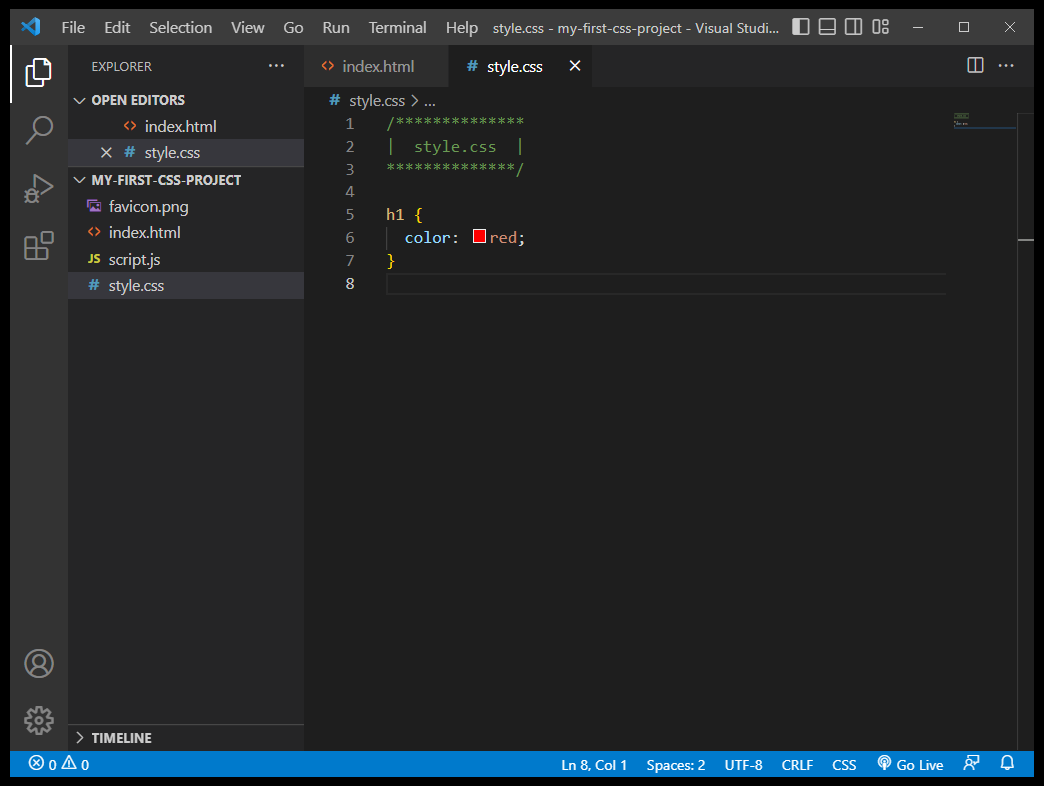
Now we need to add a CSS rule to our external stylesheet named style.css. And if we click on that file name in the left pane, a mostly empty CSS file will open in the pane on the right. Now add the CSS rule as it appears below. And then, click on Go Live at the bottom of VS Code to open this web page in your default browser. What was the result? If the text was red, then you were successful in testing CSS through an external stylesheet. An external CSS stylesheet is just that: an external file that contains CSS rules, and we link that file to our HTML file by using the link tag on line 9 inside the <head> of our HTML document. Again, external CSS always takes a lower priority than internal or inline CSS, but that is often the best way to go.
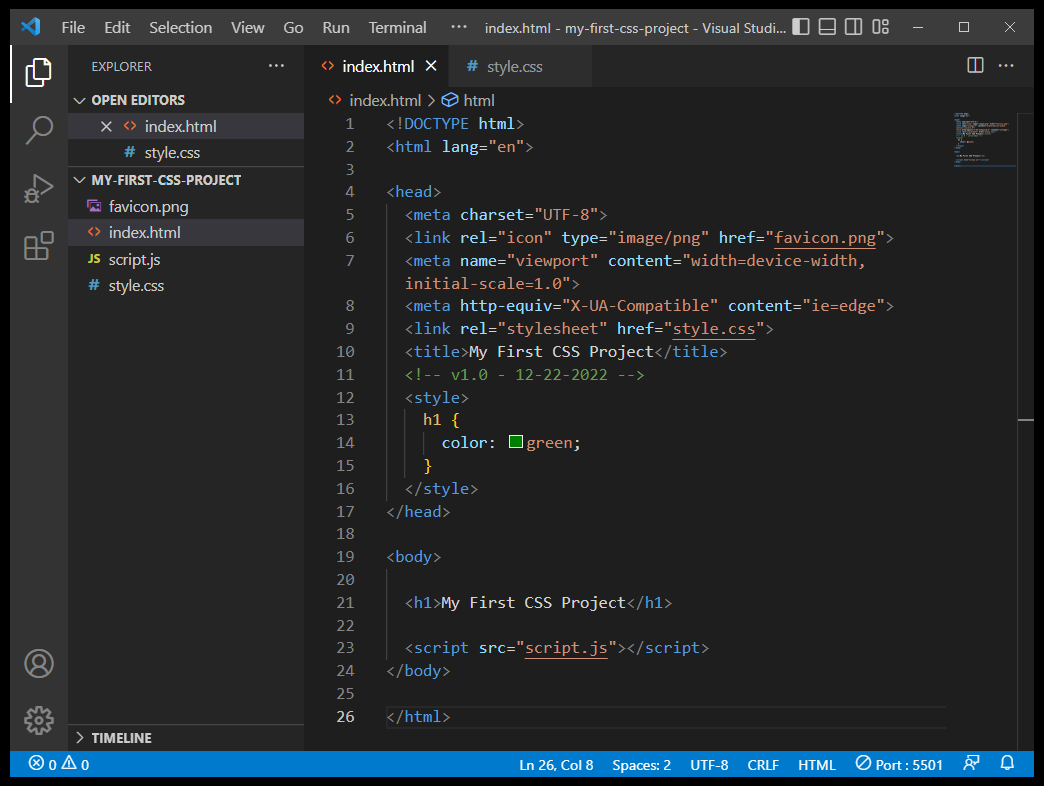
If that test was successful, we can now test our ability to change the color of the text by using internal CSS. An internal CSS stylesheet is a stylesheet that contains CSS rules that we embed inside the <head> of our HTML document. An internal stylesheet begins and ends with opening and closing <style> tags inside the <head> of our HTML document. These rules will take a higher priority than the rules inside the external CSS stylesheet, so there is no reason to change anything in that file. Notice in the image below that all we did was to add lines 12 through 16 to our index.html file before the closing </head> tag on line 17. if you Go Live with this code (or refresh the code in your browser screen), the text should turn green. If that test was successful, you just proved that internal CSS rules take a higher priority than external CSS rules. Now let's perform the final test.
Inline CSS rules are added inside of opening tags inside the document <body>. Older versions of HTML used to employ this technique, but it got to be very messy because each tag that you wanted to style would require a separate inline style rule. That caused our HTML files to grow in size and look very cluttered. The beauty of external and internal stylesheets is that a CSS rule that you write for one tag (like an <h1>) could be used to style every <h1> element on the entire web page or website. In time you will see the beauty of styling your web pages without inline styles.
For our final test, we want to prove that inline styles override external and internal styles. To do this we will change the styling of the actual opening <h1> tag on line 21. If you type this inline CSS rule correctly, as it now appears on line 21 of our HTML file <h1 style="color: blue">My First CSS Project</h1>, then you should get blue text on your web page, despite that fact that you also told it to be red and/or green. This proves that inline CSS styles always take the highest priority.
The Four Types of Brackets
In this course, we will often talk about four different types of brackets:
- Parentheses — ()
- Angle brackets — also known as chevrons <>
- Curly brackets — also known as braces {}
- Square brackets — []
The Structure of CSS Rules
In the HTML Crash Course, we talked about tags and elements, and we learned that the rules for writing tags for each element were actually rather simple. Similarly, the basic concepts for writing CSS style codes for each HTML element are also quite simple as well.
Each CSS rule has two parts:
- a selector
- a declaration block — made up of one or more declarations
And each declaration also has two parts:
- a property
- a value
And these concepts will be illustrated through the example of another coding project.
The Hello World CSS Rules
This project is one that we already worked with in Lesson 0 Part 5 of the HTML Crash Course. It is called the Hello World project. And if you already completed it, then simply copy the hello-world folder from the HTML Crash Course folder and then paste it into the CSS Coding Course folder. Otherwise, you might need to quickly review that lesson.
Now let's open the folder called hello-world with VS Code so we can see its code. If we click on the style.css file, it will open in the pane on the right, and we will be able to see a somewhat simple external CSS stylesheet, and we will use the CSS code in this example to help us better understand the concepts we described above.
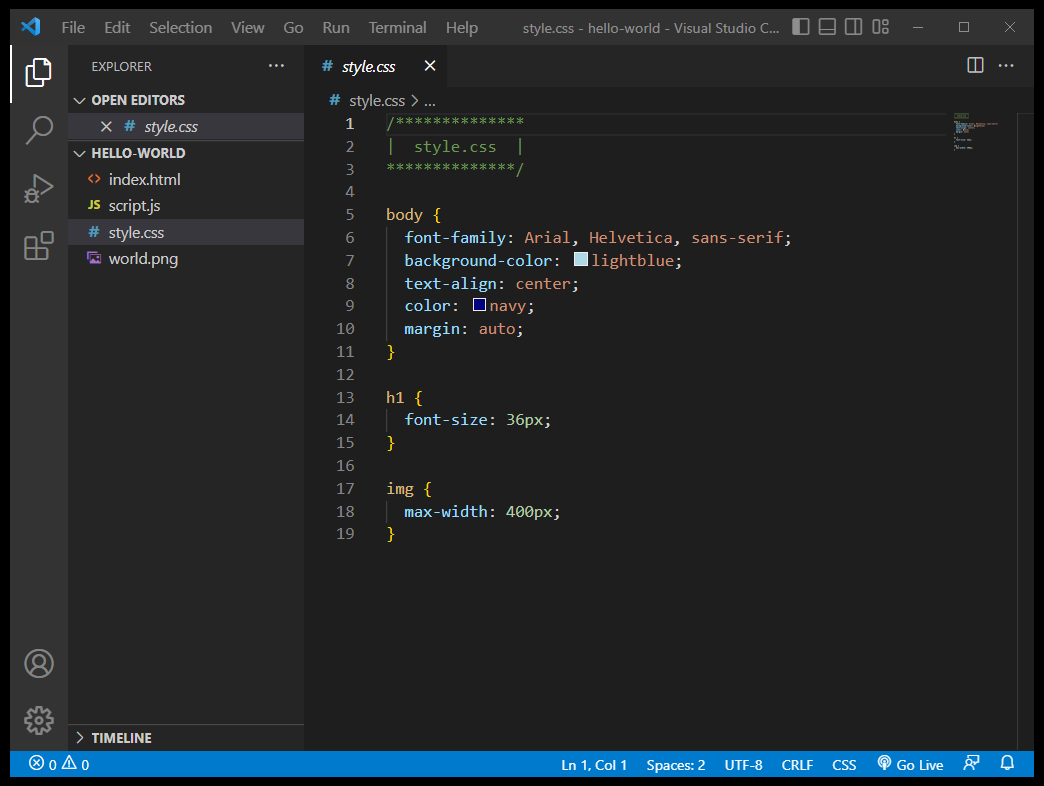
The first 3 lines of green text in this file are just a comment to let us know what file we are looking at. The way CSS files are commented is quite different from the way HTML files are commented. CSS comments always begin with /* and end with */ so a CSS comment can cover several lines as long as it begins and ends with those markers to tell the browser that this is only a comment, so please just ignore it. Comments are written for the benefit of the coders only. The web browser couldn't care less about your code comments.
/* This is how we include our comments in CSS. */
So, the real CSS code actually begins on line 5. This CSS stylesheet actually has three selectors and three declaration blocks. The three selectors are on lines 5, 13, and 17 and they show up as gold text. These selectors probably look very familiar to you because they are the names of some of the elements we learned about in the HTML Crash Course. In essence, we will be styling the HTML document <body>, all <h1> elements in the HTML document, and all <img> elements in the HTML document called index.html which is linked to this external CSS stylesheet. Following the selectors on each of those lines is a gold left curly bracket which indicates where the declaration block for each of those selectors begins. Notice that the declaration block for the body has five declarations in it, while the other two selectors have only one declaration each. And lastly, you will notice that each declaration block ends with a gold right curly bracket on lines 11, 15, and 19. These markers indicate where each of these three CSS rules end. In fact, your CSS code will not work properly if you do not include both of the curly brackets required for each and every CSS rule. Also, it is important to remember that in pure CSS, we do not nest or embed one CSS rule inside of another CSS rule. Each CSS selector should be unique and standalone. If you repeat a CSS selector, any rules that selector contains could override rules written in your original CSS selector.
Now let's talk about the two parts of each declaration. Each declaration has a property name followed by a colon in light blue, followed by an assigned value in some other color (like orange or light green). Notice that each declaration ends with a semicolon. If you fail to end each declaration with a semicolon, then the next declaration will not work properly. As a general rule, we advise you to always end each declaration with a semicolon as a best practice.
You may find CSS code examples on the Internet that do not include a semicolon at the end of the last declaration in a declaration block, and that method of CSS coding is indeed valid. But we strongly recommend that you always include a semicolon at the end of each declaration, regardless of whether it is the last declaration or not. The main reason why we insist on this practice is because you may want to add another line of CSS code to that CSS declaration block later. And if you forget to add the semicolon to the end of the line above it, then your code will be broken and it simply will not work. The bottom line here is that you should always include a semicolon at the end of each declaration. Enough said about that.
At this point, we will not dive into what each one of these declarations actually does. But if you click on Go Live at the bottom of this VS Code screen, this project will open with your default browser, and you will be able to see how this style.css external stylesheet file adds style to the index.html file that it is linked to. And you can probably guess what each one of these properties and values does. But in the upcoming lessons, better explanations for each CSS rule, and even more CSS magic will be revealed.