CSS Coding Course
CSS 101
Part 2. More About CSS
The Four Types of CSS
Wait! What? Remember when we said that the projects we create here will employ CSS in one of three ways or types? We actually deceived you about that. There is a fourth type of CSS that has an even lower priority than the external CSS stylesheet that we normally use. And that fourth type is Default CSS, so let's revise our priority list before we continue with our explanation.
- Inline CSS — the highest priority
- Internal CSS — the second highest priority
- External CSS — the third highest priority
- Default CSS — the lowest possible priority
Actually, everything else we told you about the priorities of CSS was completely true, but we did not mention Default CSS because you actually have no control over it. The web browser has its own set of defaults for CSS styling that it uses if you fail to specify CSS rules for any or all of the HTML tags and elements in the HTML content of your web page.
Let's revisit our first HTML project called My First Website. And you can download the updated and revised version of that project by clicking here. Then, you can extract that project folder and all the files in it from the ZIP file into your CSS Coding Course folder. The only changes we made to the original project were the additions of the favicon, the improved document head that includes a link to a basically blank external stylesheet called style.css, a basically blank JavaScript file called script.js, and a link to that script file near the bottom of the document body. Otherwise, the HTML content of the project did not change. NOTE: Make sure you open the folder called my-first website rather than the folder called my-first-css-project as they are both quite different.
Revisiting Our First HTML Project
Now if you open this folder and then click on Go Live, your website will still look identical to this image on the left. Yes, it's the same old boring website as before, even though it includes a few real pearls of wisdom that we really need to know.
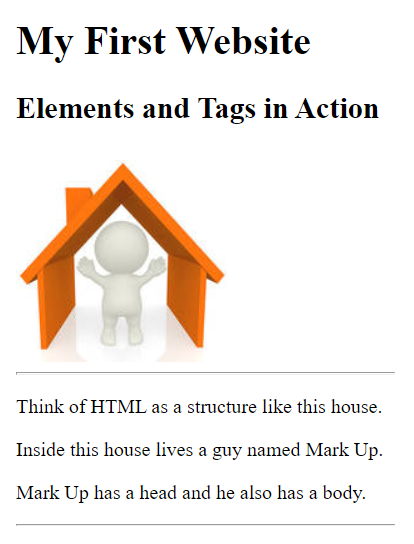
The main point that we are trying to make is that the web browser is doing all of the web page styling through its own Default CSS styling rules, because we did not add any CSS styling rules of our own. Otherwise, any CSS rules we add that are different from the defaults would take a higher priority than the default rules, and thus they would change the appearance of this web page. You may be asking, "Well then, what are those defaults?" And that's a great question! You are obviously way ahead of us.
We can see that the background color of the document body is white, and that all of the text is black. Those are both CSS defaults. We can also see that the font family is a serif font, and that is also a CSS default that the browser picks, if you decide not to change it. Similarly, the browser has predetermined font sizes that it uses for all h1 headings, h2 headings, and paragraphs. Notice that the h1 heading is in a bigger font size than the h2 heading, and that both headings here are larger than the font size of the three paragraphs. You might also notice that all headings have a bolder font weight than the paragraphs which use the normal font weight.
Some other defaults that may not be immediately apparent are that everything in the document body is aligned along the left side of the web page. There is also some default amount of margin and padding that is already built into the document body and all of the elements that it contains. We will discuss what margin and padding is sometime soon. Also the height and width of the body has certain default settings in that the width of the web page is 100% of the screen width on whatever device it is displayed on. We know this is true because the two horizontal rules (above and below the three paragraphs) go all the way across the viewable web page, with a little bit of default margin and padding to keep them off of the left and right edges of the web page. And the image defaults to 100% of its original width and 100% of its original height, which is 170 pixels by 170 pixels, which is fortunate, because if the image was bigger than the width of the document body, then only part of the image would be displayed on our web page. And lastly, the height of the document body is only as big as it needs to be. The height of the body ends when it runs out of tags and elements to display. Any white background that is below the last item of content in the document body is still being displayed, but that is because the background color of the HTML document is also white, just like the document body. And while this may all seem like TMI (too much information), we thought you might like to know.
Adding Our Own CSS Styles
Now let's add our own CSS styles to this project. The first thing we need to do is modify line 9 of our index.html file from...
<link rel="stylesheet" href="style.css">
... to...
<link rel="stylesheet" href="my-style.css">
... so that we can write our own CSS code without changing the original code in the style.css file. Actually, that file has no real CSS code, but this is good practice anyway.
The next step is to make a copy of the original style.css file in the same folder, and then rename it to my-style.css. When you've completed that step, you are ready to begin coding.
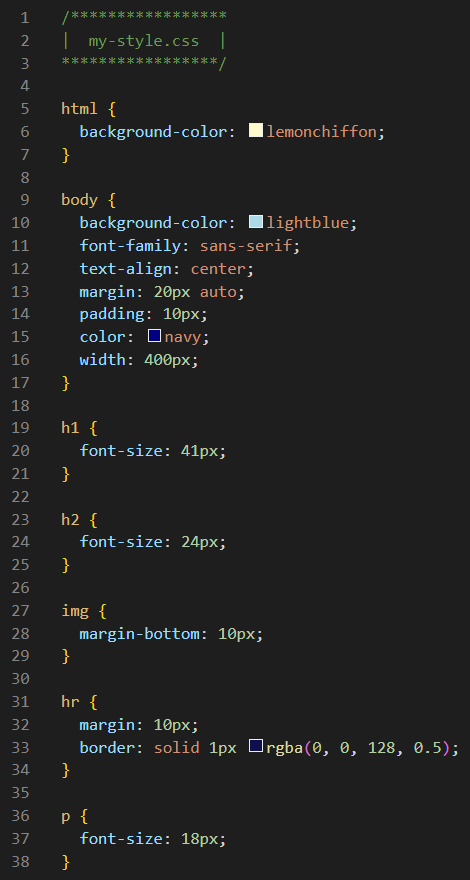
Now you should type and/or modify the code in your newly-created my-style.css file line-by-line so that it eventually looks like the CSS code in the file below. There are 38 lines of code, but you may want to Go Live and look at the styling changes after completing each selector and its declaration block to see what each line of code does. If you compare your changes to the default CSS styles described above, you will see what each change does for us. One of the biggest discoveries will be that the HTML document is one color, while the document body is an entirely different color. Then maybe the descriptions of the defaults will make more sense to you. But don't get hung up if you don't completely understand the code for each and every declaration. In future lessons, we will break each one of these down so that it makes perfect sense.
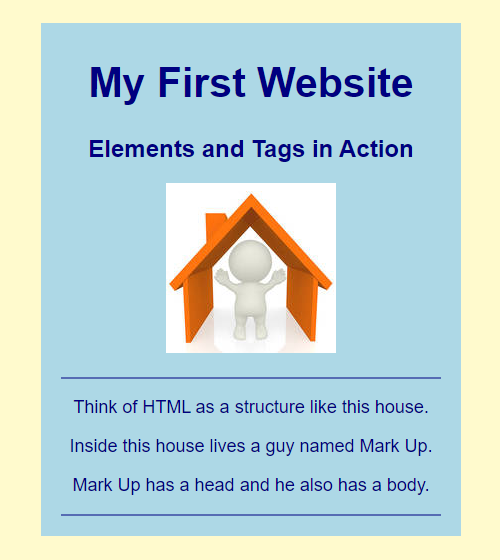
When you are done, your newly CSS-styled website called My First Website should look something like this. What an amazing change, eh?
Once again, notice that the HTML document <html> background color is a color called lemonchiffon while the document body <body> background color is a color called lightblue. When both of these elements had a white background, it was impossible to tell where each of these elements began and ended. Also notice that the image has a white background because it is a JPG file type and that file type does not allow for transparent backgrounds, but we will explain more about that when we discuss images in a future lesson.
Also, you might notice that we changed the font-family from serif to sans-serif. We believe that sans-serif fonts generally look a lot cleaner on a web page than serif fonts, but they both certainly have their place. Serif fonts are useful when you want your text to look like the text in a textbook or a newspaper. We also changed the color of all the text to navy. And you'll notice that everything in the body is centered, rather than left-aligned. That is because the CSS body declaration text-align: center; centers all of the elements in the document body including the images, not just the text. There is a lot more we could say about these CSS rules. But for now, let's move on.
Revisiting Our Second HTML Project
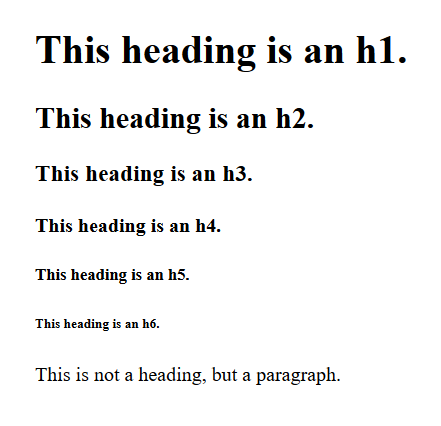
Remember this project where we displayed the six sizes of headings and the size of a paragraph? Well, it's back to get some CSS styling added to it. However, since you got lots of practice typing CSS code with the previous project, we will give you a break and provide all of the CSS code you need for this project. But you will still need to download and extract a zipped archive file and place it in the CSS Coding Course folder in your Documents folder. You should be getting good at this by now. Anyway, click here to download this project's ZIP file. Of course you will need to extract the project folder from the ZIP file before you can open it in VS Code. Remember how we do that? When you complete all of the aforementioned steps, open the six-heading-sizes folder in VS Code, and then open the index.html file in the pane on the right and click on Go Live.
This styled version looks quite a bit different than original one which was completely unstyled, or should we more correctly say that it was styled completely by the Default CSS rules that are built into your web browser. Yeah, let's say that instead!
And much like in the previous project, the background-color of the HTML document is different than the document body, just so you can see where both elements begin and end. In actual practice, we would generally not do this. But for our purposes here, this is a great visual aid. And of course, we changed the font color to navy, and the font-family to a sans-serif font, and we center-aligned everything on the web page as well. But what makes this project uniquely different than the original project is that we have two headings for each heading size, along with two paragraphs below that.
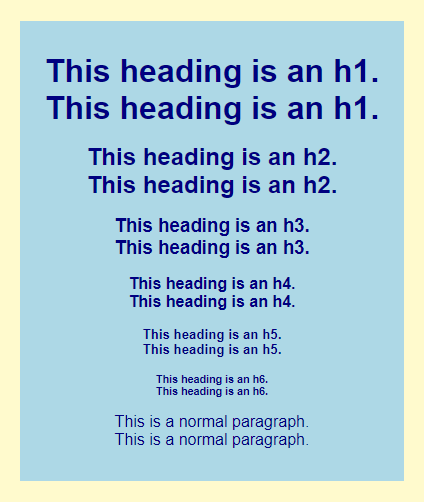
But that is not really what is happening here at all, even though your eyes may be telling you something different. And what the heck? There are four (count them) CSS files here: style.css, my-style.css, my-style-px.css, and my-style-rem.css. First of all, the style.css file is not linked to the project. It has no CSS code in it. It is just there. And if you look at line 9 of the index.html file, you will see that my-style.css is the external CSS stylesheet that is actually linked to the project.
But wait! Before you go looking at the CSS code in my-style.css, let's look at the HTML code inside the document body of index.html. All the odd-numbered lines (15, 17, 19, 21, 23, and 25) are the six heading tags that you expected to see here. But the even-numbered lines (16, 18, 20, 22, 24, and 26) are instead paragraph tags with a class attached to them to make each paragraph look just like the heading above it. That takes a little bit of CSS styling to accomplish because of what we already know about Default CSS rules. We already know that paragraphs by default have a normal font-weight while headings by default have a bold font-weight. And furthermore, all paragraphs default to a font-size of 16px.
Ah, so now we are getting somewhere, even though we unfortunately have not discussed what a class is yet. That said, let's open that my-style.css file in the pane on the right to see what is inside it. Each CSS rule that starts with a . in front of it is indeed the name of a class. And so .h1 { } is the identifier for line 16 of the index.html file, which has an opening tag of <p class="h1">, and that identifies this element as a paragraph with a class called "h1". OK, fair enough. Now let's look at lines 20 through 23 of the my-style.css file and we will see a comment on line 21 that says /* 16 x 2 */, which is followed on line 22 with font-size: 32px;. So, what does that tell you? It tells you that the default font-size for an h1 is 32px, and if the default font-size for an p is 16px, then we will have to multiply that by 2 to get the correct font-size for an h1. But that's not all! We also need to change the font-weight to bold, and that is actually happening for all six of these "imposter" paragraph elements on lines 66 through 74 of this CSS file.
The main point of this exercise is to illustrate that CSS has the ability to change the font weight and font size of any heading or paragraph, not to talk over your head or to confuse you. The actual CSS code written here is not really important to learn at this point. But what is of paramount importance to learn is that CSS is the coding language that allows us to change any of the Default CSS style rules to something that is more to our liking.
Yes, we know that was a lot. But you are really smart, so you will completely understand all of this with just a little bit more patience. The other parts of this you'll need to understand is the comments for each one of these "imposter" paragraphs. The comments tells you what number you must multiply by 16 to get the correct font-size for all six of these heading sizes. And it appears the an h4 has the CSS Default font-size of 16px, just like the paragraph does. The only difference between an h4 and a p is the font-weight. The rest of this external stylesheet is concerned with adding margin to make it all look good. And for now, you can just ignore the other two CSS files here. We will revisit this lesson again later in the course. But for now, it time to move on! Wouldn't it be great if you had a better grip on The Big Picture? And you will. That is coming soon, we promise.