Advanced System Tools
Lesson 0
Part 7. Deployment
Making Websites Public



Once you are able to create websites, you need a way and a place to deploy them. The conventional way is to obtain your own domain name and to find a suitable web-hosting service. Admittedly, this can be a costly situation. And once you have your own domain name and web-hosting service, you can simply upload your project code, and then your website is both live and public, so that anyone with a web-capable device can easily find and view your website.
The two most common methods for uploading your project code to your web-hosting service is using git through GitHub, or using FTP (File Transfer Protocol) through the FileZilla Client. Thankfully, GitHub and the FileZilla Client are both free services. However, there are a couple of caveats here. GitHub is a rather complicated tool which makes it difficult to learn, while the FileZilla Client is much easier to learn and use. Many 500-page books have been written on git and GitHub because professional web developers who work on teams use it for version control. Version control prevents buggy development code from being deployed accidentally until it is thoroughly tested first. That is its main advantage over FTP methods of deployment. You will find that individual web developers who are not part of a team don't really need to use git and GitHub, but this is a personal choice.
For now, we will not teach you either git through GitHub or FTP through the FileZilla Client. At this point, you don't need to know either. But it is good to know that both of these solutions exist. And yet, that does not mean that there is no way to deploy your projects without jumping through these challenging, elaborate, and possibly expensive hoops. For those of us who are just learning basic web development, there is a public web-hosting service that is free that virtually anyone cas use, as long as they have an email address and a mobile phone number. And that service is called Netlify.
Netlify
NOTE: Netlify has recently added some AI integration tools to their website. That means that many of our screenshots will not match perfectly. But the basic functionality has not changed. We have plans to take new screenshots sometime in the very new future. Thank you for your patience.

Well, OK then. But what makes Netlify so special? Ah, we're glad you asked that question! As with most of the development tools you find recommended on this website, Netlify is free to use, even though Pro and Enterprise solutions are available. This webpage explains the features of pricing of each plan pretty well. Here at TomFrye.com, we've never run out of bandwidth, build minutes, or server space, and we've built as many as 500 projects on a single Free & Starter account. And some of those projects were rather large using multiple webpages, with lots of images, and even embedded audio and video files.
Creating Your Account
But before you can effectively use Netlify, you must create an account, verify your email address, and sign in with your new account. This only takes a few minutes if you follow our easy instructions. And we have a word of warning here: if you create an account, but don't verify your email address, then you will only be allowed to deploy about 10 projects on Netlify rather than the 500+ projects we mentioned earlier. So it is worth the time and effort to do it right.

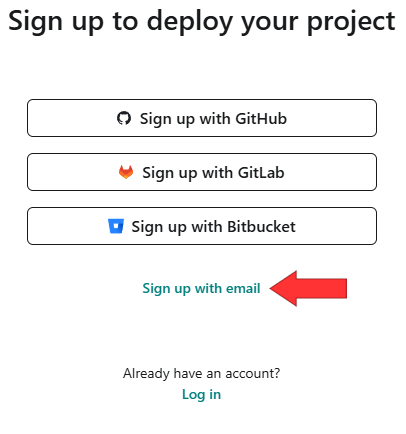
On the Netlify home page, you will see these options in the upper right-hand corner of the webpage. Click on the blue Sign up button and you will be taken to a web page that offers these options below. Of course, you want the one at the bottom next to the red arrow.
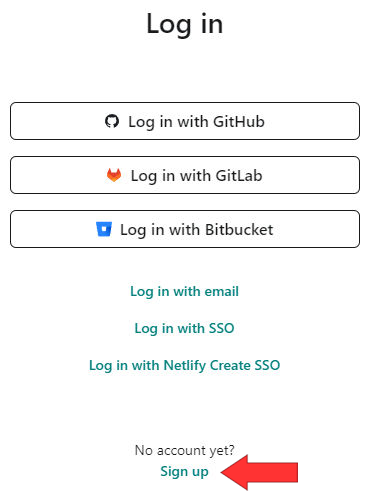
Or, if you clicked on the Log In button instead by mistake, you will be taken to a web page that looks like the one below. In that case, an extra click takes you to the same place.
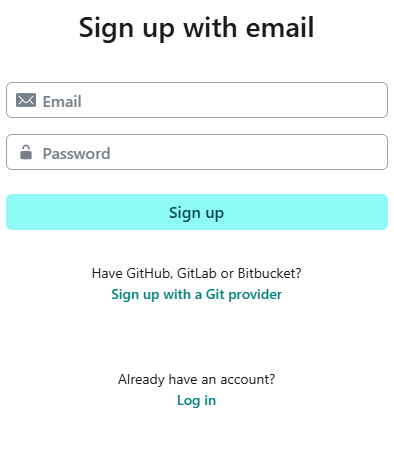
Now it only takes one more click to Sign up with email. At this point, you will enter your Email address in the box provided. And you must also pick a Password for your Netlify account as well. When both fields are entered correctly, then click the Sign up button, and then check your email for a verification email from Netlify. If you don't find one there, then make sure that your email address was entered correctly. You may also need to check your Spam folder as well. Once these steps are completed, you should have a Free & Starter Netlify account.
Logging In To Your New Account
That wasn't so hard, was it? Now that you have your very own Netlify account, you are ready to Log in to Netlify. From the Netlify home page, simply click on the Log in link rather than the Sign up button, and this page will appear.
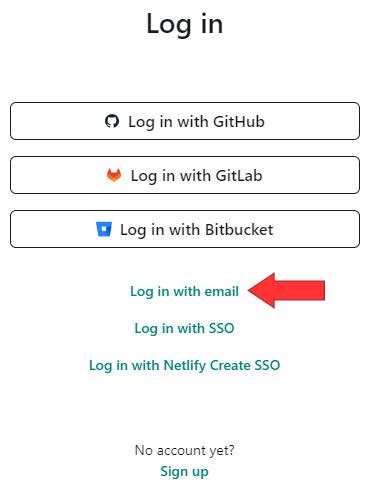
Now click on the Login with email link, and you will be taken to this page.
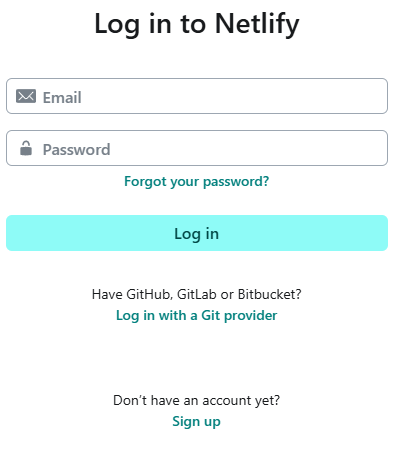
You know the rest. Enter your email address and password and click on the Log in button to Log in to Netlify. This action will bring up the Sites page that looks something like this below. Once you are all logged in, then you can begin a test drive and deploy your first project.
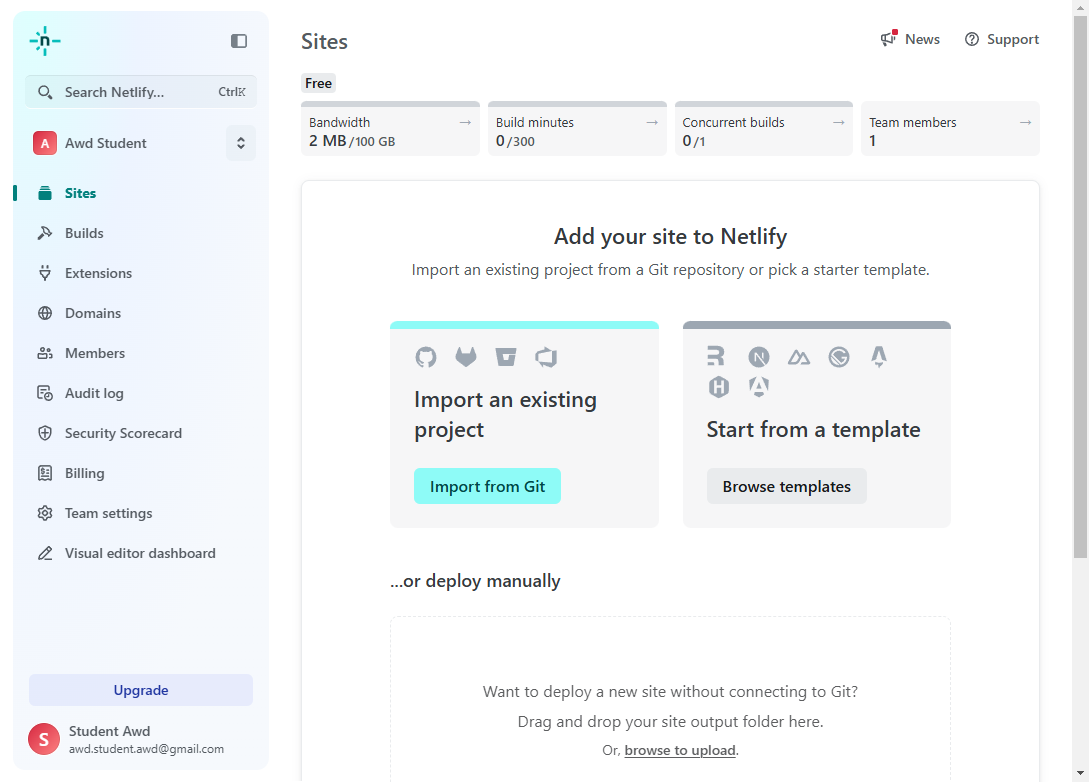
Deploying Your First Project
When you tested VS Code in Part 5, you downloaded and unzipped the Hello World project. So now, let's deploy that project using Netlify to make it public and available to anyone on the Internet. If you followed our directions precisely, then there is now a folder called hello-world inside of your computer's Documents folder and inside of another folder you created called HTML Crash Course. If not, then you may need to revisit Part 5 to create that project. Otherwise, locate that folder and get ready to deploy it. Once again, the path to that folder is Documents > HTML Crash Course > hello-world.
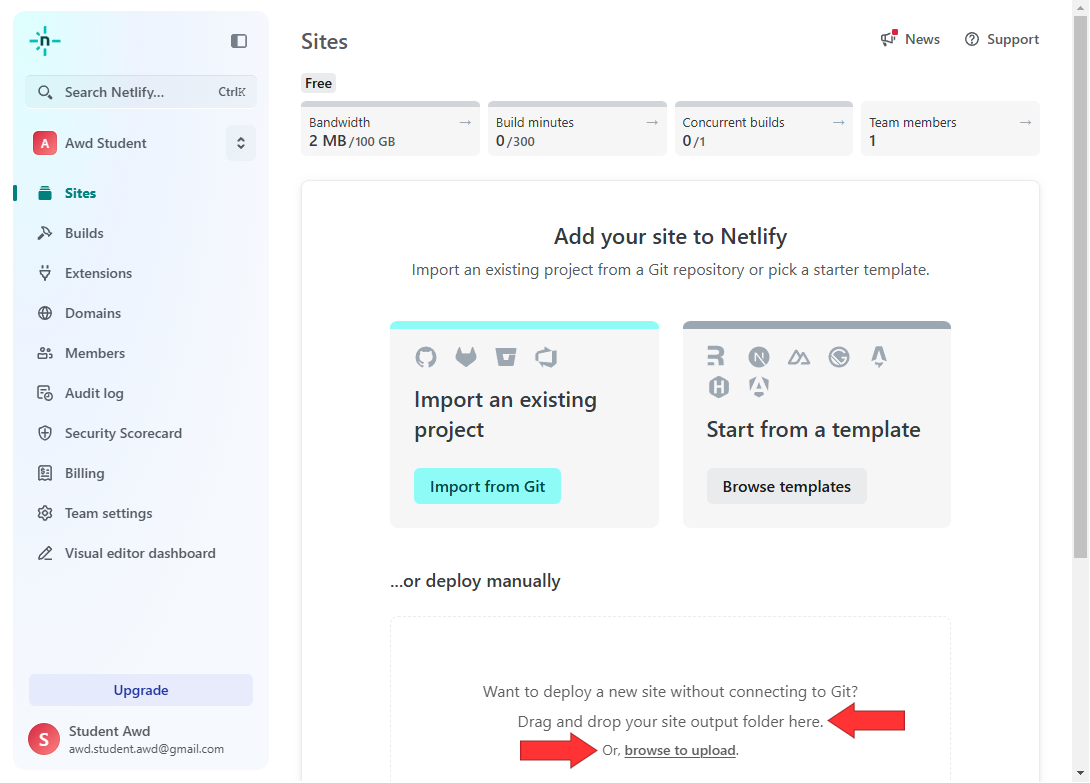
Now that you have located the project folder that you are going to deploy, there are two ways to deploy it as illustrated below:
- You can Drag and drop your site output folder here in the area shown next to the first red arrow.
- You can navigate to the folder by clicking on the browse to upload link by the second red arrow.
Now watch as the magic happens! If you did everything correctly, then you will get this screen below.
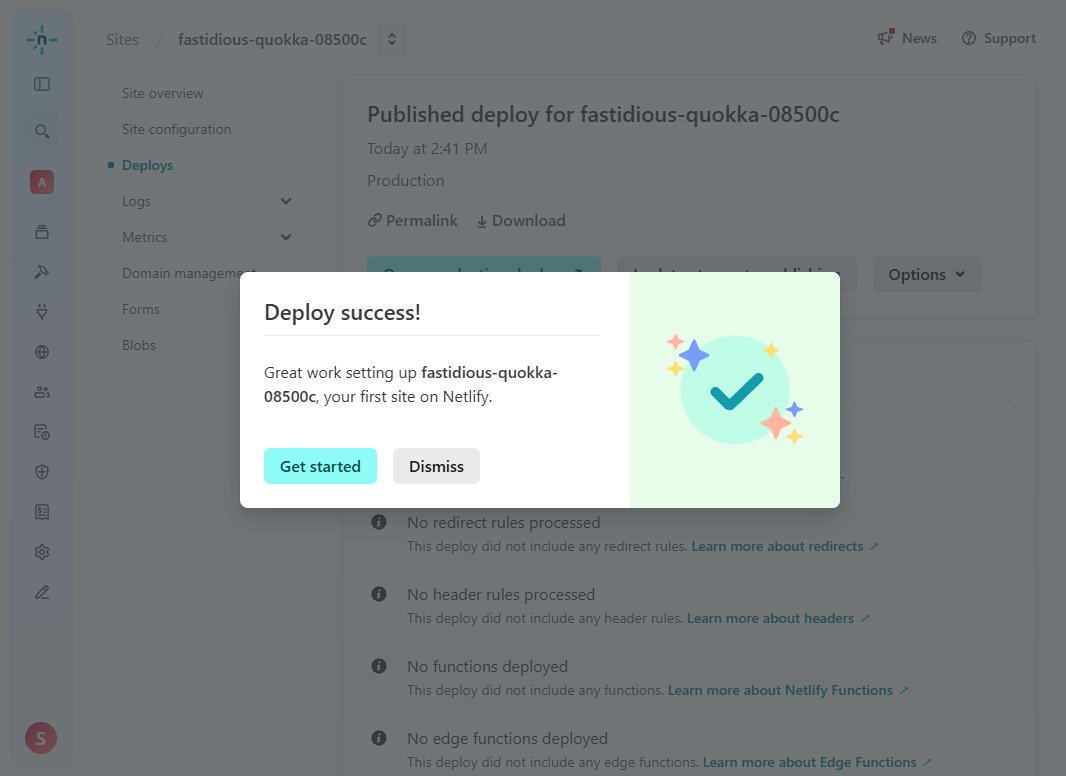
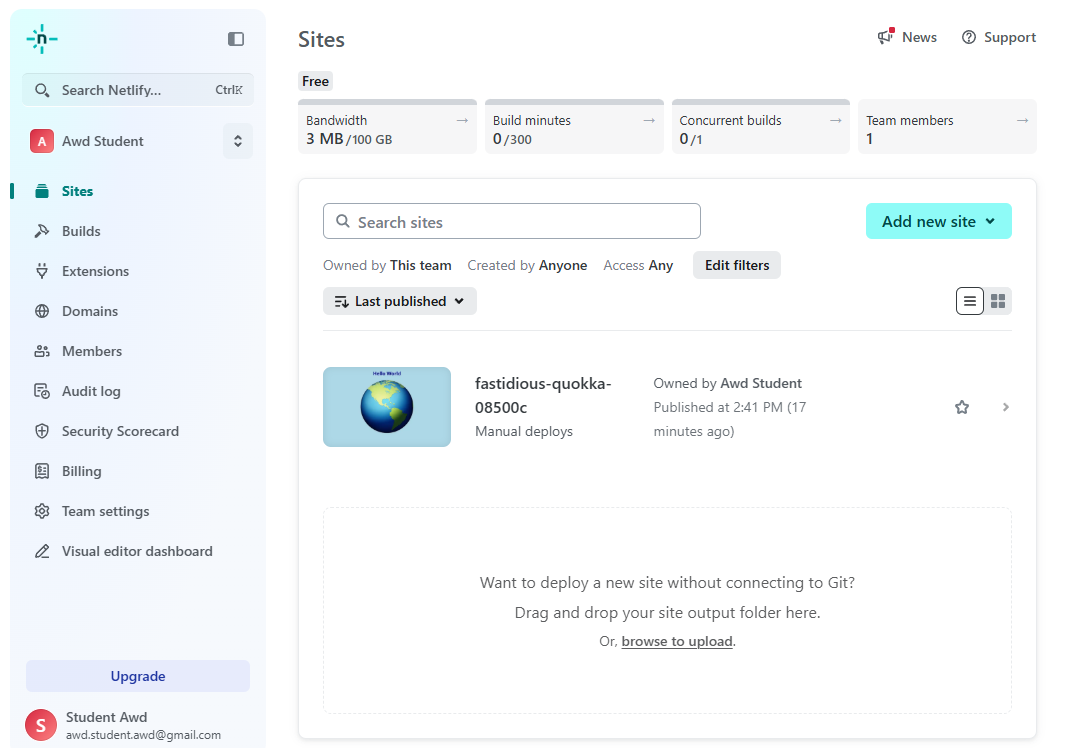
Now click on the Get started button and will be taken back to the Sites page which will have one project listed that has a very funny (but unique) name that was assigned by Netlify itself. In our example, the name was fastidious-quokka-08500c and that's not a project name that we would like to have in the end.
Renaming Your Newly-Deployed Project
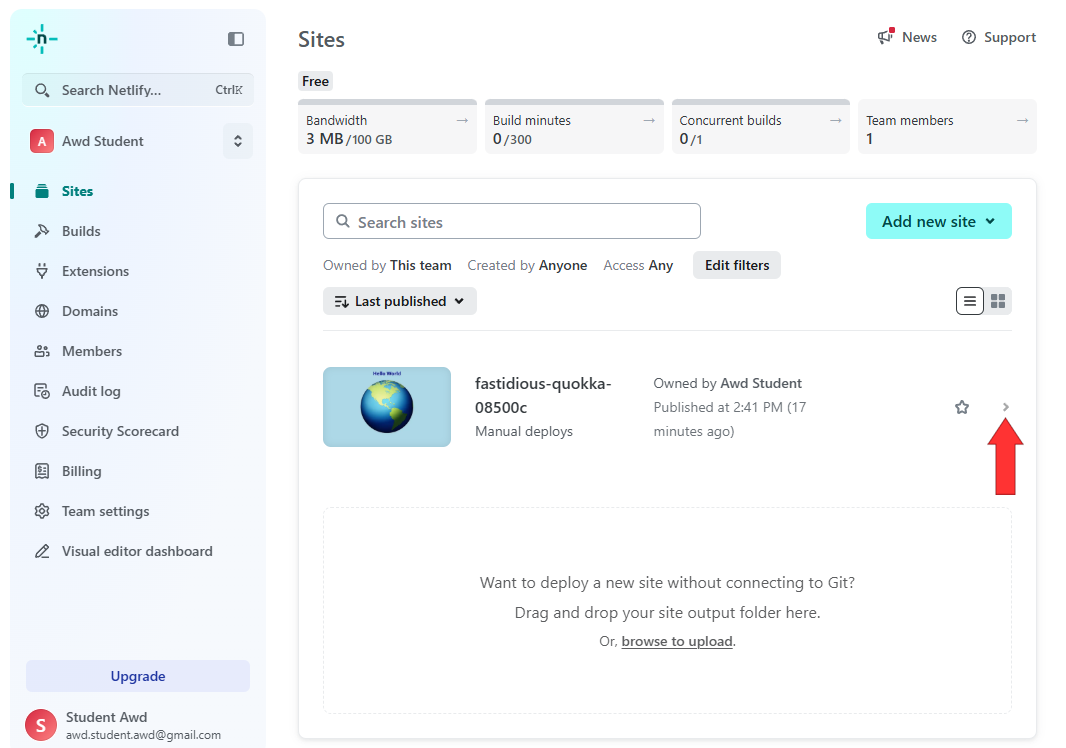
But don't panic! There is a very easy way to rename this project by clicking on the little arrow on the right side of the Sites screen above the red arrow below.
That will take you to this Site overview screen. This is a submenu of the Sites page, and you will notice that the menubar that was on the left side of the screen is now compressed into a skinny menubar that has icons. To the right of that is a menubar that has a number of items in it, of which we will only be concerned by the first three items in that menu:
- Site overview
- Site configuration
- Deploys
In fact, each site you deploy using Netlify will have these three options available to you.
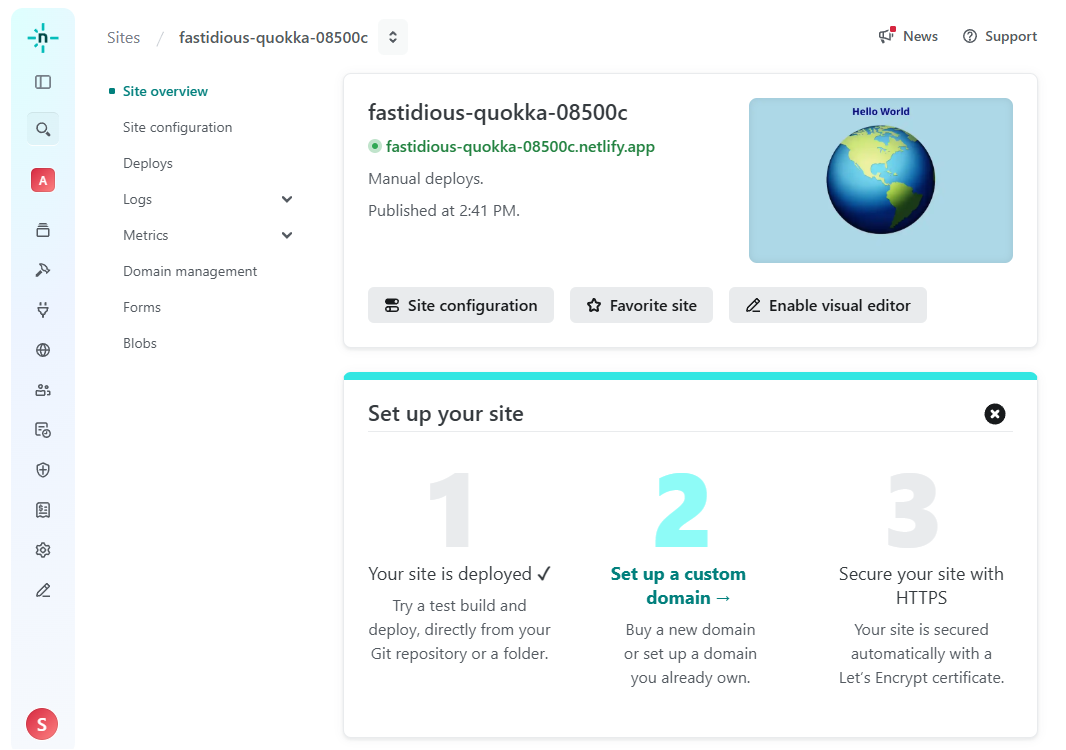
From here, there are two ways to get to the Site configuration screen from the Site overview screen above. You can...
- Click on the Site configuration menu item below the Site overview menu item.
- Click on the Site configuration button near the middle of the page.
Either method will bring you to this Site configuration screen as shown below.
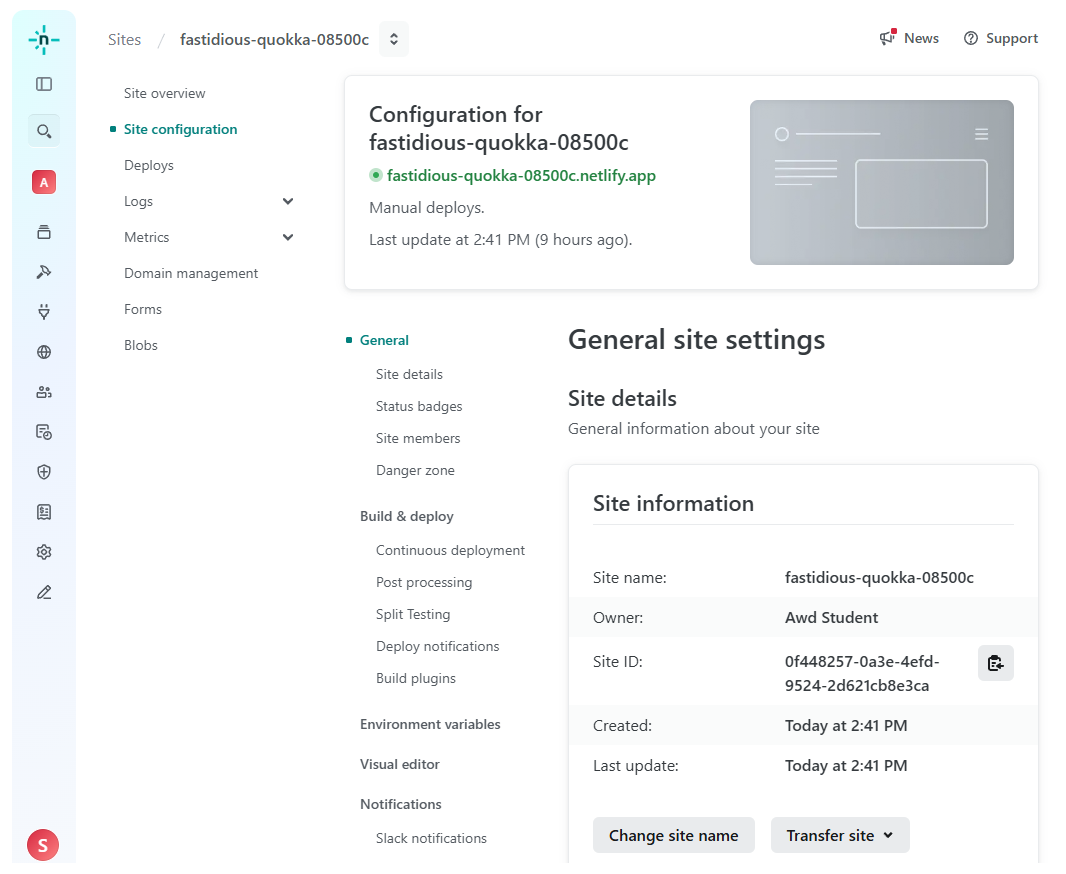
On the right side of this screen near the bottom under the Site information section, you will find the Change site name button. Go ahead and click on that button. That will produce a screen that looks something like the screen below.
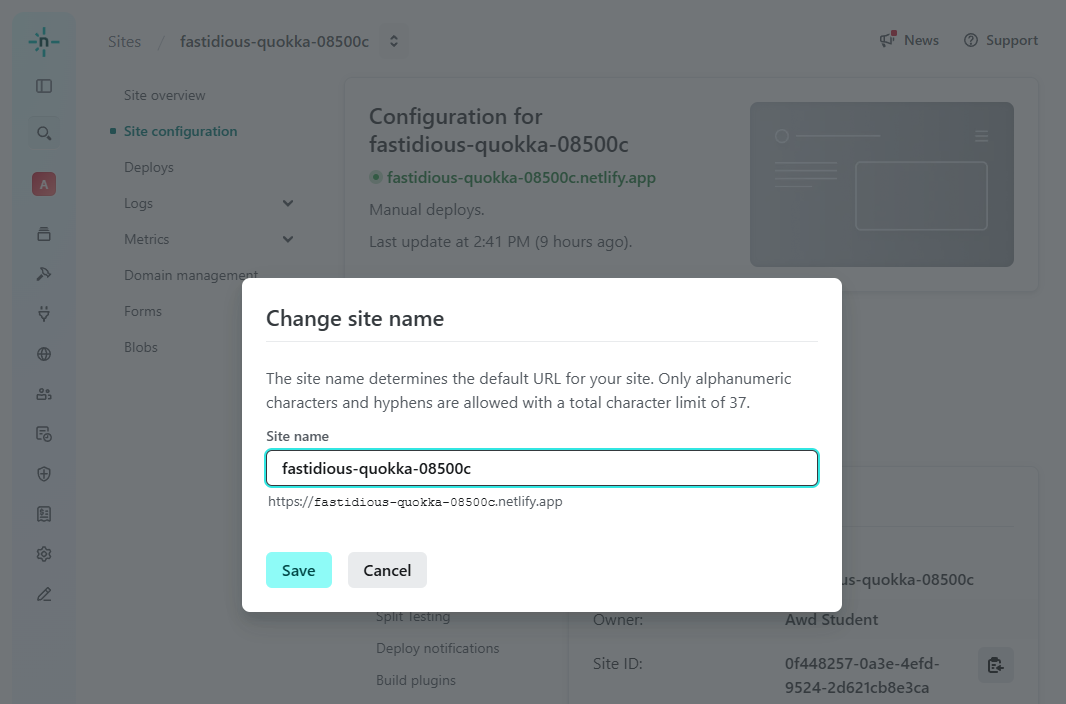
Now you need to backspace through that horrible name you don't want, and then replace it with a name that you do want. We would strongly suggest that you pick a name that is likely to be completely unique, because somebody else has probably already used the name hello-world. We think you should probably include your name, instead of awd-student as shown below, and then add hello-world to it. Your new site name will then look something like this screen below.
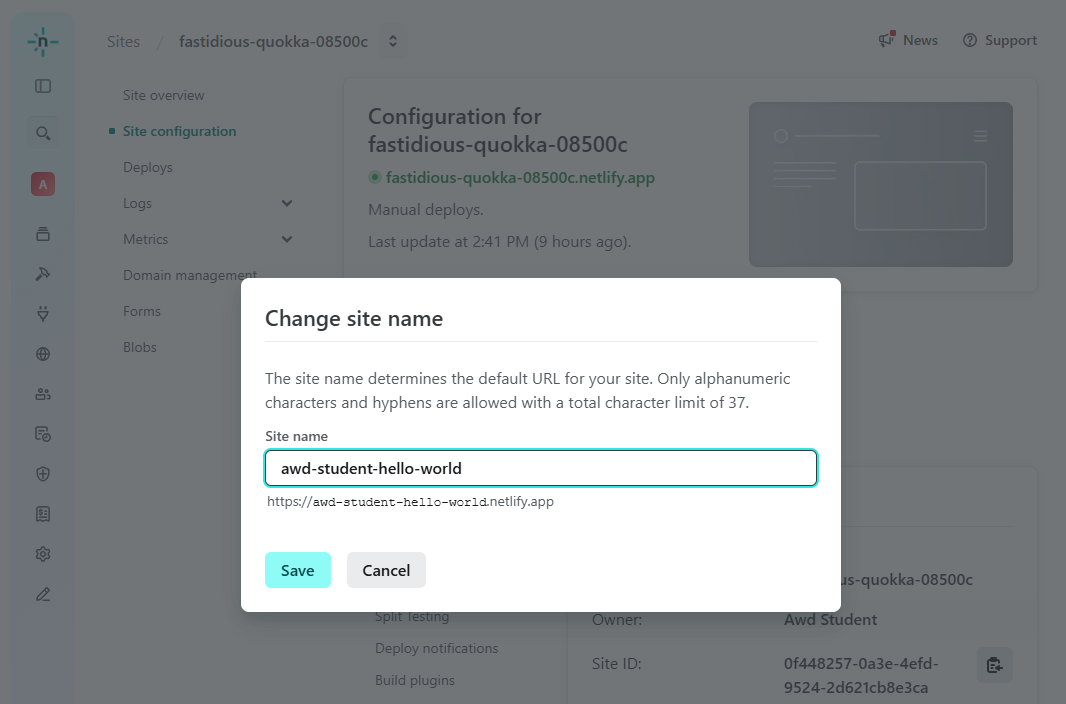
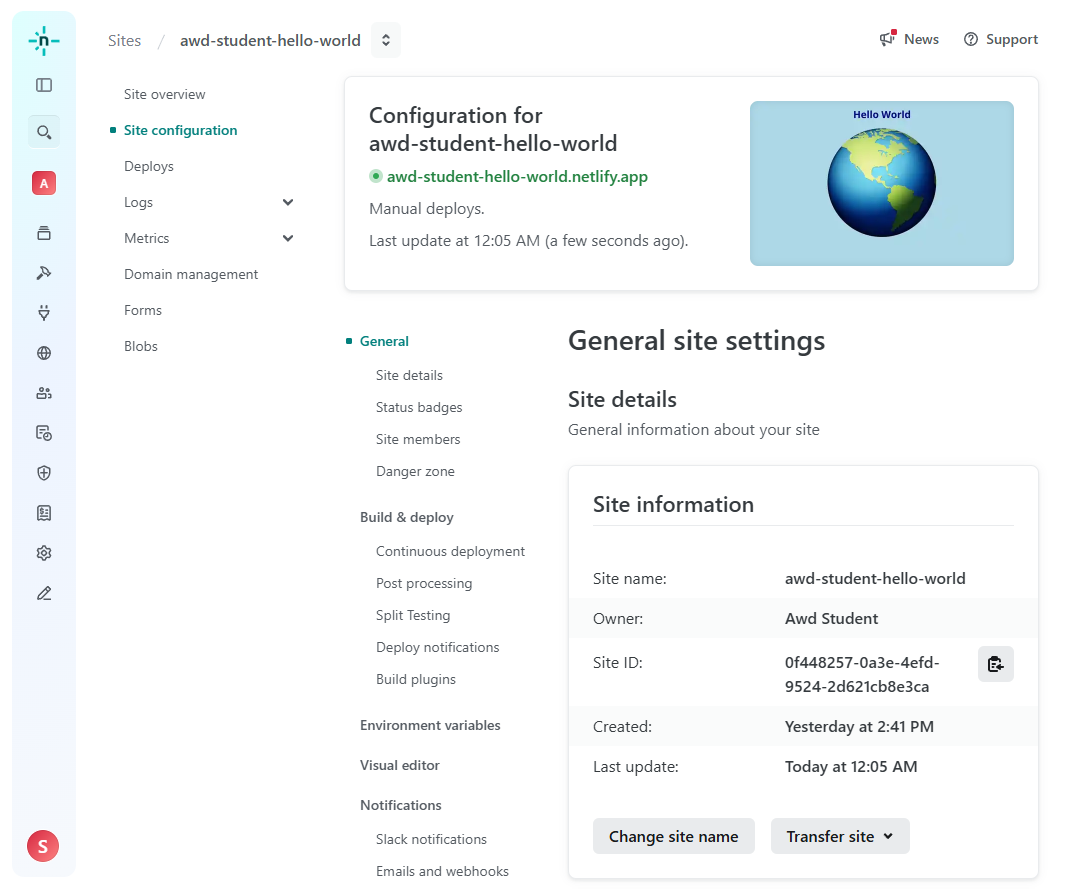
Clicking on the Save button will then complete the site renaming process, and a new Site configuration screen will appear with the newly-renamed site name as shown below.
Are We Done Yet?
Yes! You just deployed your website successfully! And it is now available publicly to anyone with a connection to the Internet! In fact, if you click on the green URL on either the Site configuration or the Site overview screens, you will launch your newly-deployed website in a separate tab on your browser. In our case, the project URL we decided upon ended up renamed as awd-student-hello-world.netlify.app. Notice that the name we gave it was added to the netlify.app domain name. All projects that you deploy with Netlify will have this netlify.app domain name at the end of their uniquely-named URLs.
Other Netlify Features
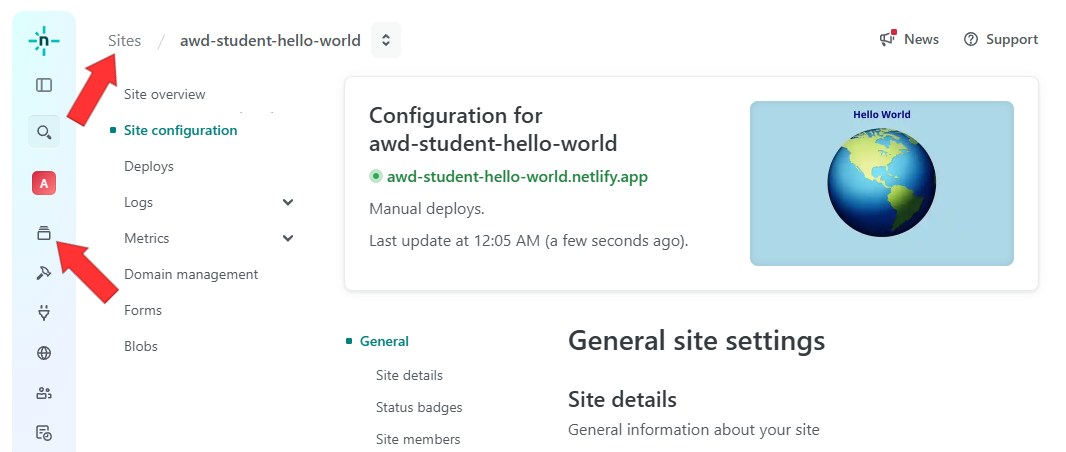
From here, there are actually two ways to get back to the Sites webpage. You can click on the word Sites at the top of the page to return to the Sites webpage, or you can click on the Sites icon on the compressed menu on the left side of the screen.
Deploying More Projects
Once you have deployed your first project, the Add new site button will appear on the right side of the screen. And if you click on that button, a pulldown meny will appear. The last item on the pulldown menu is Deploy manually as shown below.
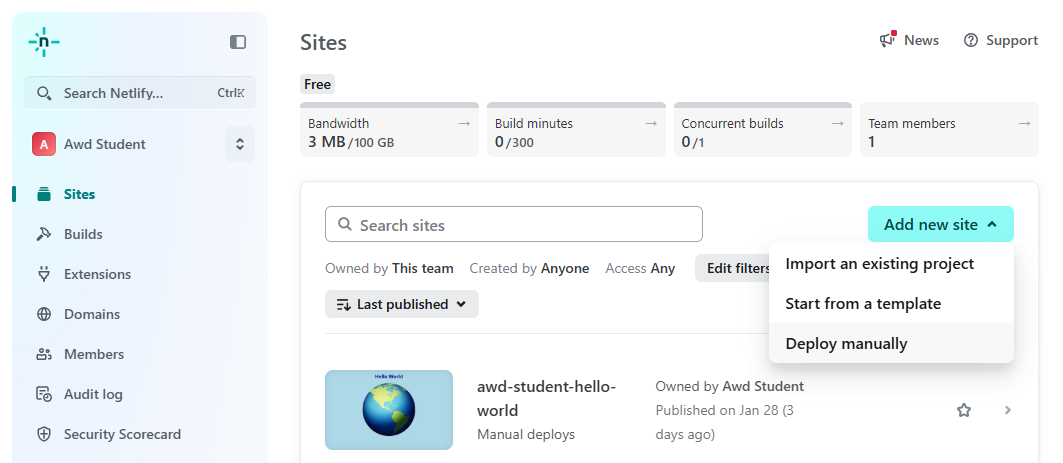
And if you click on that Deploy manually link, the Netlify Drop screen will appear. This works the same way as the other drag-and-drop method we showed you earlier. The big difference is that this one is more colorful and finding that target area to drag your project folder onto is much easier to locate.
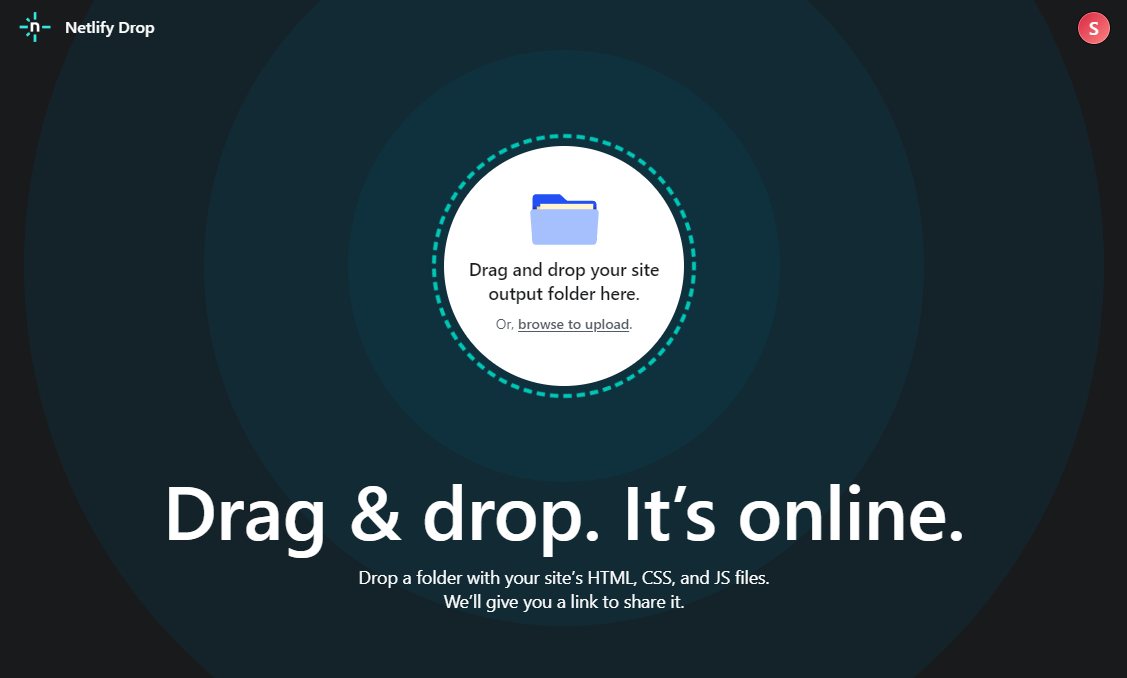
Of course, you could deploy this same hello-world project again for practice, giving it a new name like hello-world2, and by following all of the other deployment methods we showed you earlier, but that is completely optional on your part. We would also like to suggest that you use this Netlify Drop webpage for all other new future projects you will deploy here.

To return to your Sites webpage, simply click on the Netlify logo icon in the upper left-hand corner of the Netlify Drop screen.
Updating An Existing Project
Now, do you remember how to get to the Site overview page for each project? That's right! You just click on the little arrow on the right side of the screen next to the project you want to overview.
That will take you to this Site overview screen. This is a submenu of the Sites page, and you will notice that the menubar that was on the left side of the screen is now compressed into a skinny menubar that has icons. To the right of that is a menubar that has a number of items in it, of which we will only be concerned by the first three items in that menu:
- Site overview
- Site configuration
- Deploys
In fact, each site you deploy using Netlify will have these three options available to you.
But this time, we want to use the third item listed in the submenu called Deploys. And when you click on that link, the Deploys menu will appear.
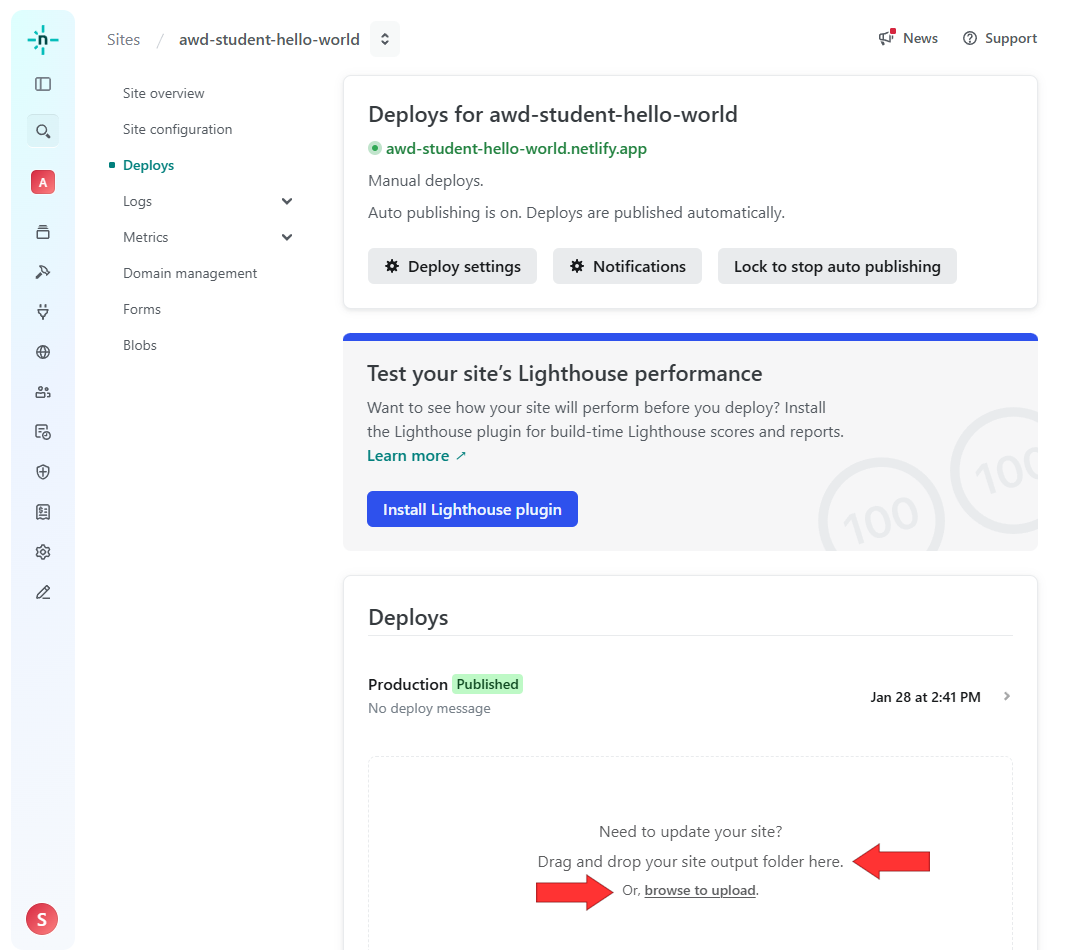
And when you look about halfway down that page, you will find a Deploys section that has two items pointed out by two red arrows and looking very much like the area we used when we did our initial deployment. However, there is one main difference between the two. If you use this Deploys link, you will be overwriting the code in the old project, and it will be replaced by the code in this new version of the same project.
But the process is basically the same as it was when you first deployed the original project. This is very useful for those times when you updated your project code and you want those changes to be reflected on your live website. These changes take place immediately. So now when you click on your project's URL, you will see the changes you made to your original code.
The other important thing to know about using this deploy method to update your existing code is that the changes you make are now permanent. So this not the method you would use if you wanted to keep your original project live on the web. If that was you goal, you would probably rename your originally-deployed project to something like hello-world-v1 and then add a new project through Netlify called something like hello-world-v2.
Downloading Project Code
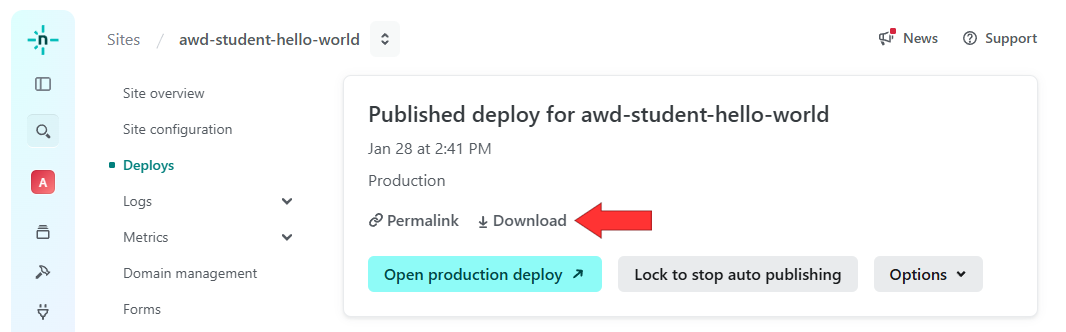
But what happens in the event that you lost or deleted your original project code and you can't update it because the only place it now exists is on your live deployment on Netlify? Actually, thanks to this Deploys section on Netlify, there is a solution for that as well. Notice in the image of the Deploys page below that there is a link called Published that is highlighted in green.
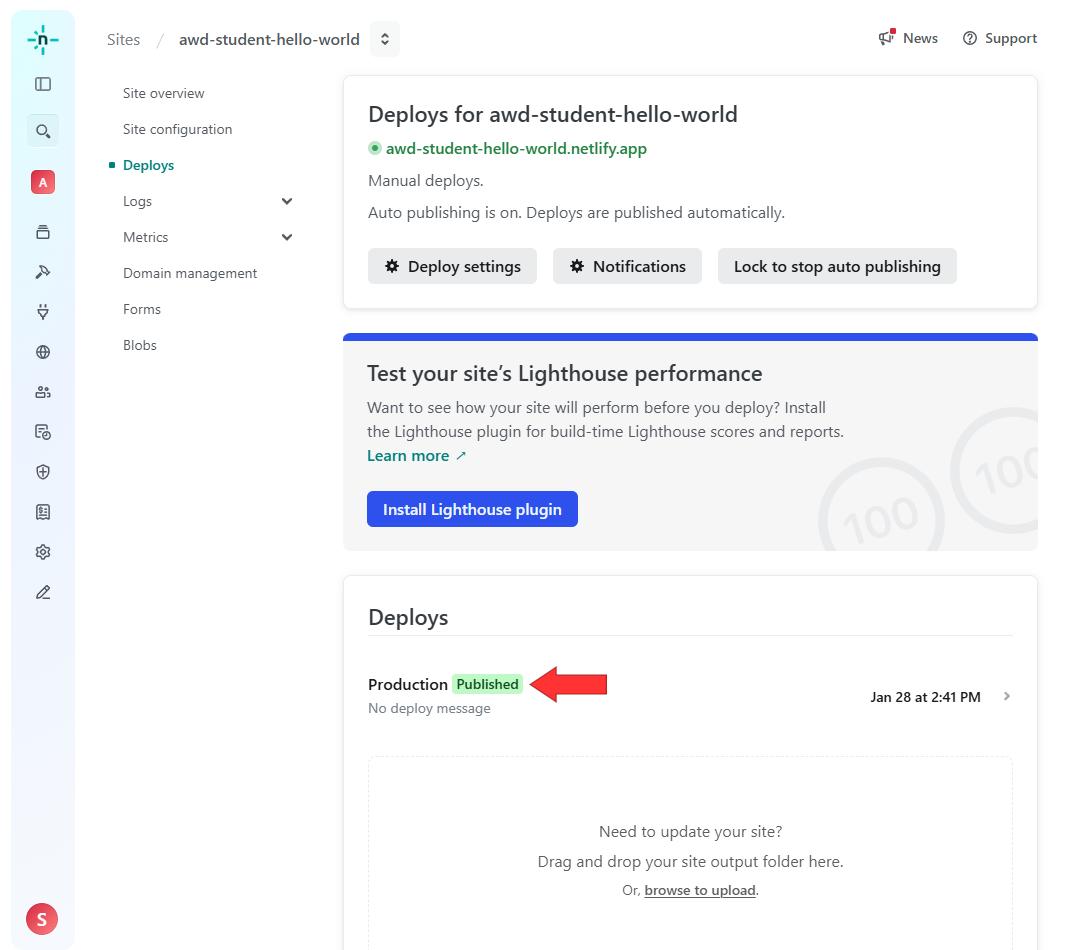
If you click on that link, you will get this screen that has a link to the original zip file that you once uploaded, and you can Download it from Netlify so that you can work with that original code once again. This is actually a two-step process. The first time you click on the Download link, the name of the link changes to Download ready. And then, when you click on that link, it will offer you a ZIP file that you can save at any location that you desire. And you will probably want to rename the ZIP file to a name that makes more sense to you.
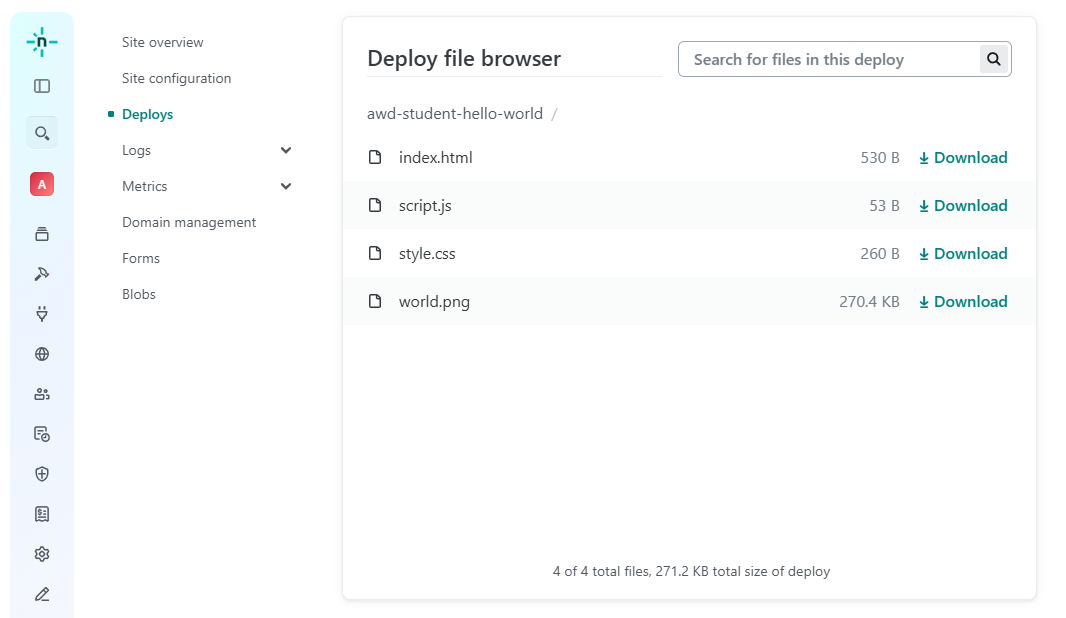
But wait! There's more! If you scroll down on this same page, you will find the Deploy file browser section which lists each file in the project individually. This is a useful feature for those times when you only want to download a specific file or set of files, rather than the entire project that could contain dozens or hundreds of files. And of course, there is a Download link on the right side of each file listed.
Deleting Projects
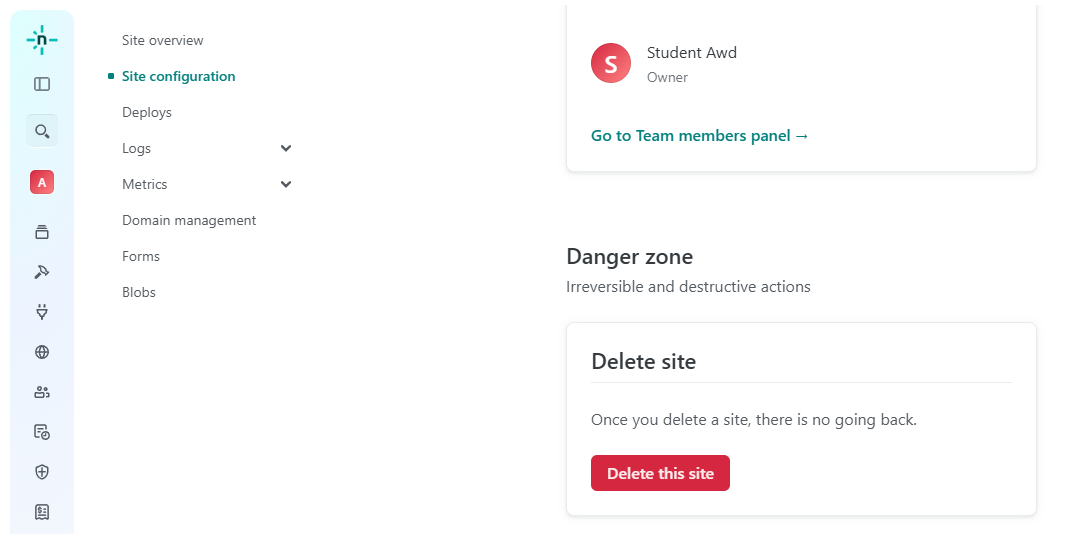
But what happens in the event that you no longer want to have one of your projects deployed publically on the World Wide Web? Those folks at Netlify thought of everything. In that case, all you need to do is click on the Site configuration link and scroll down to the bottom of that page. And there, you will find a big red button that says Delete this site.
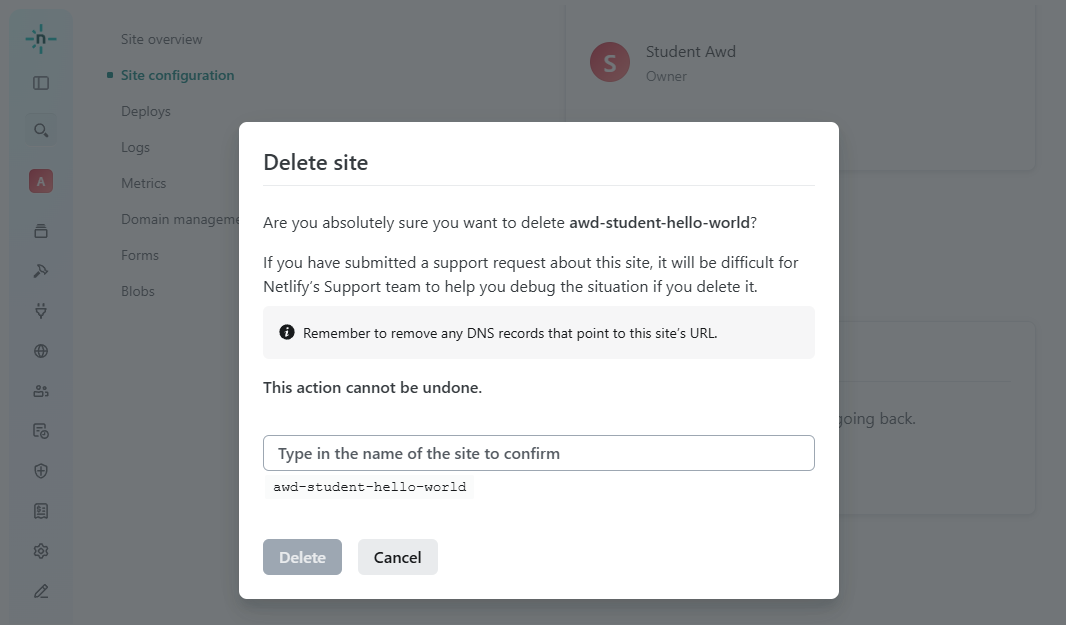
When you click on that button, another screen appears similar to the one shown below. It requires that you Type in the name of the site to confirm, just to make sure that you know exactly what site you are deleting. When both names match, you can click on the Delete button and that URL will disappear from the World Wide Web.
Signing Out Of Netlify
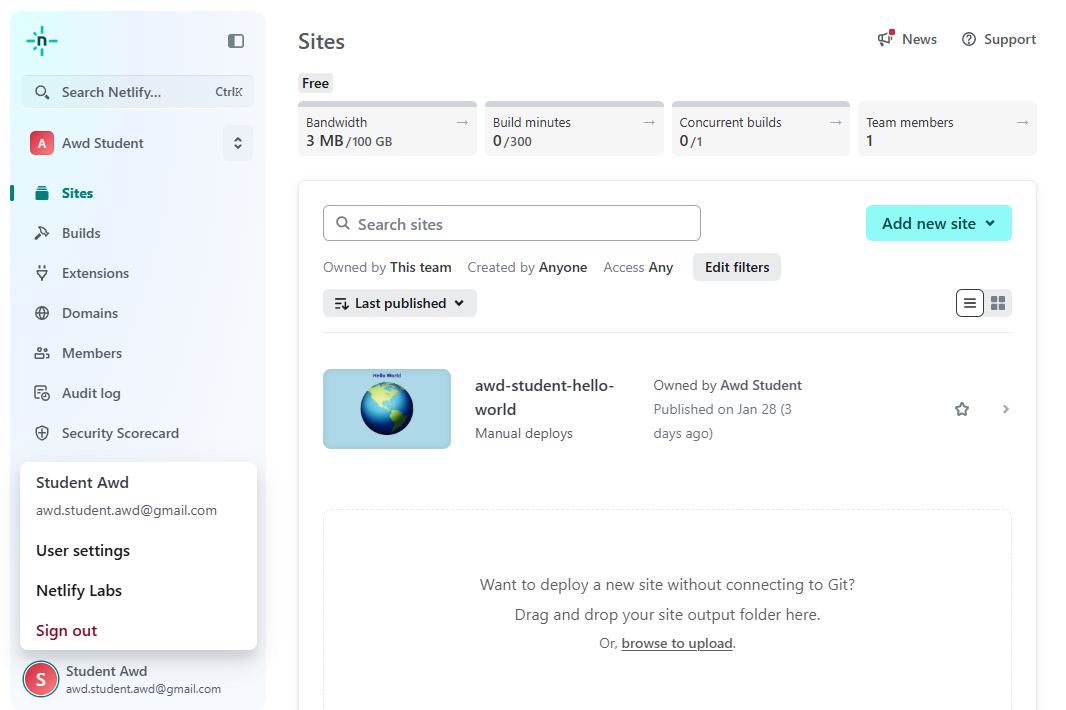
When you are done working with your Netlify account, you can simply Sign out to protect your account. To do this, go to the Sites screen and click on the little circle in the lower left-hand circle next to your name and your email address. This will produce a menu above that circle with several menu items on it. Click on the menu item at the bottom of the list called Sign out and this will sign you out of Netlify.
Summary
There was a lot to learn in this Netlify lesson. And whether you did this as part of the Required System Tools or not, you did yourself a huge favor. Believe it or not, Netlify is one of the quickest and easiest deployment tools to learn. Professionals use it to publicly deploy a project they want others on the web to see. Projects deployed this way can be easily updated and they can be deleted just as easily when we are done with them.
And furthermore, a Starter & Free Netlify account is useful when you don't already have a domain name for your website, or a web-hosting service, and you don't need version control because you are not part of a web development team. That makes this the perfect project deployment tool for students who just learning. And this tutorial was designed to be completely comprehensive, so anytime you have a quesstion on how to use Netlify, you can always return to this tutorial. We made these instructions as visual and as easy-to-follow as possible.
So now, you can either dive directly into the next lesson which will show you how to create your very own Portfolio Showcase. Or you can continue back where you left off when you started this Netlify tutorial. Learning about these Advanced Tools in a huge step forward.