JavaScript Coding Course
JS 101
Part 9. Making JavaScript Games
Learning To Write Code Should Be Fun
Creating games using JavaScript can be one of the most fun and rewarding ways to learn how to write programs in this language. There are various kinds of games you can create. However, any game that requires smooth animations combined with complex images may also require image preloading. And fast action scenes may also require the use of the JavaScript Canvas API. On the Two Clocks project, we actually used both. If you recall, we used canvas for the Canvas Clock, which is an analog clock, and we used image preloading for the Digital Clock. We also used canvas in the JavaScript Oscilloscope project as well. And we preloaded images in the Mayan Calendar Stele project, so you are no stranger to either of these concepts. But we also know that some of the best games also require music and sound effects. And they often require rapid-response UI controls. All of these subjects will be broached in upcoming lessons.
For now, please free to click on links below to preview the next five projects or to go to each one directly.
- The Man In The Moon
- Sketch-A-Wretch
- The Memory Game
- Ruby's Cube
Links To Previews
- The Man In The Moon
- Sketch-A-Wretch
- The Memory Game
- Ruby's Cube
Links To Projects
The Man In The Moon
This next project is not a game, but it does use image preloading before it displays complex images smoothly on its canvas. So we think this is the perfect segue into this new series of projects. To get a quick preview of this project, simply click here. And if you've seen all of the Harry Potter movies, then you may already know the answer to the question it asks. However, if you are unfamiliar with this particular character, that is not important. What is of paramount importance is how to achieve these smooth in-and-out animated transitions. But learning the techniques of how to accomplish this is where we are going next. And downloading this zip file is a great place to begin. Once you have unarchived that file and have it open in VS Code, we can begin.

And the canvas is exactly what it sounds like. So if you can envision a painter with a canvas on an easel, then you have the right idea. In web development, a canvas is an HTML element that provides us with a rectangular area for rendering graphics. But just like the canvas on the artist's easel, it cannot do anything on its own without the artist and his palette of paints. And as you will soon see, the name of our artist is JavaScript. But in order for our artist to interact with the canvas, he must first access it through the DOM and obtain a rendering context. The context is the actual interface that provides the methods and properties for drawing shapes, images, and text on the canvas. So without the context, the canvas element remains an empty container with no drawing capabilities whatsoever. We will see them both in a few moments.
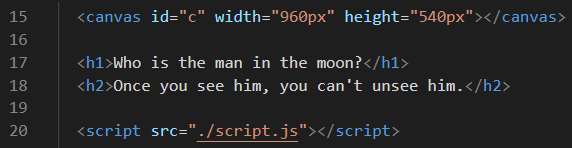
As you can see from the code listed below, the HTML content inside the document body of our index.html file is about as simple as it gets. On line 15, we define our canvas. And we also give it a unique id of c. And we define the canvas width of 960px and the height of 540px. One of the peculiarities of canvas is that these dimensions are usually declared as inline attributes. However, there is nothing special about the h1 and h2 headings on lines 17 and 18. On line 20, we find the source file for our script, so we are ready to go. Feel free to look at the CSS code for this project as well, but it's all simple CSS code that you have seen many times before. And yet, there is one thing that might impress you in that this web page is very mobile-friendly without the use of any media queries to accomplish that, so please check that out.
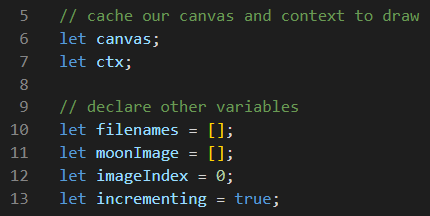
At the top of our script.js file, we are declaring six global variables. There are undoubtedly better ways to do this. And the comment on line 5 is not very helpful. However, on line 6, we declare a variable named canvas wthout assigning a value to it, and that requires us to use the let keyword. On line 7, we are declaring a variable named ctx wthout assigning a value to it, and that also requires the let keyword. But ctx is short for context, and suddenly our artist has his palette of paints and a handful of brushes. On line 10, we are declaring an empty array named filenames. And on line 11, we are declaring an empty array named moonImage. On line 12, we are assigning the value of 0 to our newly-declared let variable named imageIndex. An on line 13, we are declaring a boolean with the name of incrementing, and assigning the value of true to it.
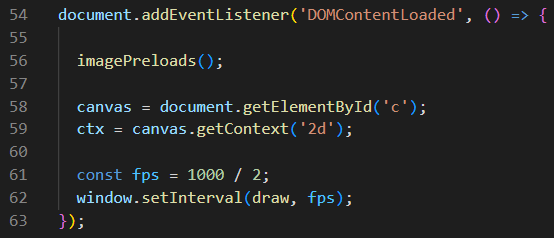
Now let's jump down to the bottom of our script file. On line 54, we are adding an event listener that waits for the DOM content to be loaded before it executes this arrow function. On line 56, we are calling the imagePreloads function. And the reason why this is important is because it is happening before our artist ever enters the studio with his canvas and paints. However, after program control returns from the imagePreloads function, we see the canvas entering the studio on line 58, and our artist and his tools following right behind the canvas on line 59. Did we already meantion that our artist is a JavaScript API and his initials are ctx, which he demands that they be written in lowercase letters? Speaking of initials, a const named fps is being declared on line 61, and it is being assigned the value of 1000 / 2. And just so you know, fps stands for Frames Per Second, and the value of 1000 is the number of milliseconds in one second, and when we divide that by 2, we get 500 milliseconds. So on line 62, we are setting an interval that will call the draw function every 500 milliseconds, or twice per second. And that is generally considered to be a rather slow frame rate, but this program is not a fast-action video game, so it is doing its job perfectly and as intended. Now let's look at that imagePreloads function.
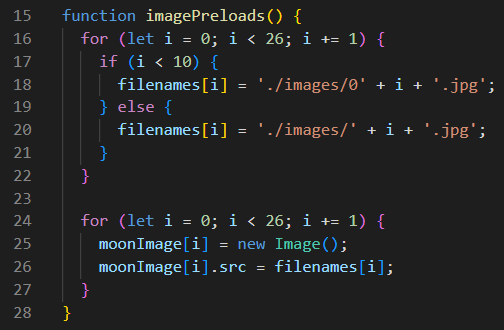
The first thing to know about this is that the images folder has 26 images in it (actually 27, if you count the favicon.png). And these 26 moon images are named in the ranged order of 00.jpg through 25.jpg. And those filenames work well with the for-loop on lines 16 through 22. By now you already understand why we have the if-statement inside of the for-loop, and that reason is so that we can insert a leading zero to the beginning of all filenames when the index variable named i has a value that is less than 10. So we don't need to explain that to you, right? And when this for-loop finishes, we will have an array named filenames with 26 image files in it.And then on lines 24 through 27, we have another for-loop that creates 26 new Image objects, and then adds them one-by-one into another array named moonImages. Now we have two arrays with 26 members in each array, and the execution of the imagePreloads function is now complete.
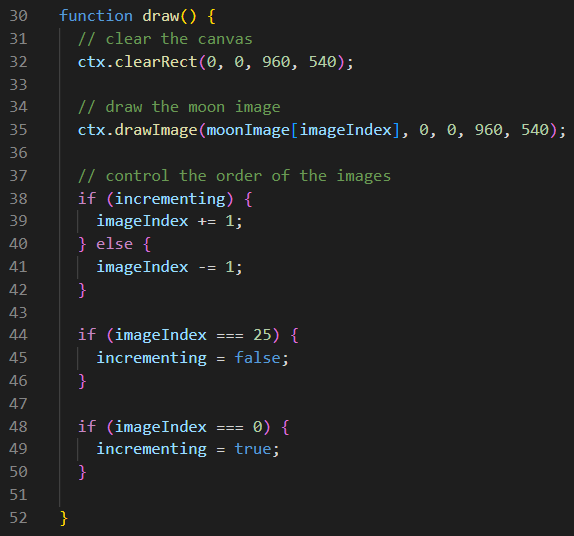
Now that we've preloaded the images, it's time to run the draw function every half-second. This is where ctx, our resident JavaScript artist takes over. On line 32, the first thing ctx needs to do is clear the entire surface of the canvas to remove any images that were there before. Then on line 35, he needs to draw the next moonImage in the series he is working on. But he has to complete drawing all 26 images in order every 13 seconds, before he needs to turn around, and then draw all 26 images in reverse order over the next 13 seconds. And when he completes that series, he needs to start all over again. No doubt ctx is a very busy guy. But he has two tools to help him keep track of where he is in this process, and they are the two global variables of imageIndex and the boolean named incrementing. For you see, when incrementing is true, then the imageIndex increases by 1 after each moonImage is drawn. But when imageIndex reaches 25, then it sets incrementing to false, and then it draws each moonImage in reverse order until imageIndex reaches 0. When that happens, incrementing is set back to true again, and the whole process begins all over again.
And we are done! So let's just click here and enjoy watching ctx draw a new moonImage on the canvas every half-second. Pretty cool, eh? By the way, who is that guy? And which Harry Potter movie was he in? We have no clue. Who? Never heard of him.
Sketch-A-Wretch
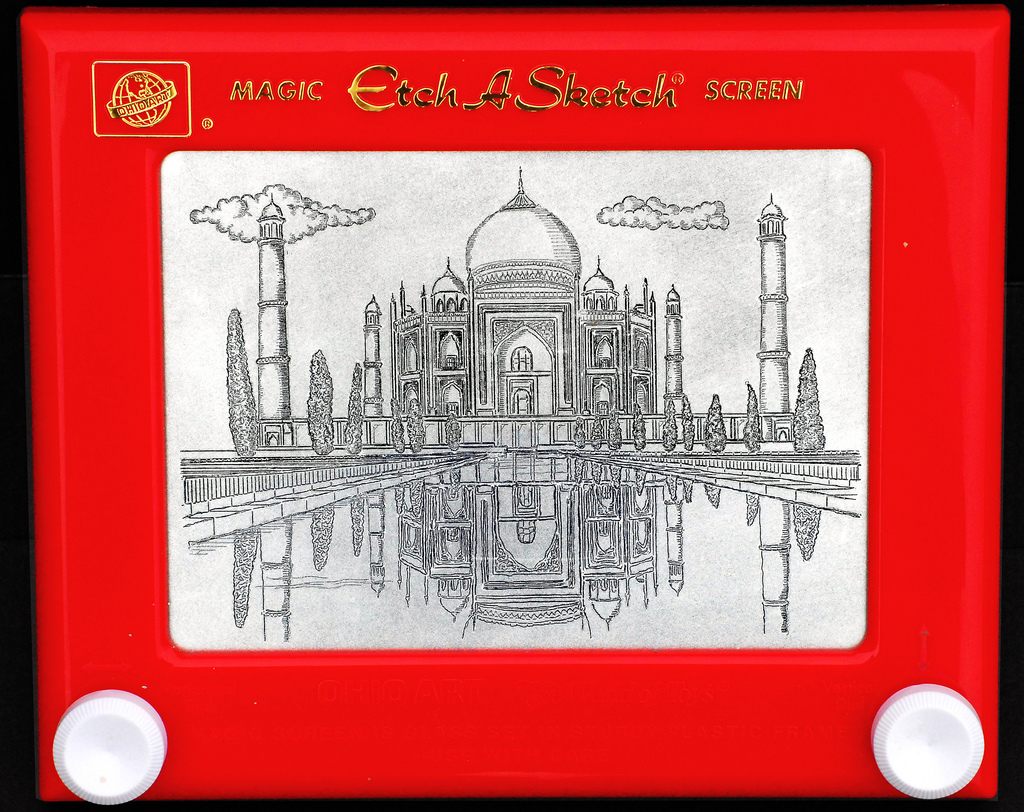
Once upon a time back in ancient times, about 66 years ago, there was a toy called the Etch A Sketch that was all the rage at the time. It was all red, but otherwise resembled the old black-and-white television sets of the time. And it had two white knobs that allowed the user to draw a line horizontally by turning the knob on the left, and it allowed the user to draw a line vertically by turning the knob on the right. Supposedly, a skilled person could create some beautiful works of art, if they had the skill and patience required to fiddle with those two knobs. And the way you cleared the screen to start all over again, was a process called shaking it. You see, inside the Etch A Sketch, there was a lot of powdered aluminum that would stick to the screen. And shaking it would recoat the screen on the inside, so that a new drawing could be made. Of course, turning the knobs scraped some of the aluminum powder off of the screen, and therefore produced a line. Over 100 million of these toys were sold. And believe it or not, you can still buy one of these ancient artifacts today, if you so desire. The manufacturer boasts that it is "a great screen alternative – no charging, batteries, or Wi-Fi needed". And that sounds great. But we suspect that you would probably prefer to have an iPad, right?
Anyway, we created this primitive canvas app to emulate the Etch A Sketch, and we named it Sketch-A-Wretch. To take it for a little test draw, just click here. And observe that its operation is just as horrible as the original. This version has no white knobs to turn. It relies on you using the arrow keys on your computer keyboard. And unlike The Man In The Moon project, this project is not even remotely mobile-friendly. But let's not forget that its main purpose it to teach you some canvas code in the easiest possible way. So in that way, the Sketch-A-Wretch fulfills its promise. Let's not waste any more time. Let us begin by clicking on this link to get the zip file required. And once you have it all unzipped, and open in VS Code, we can dive right in.
As you can see from the code listing below, the HTML content inside of the document body is actually pretty simple. On line 15, we have a button with the unique id of shake. Hey! There is something you don't see everyday! It's an inline event handler with an onclick attribute that calls the shakeMe function when this button is clicked. We generally try to discourage the practice of using inline event handlers in HTML. The more modern alternative is to use addEventListener in an external script file. Of course this HTML way certainly works, but it is less elegant than having all of your event listeners inside of a JavaScript file. On lines 16 through 19, we have a <div> with a class of frame, Inside of the frame div, we have our canvas element that has the unique id of myCanvas. And we can clearly see from its internal attributes that the dimensions of this canvas element will be 680 × 480 pixels. The <h3> heading on line 18 the unique id of message is all of the instructions we need to begin using our Sketch-A-Wretch. And just FYI, they will disappear as soon as we touch one of the arrow keys.

Now let's spend some time looking at the CSS code below. The only thing that really sticks out in the body rules is the inclusion of flexbox column rules on lines 17 through 20. Actually, the frame class has much more interesting rules in it. on line 24, we see that the frame has a background-color that is an interesting shade of the color red. It also has a nice box-shadow and border-radius. And we are giving it relative positioning which means that another element will be positioned absolutely and relative to this element. On lines 29 and 28, we see that the dimensions of the frame will be 920 × 720 pixels, even though the dimensions of the canvas element will only be 680 × 480 pixels. We also see that the frame has its own flexbox rules as well.
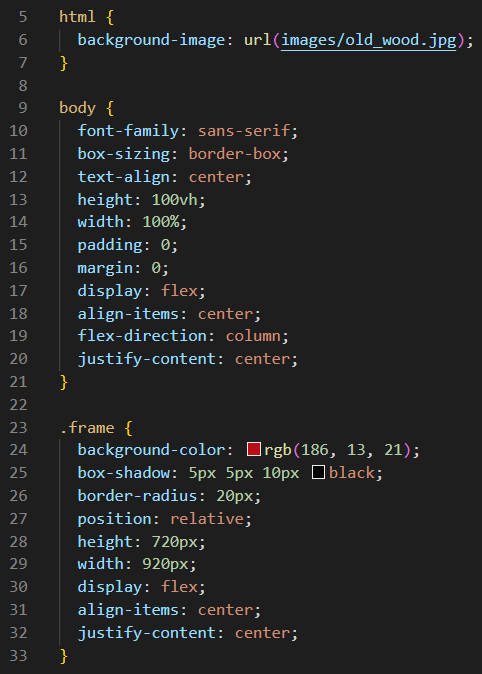
On lines 35 through 44 we find all of the rules that apply to that message <h3>. Line 38 assigns a value of visible to the visibility property for this element, but we will soon see that JavaScript hides it as soon as we touch one of the arrow keys. And notice the absolute positioning rules on lines 41 though 43. We knew this was coming, and here it is. Lines 46 through 51 hold all of our canvas rules. The little outline on line 49 is barely visible. And you really have to look closely to see it.
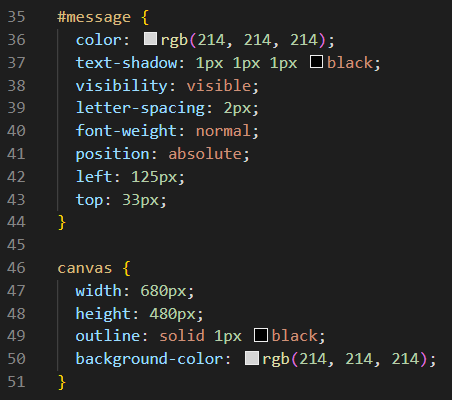
In the block of code shown below, we see all of the rules for the shake button and its hover effects. There is nothing really remarkable about any of this CSS code, but we decided to show it to you anyway. Now let's dive into that JavaScript code.
As usually happens with most of our script.js files, we declare our global variables at the top of the script. But please notice how we declared these canvas and ctx variables differently than the way they were declared in the last project. If you recall, in The Man In The Moon project we declared both of these variables using the let keyword, because we did not initialize or assign values to them until after the document was loaded, and using the const keyword simply does not allow variable declaration without variable initialization and variable assignment. And if you recall, we had a shark patrolling those waters so that you would take that point seriously.

Wait a minute! The canvas HTML element was not declared as a const variable before we declared our ctx variable in the code shown below! How can that possibly work? Don't we always declare the canvas first, so that we can getContext('2d') of that HTML element as our very next step? And the definitive answer is: No, not always. It is true that the more conventional way of declaring both canvas and context is shown above. But that does not mean that the code on line 6 is wrong, or that this way does not work. Since we gave our canvas element the unique id of myCanvas, the web browser is way ahead of us, and it knows explicitly who myCanvas is. You could say in less technical terms that they have been properly introduced.

Let's attempt to get back on track. On line 5 above, we declared a const named message that references the message <h3>. On line 6, we declared our const named ctx. And on lines 7 and 8, we declared two let variables named x and y which will be used as the two required coordinates for drawing on our Sketch-A-Wretch. Now let's jump down to the bottom of the script.
On line 47 below, we are adding an event listener that will wait until all of the DOM content is loaded before it perfoms the tasks listed as part of this arrow function. On line 48, it calls the drawTitle function. On line 49, it sets an interval that will call the drawSketcher function every few milliseconds, but we fear that every 2 milliseconds is extremely frequent. If this was a video frames-per-second (FPS) parameter, it would crash your browser, and perhaps your computer as well. So our advice is to PLEASE CHANGE THAT NUMBER to a number that is greater than 5. If this function gets called every five milliseconds, that is still 200 times per second. We are currently using 8, and it works just fine. If the fan on your computer starts spinning faster and getting louder, then you are working it way too hard, OK?
On line 50, we adding a keydown event listener that will call the move function each time a key is pressed on your keyboard. One final word to mention before we move on is that lines 47 through 51 only happen once when the program first loads (or when you refresh the browser). Once you start the interval timer and the keydown event listener, they take over complete control of this program. Now let's look at those other functions.
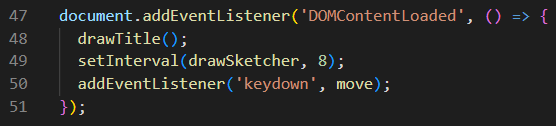
The drawTitle function on lines 10 through 13 is the very first thing that happens after the DOM content loads. And on line 11, our resident JavaScript artist named ctx has selected a sans-serif font, with a font size of 58 pixels, before placing the text of Sketch A Wretch at the x location of 128, and the y location of 240 on our canvas. And you can just click here if you want to be reminded of what that looks like.
But let's not forget what happens next. We also set and interval that runs the drawSketcher function every few milliseconds as well. And that's a very simple function that does only one thing over and over again. Our artist fills a rectangle that is only 5 pixels wide and 5 pixels high. The location of that tiny rectangle is determined by the two variables we named x and y. So the syntax for the fillRect method is ctx.fillRect(x, y, width, height); and we decided that 5 pixels should be the width and height of each rectangle. We could have used a smaller number like 3 pixels, but then the move function would need to move 3 pixels with each keydown event as well, and we will see how that works in a moment. And although we neglected to tell you this, the default color is black unless we change it through a fillStyle command.
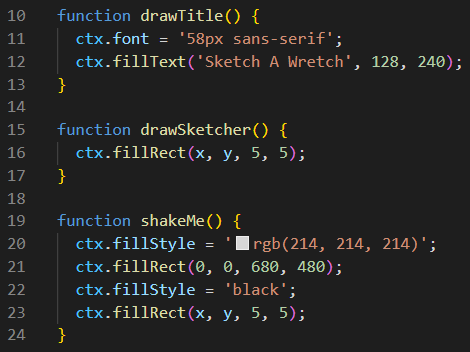
Now don't forget that our HTML document has an inline event handler with an onclick attribute that calls the shakeMe function each time that button is clicked. And you can see the code for the shakeMe function above on lines 19 through 24. And we see that ctx needs to change the color he is painting with on line 20. He had black paint in his brush, but now he needs to fill it with this light gray color of rgb(214, 214, 214) before he paints the entire canvas with this color on line 21. But on line 22, he need to put black paint back in his brush. Because on line 23, he is filling that little 5 × 5 rectangle at the last location of x and y. And that's where it will stay until the next keydown event trigger another move.
And speaking of the move function, we can see all of the code for that function below on lines 26 through 45. The first thing that happens on line 27 is that the little <h3> message that we saw when the program first started is now hidden. That message said Use arrow keys to draw. And the very first keydown event removed that message from our sight, regardless of which key was actually pressed down.
The rest of the code is only concerned with four possible keyCodes. And in case you are unfamiliar with this concept, each time a key is pressed on the computer keyboard, a keyCode is generated. But this function will ignore any keyCode that is not the correct code for one of the four arrow keys. Let's look at the syntax of this if-else-statement that has no else. Well, how on earth are we supposed to figure out what is happening here if the programmer did not write any comments?
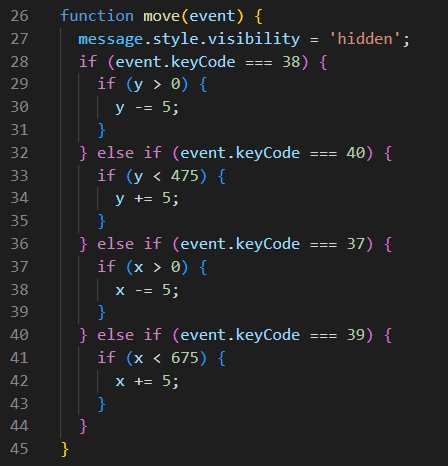
Let's look at lines 28 through 31 above. Yes, we get it that the next two lines of code will happen only if a keyCode of 38 is detected. But the next two lines of code are yet another if-statement. And the if on line 29 will only perform the code on line 30 if (y > 0). Since it is using the y variable, we know that it is concerned with horizontal movement only. And since y has to be greater than 0, it tells us that we are barred from going any further to the left. So in that case, we must be hugging the left side of the canvas. And what happens if that condition is true? On line 30, we are subtracting 5 from the variable y, and then the result is being assigned back to the variable y.
From these clues, we can deduce that keyCode === 38 is the code for the left-arrow key. Now, your job is to use the same deductive power of reasoning to determine what keyCodes are assigned to the other three arrow keys. It's not all that difficult, and we are 100% confident that you can figure this out for us!
The Memory Game
Did you solve the two riddles? Do you know who The Man In The Moon is? And do you know what keys on your keyboard produce the keyCodes of 40, 37, and 39? If so, then you are ready to tackle for the next project, which is appropriately named The Memory Game.
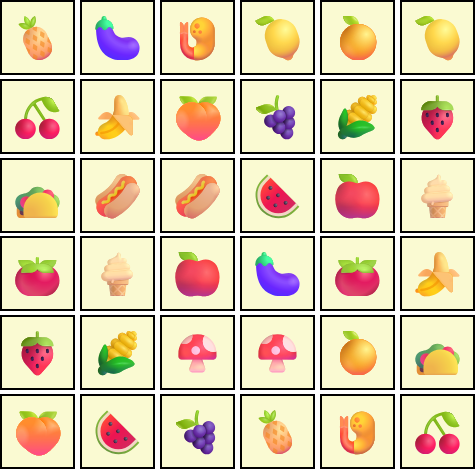
This game does not require image preloading, because all of the images in the game are Unicode characters. This game is not a canvas game, but it has two game modes: a One Player game mode, and a Two Player game mode. But Player One must complete the entire gameboard before Player Two gets their chance to play. Each player starts with 500 points, and 1 point is deducted for each click on the gameboard. So it stands to reason that the player with the least amount of clicks will have the higher score. And of course the player with the highest score will win the game.
The gameboard is a matrix of 36 blocks. Hidden behind each block is the picture of a food item. And there are 18 food items total, which means that each food item has a matching food item hidden somewhere on the board. Of course the location of each food item is selected randomly before the game starts, so no two games are predictable or alike. The player clicks blocks on the board until two matching food items are revealed at the same time. And then, both of them disappear. Gameplay continues until all food items are removed from the board. You can mouseover the gameboard image on the right to see a few different screens during gameplay. However, there is no screen during gameplay that reveals the locations of all of the food items. But you can click here to play the game in advance of our coding lesson.
And there can be no coding lesson without source code, so please click on this link to download the zipped-up project files. When you finally download them, unzip them, and open them in VS Code, we can begin.
In this project, there is a lot of content in the index.html file. And that is because it has two different screens. There is an opening screen called main where users can select a one-player game or a two-player game. And after game selection, the container screen opens, and it contains the actual gameboard and a scoreboard with messages. And it is our JavaScript code that tells the DOM which of these two screens to display, and when and how to display them. One other factor that makes this file so large is that it also contains a total of 38 buttons, each with its own inline onclick event listener. This was the programmer's design decision from the very beginning. And while this technique may be easier for novice programmers to understand, it does require larger source file sizes. And we will cover the index.html file in three sections below.

Of course the code for the main screen is displayed above. No other explanations are needed here. We will discuss the hideSelector function calls from the two inline onclick event listeners when we get into the JavaScript code.
And as you already know, clicking on one of the two buttons above hides the main screen and shows the container screen. In the block of code below, we can see the opening tag for the container div on line 21. And after than, you can see the entire gameboard div and all 36 of its buttons, each with its own unique id and its own inline onclick event listener that calls the flipTile function while sending its own location as a parameter. You might find it interesting that the legend on top of each button is which is a fancy way of putting a non-breaking space on each button. I guess you could say, "A blank button offers no clues." But let's move on.
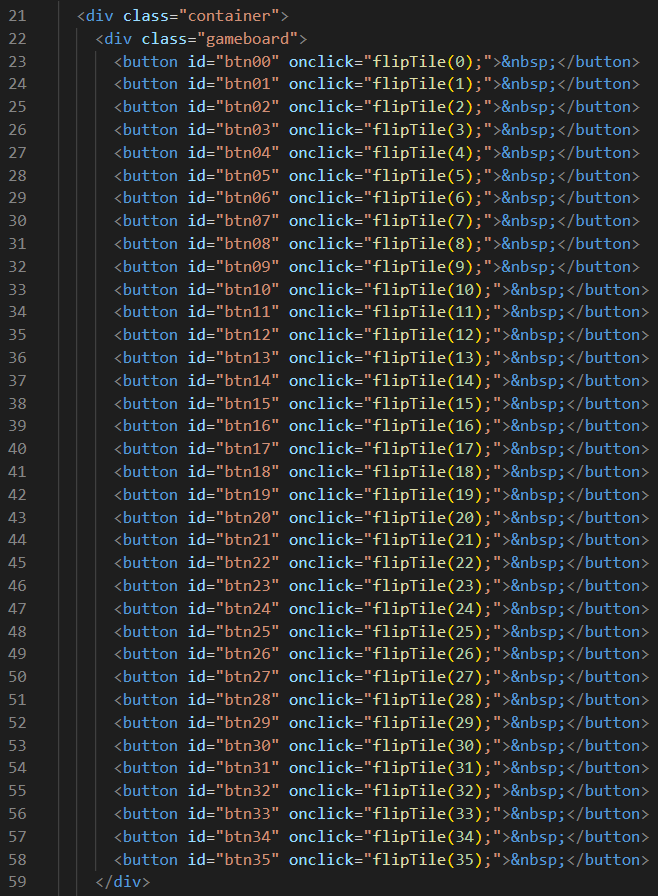
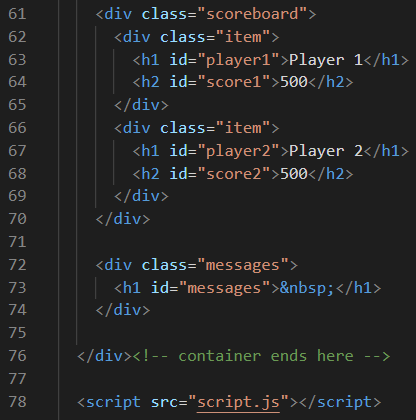
That gameboard required a lot of HTML code. And the scoreboard is located below the gameboard. Once again, the code is so simple that it doesn't really requires any explanations. The two item divs inside the scoreboard div are controlled by JavaScript. If a one-player game was selected, then only the Player 1 score will be displayed. And if a two-player game was selected, then both the Player 1 and the Player 2 scores will be displayed. JavaScript also controls the messages div which quickly displays information during gameplay. It will flash a Match message when two of the same food items are selected at the same time. And there are other messages it displays like Ready Player One... Oh, so that's where that comes from. We had no idea that this game was so famous. Let's skip over the CSS code and look at the JavaScript code next.
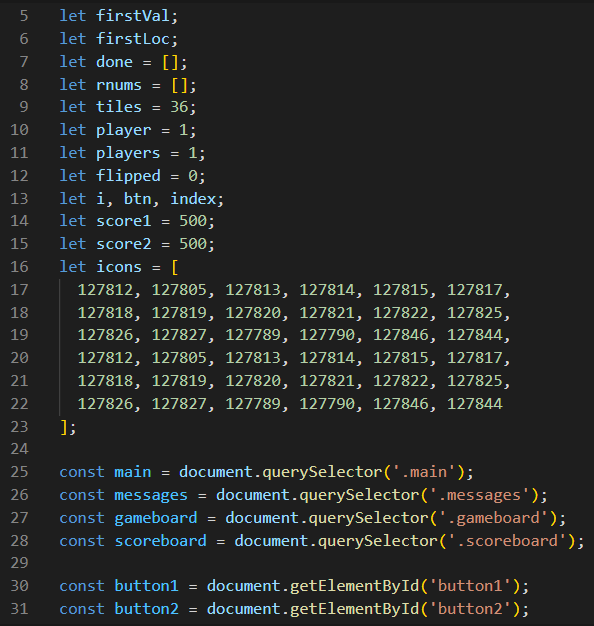
This script.js file has a lot of global variables declared at the top of the file. All of them are declared as let variables, which would lead us to believe that this was once an old program that originally declared all of its variables as var variables: a practice that is frowned up these days. And we must be careful not to confuse variables with similar names, like player and players, or icon and icons. And just FYI, the 36 values in the icons array are the codes for Unicode characters in decimal numbers. And notice that the bottom three lines are identical to the top three lines, which means that we have two identical food items for each of these 18 different food items. It is also intriguing that all of the let variables were declared before the const variables. But those six const variables make perfect sense because they are sometimes displayed and sometimes hidden, as we shall see next.
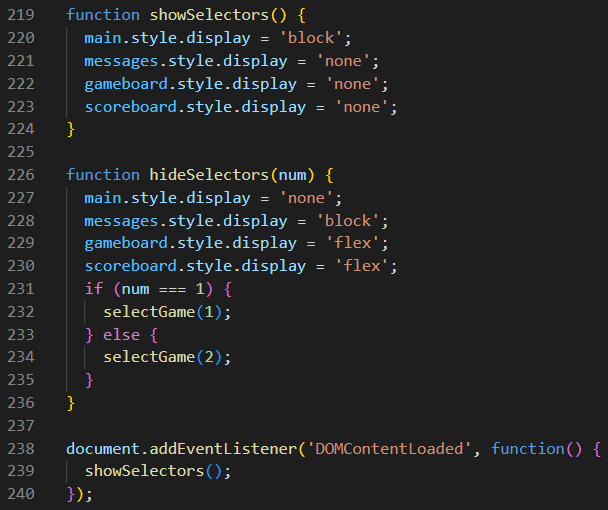
Jumping all the way down to line 238 near the bottom of our script file, we see that the showSelectors function is called by this anonymous function as soon as our other content is loaded. The showSelectors function on lines 219 through 224 is pretty simple. It displays our main screen, and hides the messages, gameboard, and scoreboard divs. And at this point, it waits. But don't forget that there are two buttons on the main screen. And when one of those buttons gets clicked, the hideSelectors function on lines 226 through 236 get called, but it also passes a parameter called num to this function. Line 227 simply hides the main screen. Lines 228 through 230 display the messages, gameboard, and scoreboard divs in their proper display modes. And then lines 231 through 235 use num to determine whether we have a one-player game or a two-player game, and it appropriately calls the selectGame function and passes the number of players to that function as well.
The selectGame function received the parameter we sent to it, which was only an integer of either 1 or 2. And num seemed like a silly name since we all know that it is actually the numberOfPlayers. And since we know that we can call it any name we like here, it gets a more descriptive name change. Notice that on line 187 is the beginning of an if-else statement that pretty much takes up the whole function.
Now let's suppose that the numberOfPlayers is 1. Then the else code on line 203 is triggered, and it executes the code on lines 204 through 211. You can read the code just as easily as we can. So we establish that there is only 1 player, and the number of players is also only 1. Then, we call the shuffleTiles function (and we'll give you three guesses as to what that function does). Next, we label the Player 1 score. And then, we paint the everything that would have been associated with score2 and player2 on the screen lightblue, thus rendering it invisible. At this point, the program is waiting for Player 1 to click a tile on the gameboard.
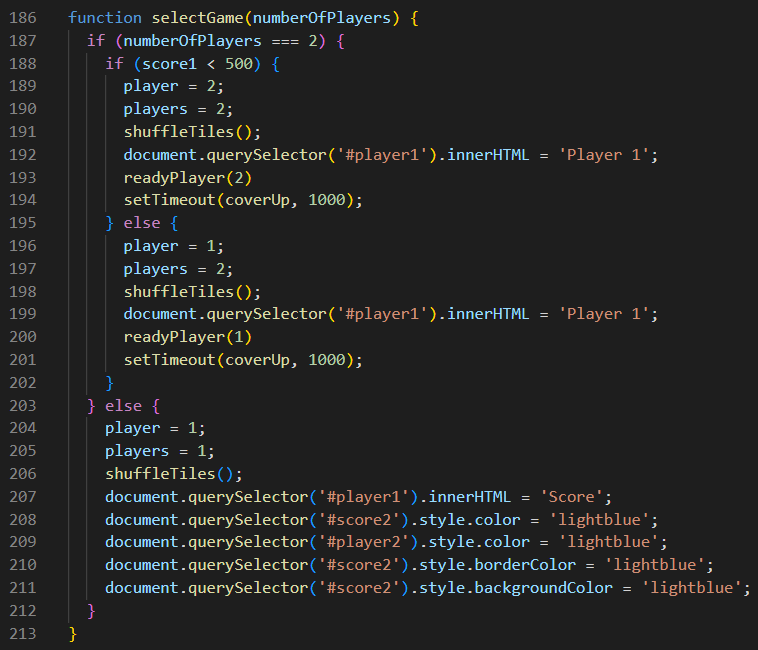
But what happens if the numberOfPlayers is 2 when the code first reached line 187? At that point, the if-else statement on line 188 takes control. Now please remember that Player 1 gets to finish completely before Player 2 gets to play. So if the variable named score1 is less than 500, it means that it is now Player 2's turn. But if a two-player game just started, then score1 will not be less than 500, and program control will be passed to the else on line 195, so that Player 1 can go first. In that case player is 1, players is 2, and then we call the shuffleTiles function. Line 199 basically prints Player 1 in the appropriate place. Line 200 calls readyPlayer(1) (and we'll see what that does in a moment). And line 201 calls the coverUp function after a one-second timeout.
And as we shall soon see, this selectGame function will be called again after Player 1 finishes their turn in the game. And at that point, all of the code between lines 189 and 194 will run. One difference from the code on lines 196 through 201 is the player variable is now 2. That makes sense because it is finally Player 2's turn. And another difference is that on line 193, we call readyPlayer(2) which will flash a quick Ready Player 2 message. The code in the next three functions should help clarify any confusion for us.
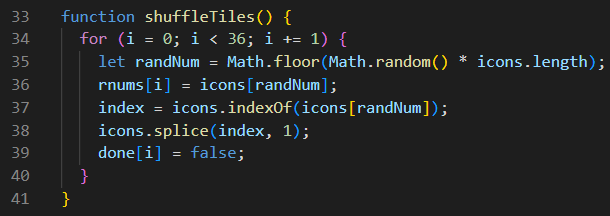
The shuffleTiles function does exactly what you think it should do. But before we can dive into the code, we need some more information. First of all, you need to remember that we declared two empty arrays named rnums and done when we were declaring global variables. And we never explained these two array methods of indexOf and splice. The indexOf method simply returns the location of an element in an array. And as used here, the splice method simply removes an element from an array. It might also be helpful to know that the rnums array will become our new array of shuffled tiles that will be used during each round of gameplay. Now let's look deeper into this code.
On line 34, we have a for-loop that will iterate 36 times using the numbers of 0 through 35 using the variable named i. Then on line 35, we generate a random number in the range of 0 to 35. On line 36, we are going to select a random tile from the icons array, and place it in the rnums array. It will use the variable of i from the for-loop to fill the rnums array in sequential order. Line 37 finds the location of that random tile in the icons array using the indexOf array method. And then, line 38 removes it from the icons array using the splice array method. On line 39, we assign the boolean value of false to each sequential location in the done array. Later on, each one of these will be changed to true when that tile finds its match and is removed from the gameboard. This explanation might sound complicated, but it is actually a very simple process.
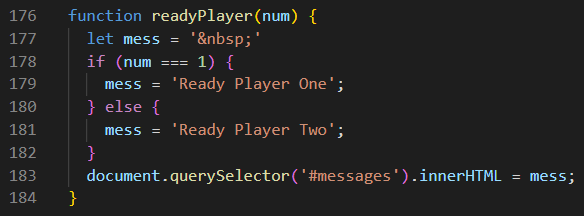
The readyPlayer function requires very little explanation. The function receives a number: either 1 or 1. Then on line 177, it declares a variable named mess and assigns a non-breaking space to it. The if-else statement on lines 178 through 182 will assign an appropriate Ready Player message to the variable named mess. And then on line 183 prints that message on the screen. This message only appears on the screen for about 1 second because line 58 in the enableClicking function will replace it with another non-breaking space, as we will see in the near future.
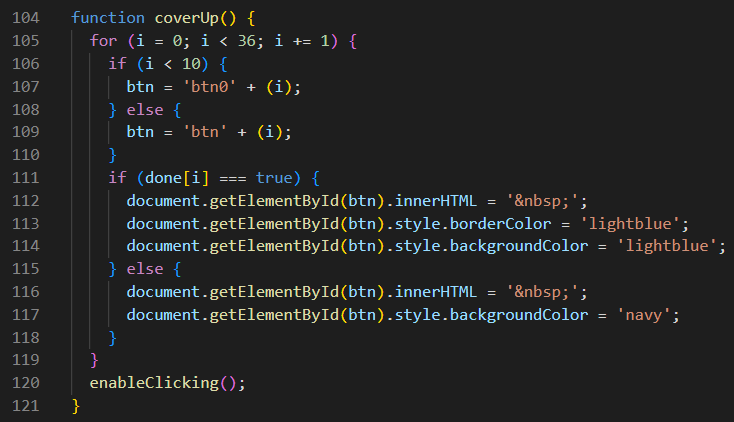
One last function is required before we can enableClicking, and that is the coverUp function shown below. But you should know that no function is required to enable clicking on the gameboard tiles. In fact, those tiles already allow clicking. This function uses a for-loop to iterate through all 36 game tiles, while it checks to see if the boolean element stored in the same location in the done array is true. If it is, then this tile found its match earlier in gameplay, and it was removed from the gameboard, and so that location is covered with a non-breaking space, and the color is changed to lightblue, making that tile invisible. However, if that location in the done is false, then it is the color is changed to navy. Program control is then passed to the enableClicking function.
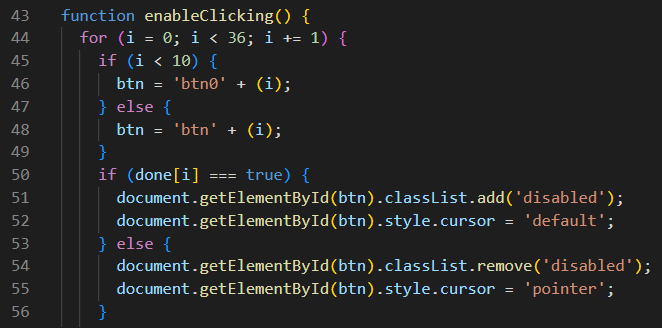
A-ha! Yes, each tile originally had clicking enabled through its inline onclick event listener in HTML. But the first purpose of the enableClicking function is to disable clicking for tiles that were previously eliminated from the gameboard. Notice just how closely the code in the block below resembles the code in the block above.
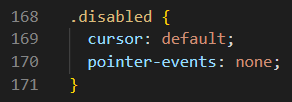
And we see that control over the clicking of the tile is managed by the CSS property of a class that we have not seen yet. Notice how we add or remove the disabled classList on line 51 or 54 below, to either enable or disable clicking in that tile. Notice that we also change the type of cursor that appears when the mouse hovers over each tile. This little snippet of code on the right can be found at the very bottom of the style.css file. And if you've never seen any previous mention of the pointer-events CSS property before, you can now see just how helpful this CSS property can be. And you can click here to learn more.
But the enableClicking function is long function, and the block of code above is only the first part of it. Remember way back several paragraphs ago when we said that the Ready Player message only appears for about one second? well, line 58 below covers up that message. But the if-else statement on line 59 is checking to see if the variable named tiles is 0. So far, all we know about this variable is that it was declared as a global variable and was assigned a value of 36 at that time. So this line of code if (tiles === 0) means that all tiles on the gameboard have been matched and removed. But which gameboard are we talking about? Line 60 wants to know if (players === 1), and if it is, then this is a one-player game, and there is only one gameboard. So on line 61, we print the message Game Over, and after a 5 second timeout, we call the playAgain function.
On line 63, we have an else if statement that is asking else if (player === 2) and that is telling us that since it is not a one-player game, then this is a two-player game, and Player 2 just cleared the gameboard. So this is how a two-player game can end. On line 64, we want to know if score1 is greater than score2, and if so, we announce that Player One Wins!. However, line 67 want to know if score1 is less than score2, and if that is the case, then we announce that Player Two Wins!. And in the unfortunate situation that neither of these two conditions is true, then we announce Game Over. Tie Game! but notice that after weach of these outcomes, there is a 5-second timeout before we call the playAgain function.
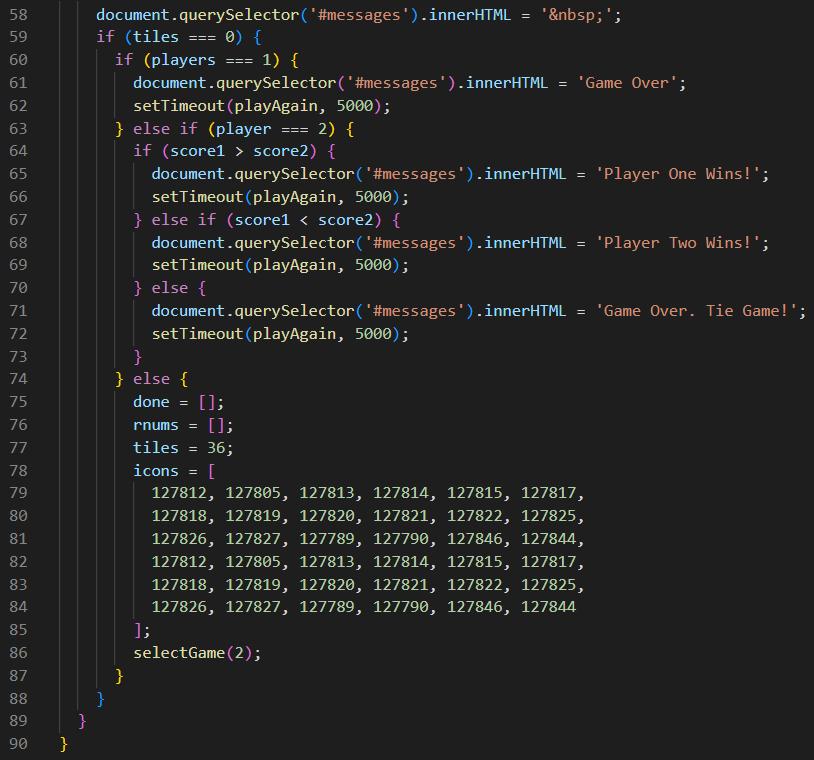
So now we are faced with the question of what triggers the else on line 74 above? Well, it means that line 59 was true, in that (tiles === 0). And it means that line 60 proved to be false, in that players was not 1, which means that this is a two-player game. And also line 63 proved to be false, meaning that Player 2 did not just finish their turn. And these clues can only lead us to one conclusion: this is a two-player game, and Player 1 just finished their turn. So now, we need to reset the gameboard because it is now Player 2's turn. And just look at how we do that. We change all four of these global variables done, rnums, tile, and tiles back to their original values. And on line 86, we call the function selectGame(2). And the gameboard will now be reset for Player 2's turn.
So what happens when we call the playAgain function after the 5-second timeout? The code shown below is then executed.

Now don't forget that each of the 36 tiles on the gameboard is actually a button that has an inline onclick event listener attached to it that calls the flipTile function, while passing a unique identifier of that button to the function. And the flipTile function is also a long function that we will present to you in two parts. Lines 124 through 128 are self-explanatory. One point is subtracted from the score of the player each time a tile is clicked by that player. Lines 129 and 130 keep a running tally of the score for each player, and with each click. But of course, score2 is not displayed in a one-player game.
But the real fun begings in line 131 at the begining of this switch-case statement Notice that the parameter of flipped is passed to the switch. The variable named flipped was declared as a global variable and assigned the value of 0, and it is used to keep track of the two buttons that are clicked while trying to find a match. So after the first button click, the code following case 0 will be executed. Lines 133 through 137 determine which button/tile was clicked. And it uses the parameter named num passed to the flipTile function to figure that out. On line 138, it assigns the Unicode value found in the rnums array and the num location. Lines 139 and 140 display that Unicode character on a lightgoldenrodyellow background. On line 141, firstLoc is assigned the location value of num. On line 142, firstVal is assigned the value of the Unicode character found at rnums[num]. The flipped variable is set to 1 on line 143. And then lines 144 and 145 disable that button/tile to prevent it from being clicked again. Now the program is waiting for the next button/tile to be clicked.
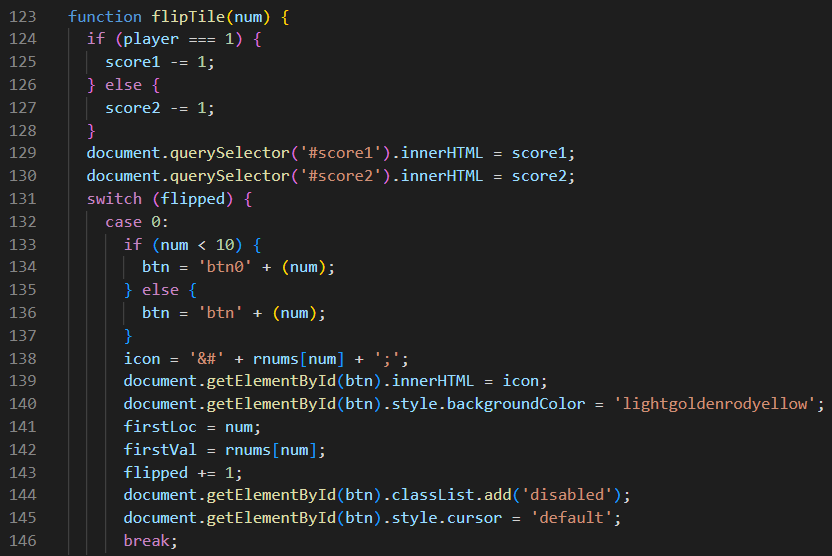
Now this whole process repeats during the second button click, but now the variable flipped is now set to 1, so after the second button click, the code following case 1 will be executed. And the first eight lines of case 1 code are identical to the case 1 code. But everything changes with the if-else statement on line 156, because we are now looking for two tiles that match. And if they do indeed match, then on line 157 we subtract 2 from the variable named tiles. Then, we flash a Match message on the screen. And we call the disableClicking function (and we'll see what that does in a moment). On lines 160 and 161, we set the boolean value of both of those locations in the done array to true. And after a 1-second timeout, we run the coverUp function on line 162. This will redraw the gameboard without the two matching tiles we just eliminated. Then we have three lines of housekeeping to take care of as firstLoc is assigned null, firstVal is assigned 0, and flipped is assigned 0. So now we are ready for the very next button click., and the process repeats.
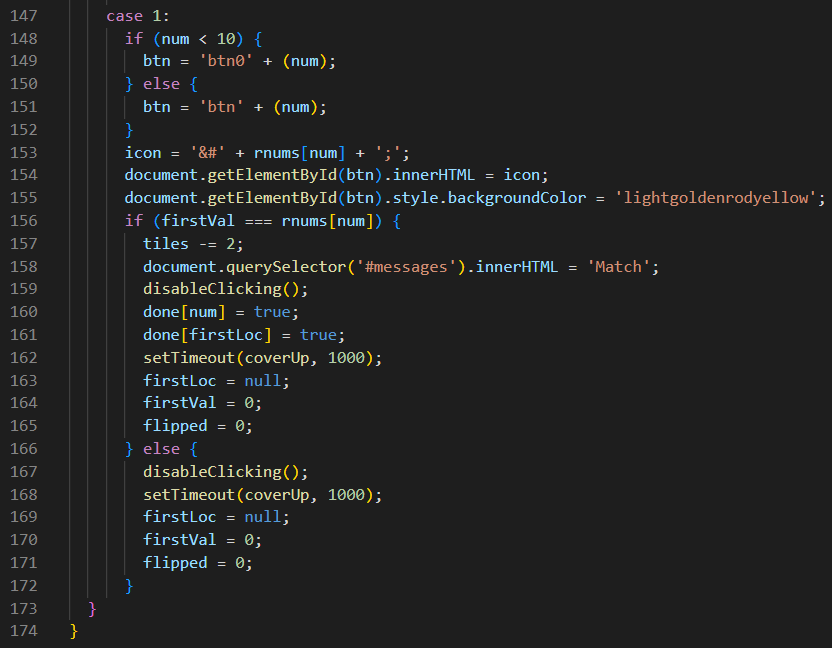
But what happens if no match was found by line 156? Ah yes! In that case, program control moves down to the else on line 166 where we disableClicking, run coverUp after a 1-second timeout, and once again reset our three housekeeping variables. There was no match this time, so more clicking is required.
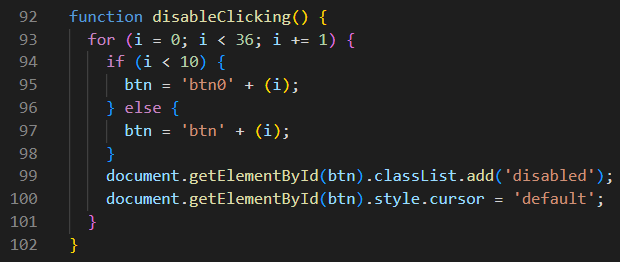
And what does this disableClicking function do? See for yourself in the block of code listed below. Essentially, it disables clicking on all buttons. But please remember that clicking is only disabled for 1 second, after which the coverUp function runs. And then this crazy game of endless button-clicking can resume.
Spaghetti Code
Was this last project fun for you? Or was it convoluted and complicated for you? If you were able to follow along and understand the jist of what was happening, then you did well. This is an old program that was updated many times in the past. And it is now much improved from the spaghetti code that it once was. What is spaghetti code? Well, a convoluted tangle of code that is difficult to follow and straighten out resembles a bowl of cooked spaghetti noodles, and that is how it got its name. There are many different recommended solutions for fixing spaghetti code. And in the Age of AI, the quickest and easiest solution is often to let an AI chatbot like ChatGPT do it for you. Or you could let an AI agent like Codex or Claude Code fix it for you. The only real downside is that the code you get back might be even more difficult to follow than what you had before, but it will most likely run faster and more efficiently. We chose to not do that with The Memory Game because we thought this code was easier to follow. Anyway, we will now move on to another program that is easier to understand.
Ruby's Cube
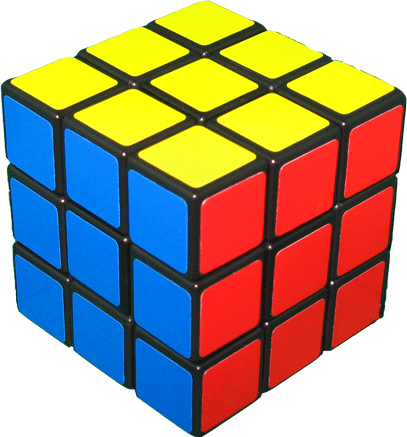
First, let's talk about what this project is, and what it is not. This is not Rubik's Cube, the puzzle that requires skill to solve! This is not a strategy game that requires high levels of concentration to find a solution like The Memory Game. This game is more of a game of chance that requires lots of luck while the program generates random numbers. But there are a few new things to learn here. This game relies mostly on hover events rather than on mouse click events. And there are two kinds of mouse hover events that can happen: mouseover and mouseout. The mouseover event is triggered when the mouse is initially hovering over an element, but the mouseout event happens after the mouse is no longer hovering over an element. This game will also save your best score in localStorage on your computer, so you can beat your best score with subsequent attempts of gameplay. This game will also introduce you to the Audio object because it does have a couple of very simple sound effects. Anyway, why not take a quick preview of this game by clicking here, and then taking Ruby's Cube for a test drive?
The code in this project is very well-commented, unlike many other projects in the past. For that reason, we will try to keep our discussions of each code block to a minimum. But before we can begin, you need to download, unzip, and open the Ruby's Cube project files here.
One of the first things you will discover after opening the index.html files is that this project also has several inline event listeners, but these are detecting mouseover events, and each one is calling the cellUpdate function while passing a number that identifies which one of the nine cells gets the update. Now let's jump down into the next block of HTML code.
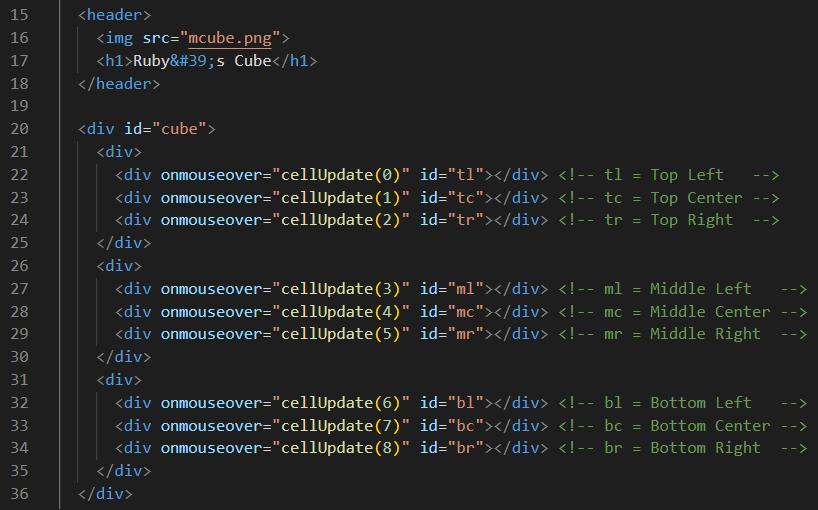
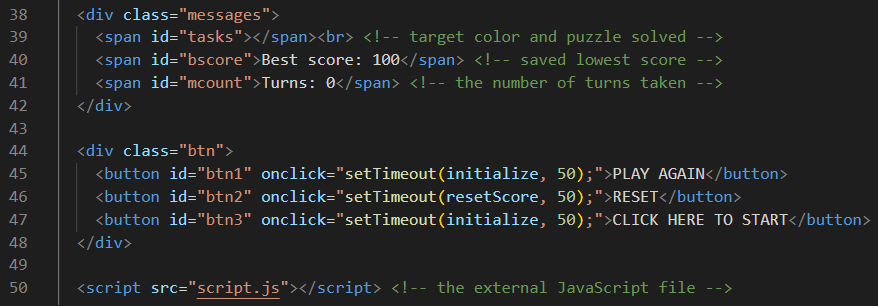
Here we see a messages div and a btn div. The messages div contains three spans, each one has a unique id. They are tasks, bscore, and mcount. The comment help to explain what they do. The btn div contains three buttons, each with a unique id and they are numbered appropriately as btn1, btn2, and btn3. These buttons have inline click event listeners that call either the initialize function, or the resetScore function. The JavaScript code will help explain these functions.
The script.js starts out by declaring all of its global variables at the top of the file. Thanks to whoever spent time writing these comments, there really isn't much more to tell.
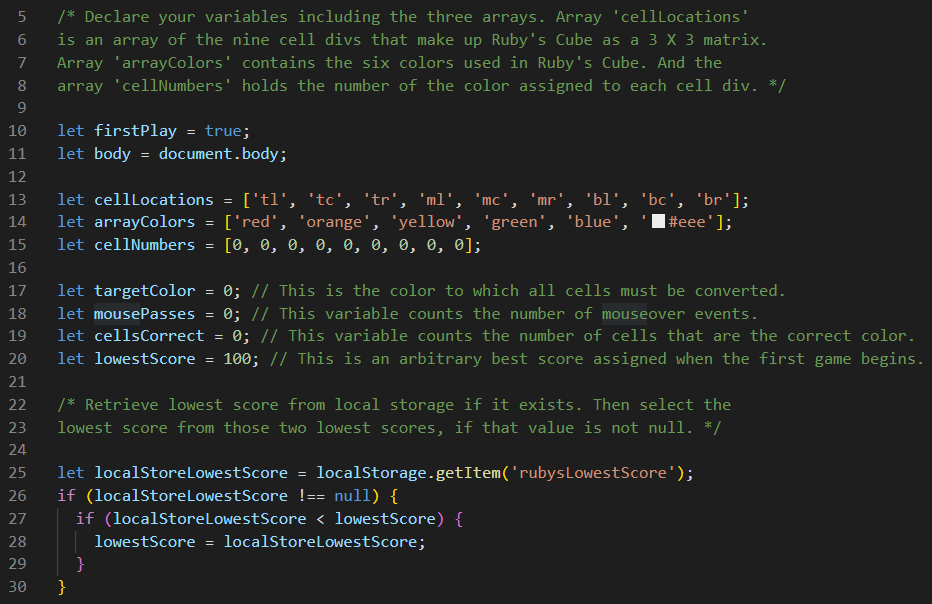
LocalStorage
Actually, we will spent time talking about lines 20 through 30 above. As you can see, we assign the value of 100 to the lowestScore on line 20. Then on line 25, we attempt to get the item named rubysLowestScore from localStorage on this computer, and we assign what it returns to the variable named localStoreLowestScore (say that ten time fast). On line 26, we check to see if it returns null. If it does, then lowestScore remains unchanged as 100. However if we find that the value of localStoreLowestScore is not equal to null, then that means that a value was stored in localStorage, and we need to check to see if that value is less that whatever the current value of lowestScore on line 27. And if it is, then that value is assigned to the value of lowestScore. That might sound complicated, but it really isn't, if you actually think about it.
Now let's jump down to lines 175 through 177 at the bottom of the script file where we see that an anonymous function is calling the startGame function that is on lines 161 through 173. And if this is the first time the game is played (line 162), then we loop through all nine cells, while painting each one with one of our six possible random colors. And then on line 166, we are enabling pointerEvents for each cell as well. But there is a subtle catch involved here that can be found on line 162. Yes, firstPlay is indeed true, and that enables this code to run. But the first mouseover event that happens triggers the cellUpdate function on line 88. But if you look at the code following it, that function does nothing as long as firstPlay is true, and that prevents any mouseoverevents from happening until the START GAME button named btn3 is clicked, which runs the initialize function. And that immediately sets firstPlay to false. And we will see these two blocks of code next.
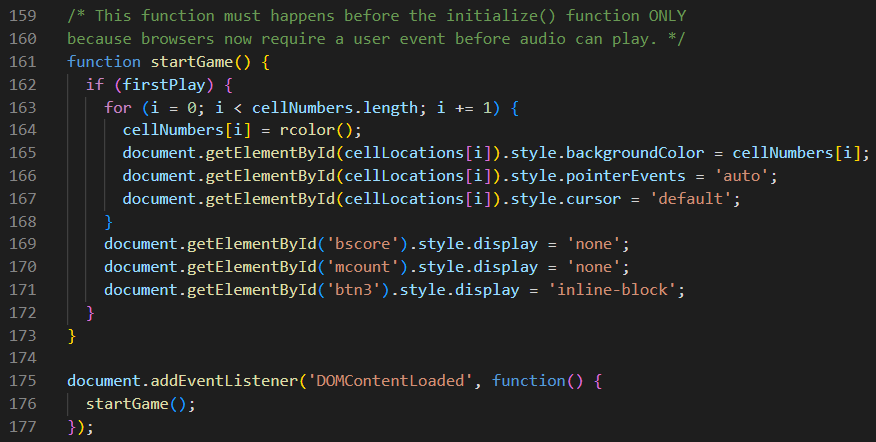
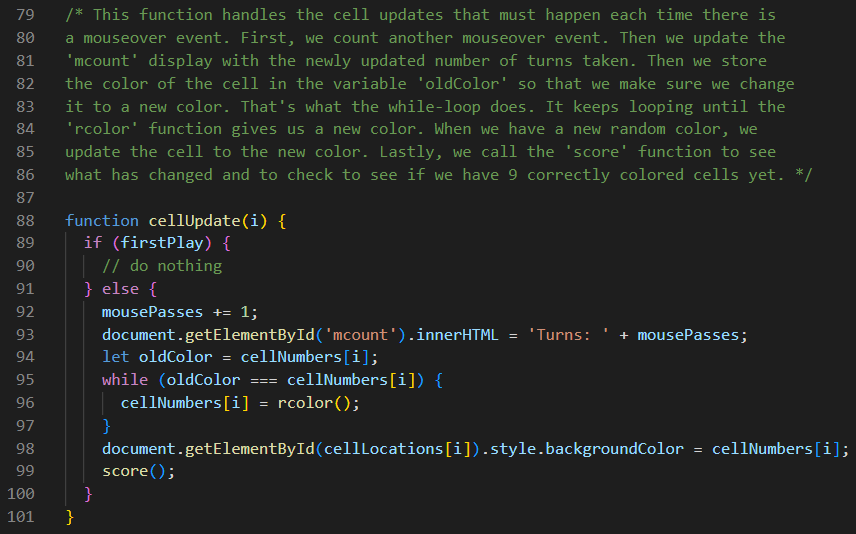
Lines 89 below tells the rest of the story that we talked about above. As long as the firstPlay variable is true, then no other mouseover events can happen until the START GAME button named btn3 is clicked, which runs the initialize function. And that immediately sets firstPlay to false. We will see the initialize function in the next block of code. And the code comments before the function below will tell you everything you need to know about the rest of the code in the cellUpdate function.
These comments below tell you almost everything you need to know about the initialize function.
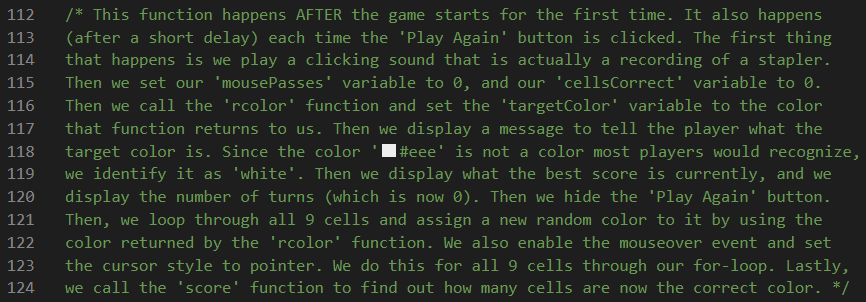
But we wanted you to pay special attention to line 127 because it completes the discussion we started above. As you can see, line 127 changes the value of firstPlay to false, and that magically allows the cellUpdate function to recognize mouseover events.
We also wanted to make special mention of lines 133 through 136 because we have not worked with Audio objects before. Of course line 133 creates a new Audio object. Line 134 sets the volume to just over half volume, and that helps to prevent frightening players. Line 135 define the source file of this sound effect, which is the sound of a stapler clicking. And line 136 actually plays that sound.
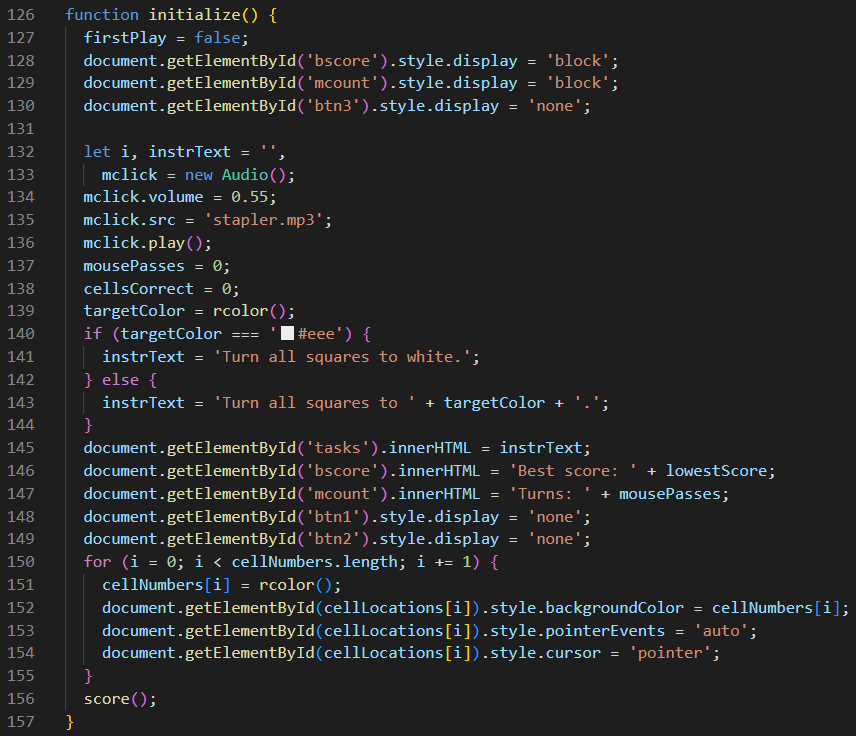
The very last thing that happens in the initialize function on line 156 is a call to the score function. We will see how that works in just a moment.
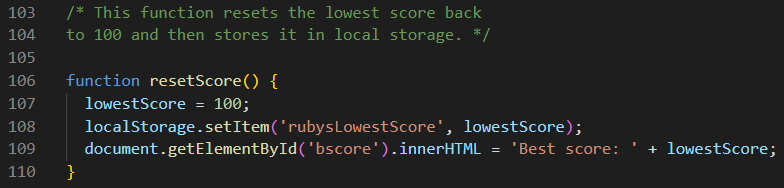
In the block of code below, we see the result of clicking the Reset btn2 button.
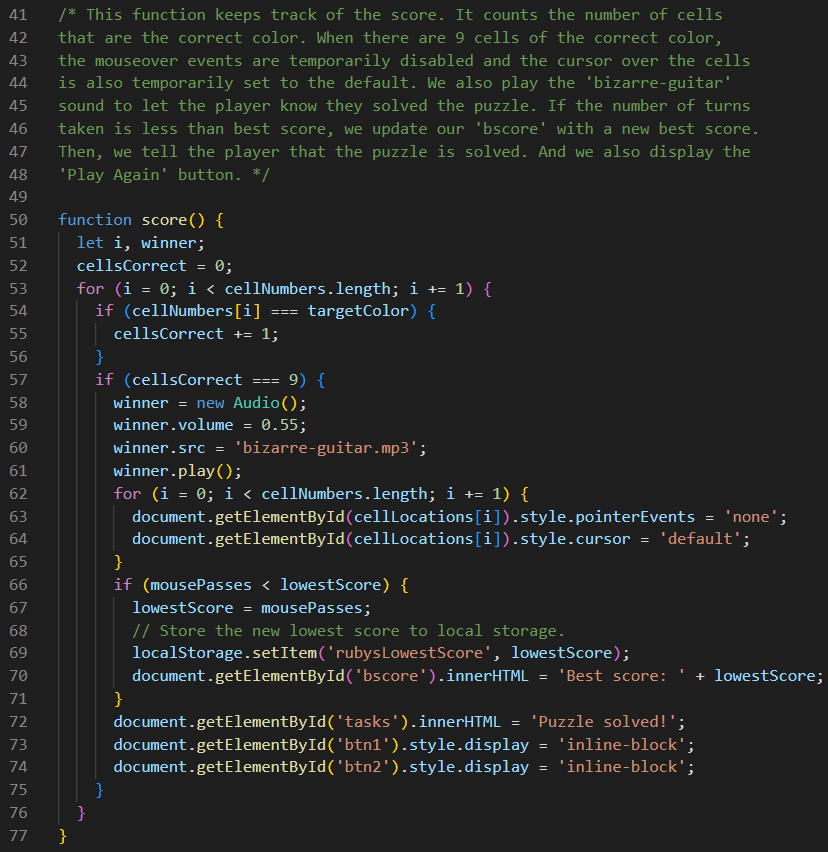
Ah yes! The all-important score function is seen below. The comments explain it well, but notice that we also have another Audio object that plays a bizarre guitar sound when the puzzle is finally solved. This function also keeps the Best Score updated onscreen and in localStorage.
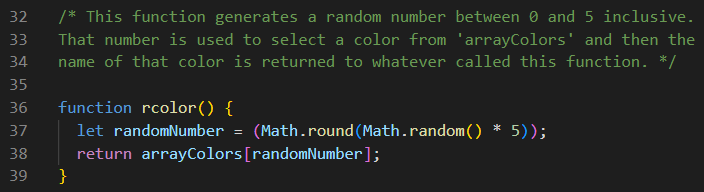
And lastly, we have our random color generator which is actually nothing more than yet another random number generator that generates an integer between 0 and 5 which is then used to index a color value in the arrayColors array.
We hope that you had fun with this silly Ruby's Cube project. We never bothered to even mentioned the CSS code behind this project. But one of the silliest things about this project's design is that there are around 100 lines of media queries at the bottom of the style.css file. Apparently, the goal here was to create a mobile device-friendly game. But mobile devices do not recognize hover events! You simply cannot hover your finger over a cellphone screen, and expect it to recognize the hover. So how silly is that? Less silly is the fact that a special Google font called Rubik Mono One was used in this game. Anyway, please feel free to study the CSS code. Our JavaScript coding adventures will continue in the very next part.