JavaScript Coding Course
JS 101
Part 1. An Introduction to JavaScript
What is JavaScript Anyway?
We have already learned that there are three main languages used to develop web pages. They are HTML, CSS, and JavaScript. HTML is the markup language that allows us to put content on our web pages. CSS is the stylesheet language that gives us the ability to add aethetic presentation to our web content. And together, these two languages create static web pages which consist of a tree structure of nodes known as the DOM or the Document Object Model. But in order to make our web pages interact dynamically, we must use JavaScript to manipulate nodes in the DOM.
In fact, JavaScript is the only programming language that was designed solely to interact dynamically with the static content of our web pages, especially on the front-end or client-side. And while some elitists will argue that JavaScript is a scripting language rather than a true programming language, the truth of the matter is that JavaScript is both. But please don't be discouraged by these rather lofty explanations. In short, JavaScript is a useful tool that you can use to make your web pages come to life in ways that otherwise would not be possible. Also, JavaScript is a loosely-typed language that is interpreted at runtime, meaning that code does not have to be compiled before it is run. And yet, it runs amazingly fast for an interpreted language. Beyond that, JavaScript has been used to create a plethora of JavaScript Libraries and JavaScript Frameworks that can also work on the back-end or server-side as well. Examples of JavaScript libraries and frameworks are Node.js, React.js, Next.js, Vue.js, Svelte.js, and Angular.js, to name a few.
What JavaScript is Not!

JavaScript is not related to the strongly-typed programming language called Java, even though the two might sound like they are related in some way. For that reason alone, most web developers don't claim to know Java. And just in case you don't know the difference between loosely-typed and strongly-typed languages, we will briefly explain here that we are talking about data types. In short, Java is strict in its assignment and declaration of variables before they are used. On the other hand, JavaScript is much more flexible which offers some advantages and disadvantages.
For example, in JavaScript, you could declare let a = "1"; and let b = "3"; and let c = a + b;. JavaScript does not care that variables a and b were both declared as string variables instead of number variables, so it will concatenate the two string variable values together, rather than add them together as two integers. The result is that the variable c now holds the value of "13" rather than the value of 4. If you try similar variable assignments and operations in Java, it will become very unhappy and produce error messages rather than results. In stark contrast, JavaScript is completely happy to comply with your request, regardless of whether it seems logical or not. This little quirk can be so disturbing to programmers of strongly-typed languages that they often prefer to use a JavaScript precompiler called TypeScript which tightens up variable assignments making JavaScript much less prone to errors. But most JavaScript programmers think that toads are cute, so they simply accept them: warts and all.
And while we could spend a lot more time explaining all of the myriad ways that Java and JavaScript are different and unrelated, that would basically be wasting your time. If you would like deeper explanations about Java and/or JavaScript, we recommend that you look them up and read about both topics on Wikipedia: Java on Wikipedia and JavaScript on Wikipedia. So without further ado, let's lift up the hood and look at the JavaScript Engine itself to see how it works.
Script Placement
In Part 2 of our CSS Coding Course, we learned that there are four different ways to invoke CSS:
- Inline CSS — the highest priority
- Internal CSS — the second highest priority
- External CSS — the third highest priority
- Default CSS — the lowest possible priority
In JavaScript, there are three ways to invoke scripts, which (for our purposes) we will call:
- Inline JS
- Internal JS
- External JS
Remember that the order in which your web browser reads your code is very important. Your browser reads all of your code from the top of the index.html file to the bottom. When it encounters CSS or JS, it must decide whether to execute that code then or later. That is generally why we try to place our internal stylesheet (or links to our external stylesheets) in the <head> of our index.html file. However, we can use inline CSS to change the style of any HTML element that needs to be different than the CSS rules we defined for the rest of the HTML document.
We generally try to do just the opposite with JavaScript. Usually we will place our internal script (or links to our external scripts) near the last line in the <body> of our index.html file, right before the closing </body> tag. And there are good reasons for this order of placement because scripts that manipulate the tagged HTML elements must know where those elements exist before they can interact with them. That is also true for scripts that change the CSS styles of these tagged HTML elements. In almost all of the projects we did up this point, we saw a linked pair of script tags near the bottom of the index.html file, even when they were linked to an empty script file. You should easily recognize this now all too familiar line <script src="script.js"></script>.
However, just as internal CSS stylesheets can be defined in the <head> of our index.html file between an opening <style> tag and a closing </style> tag, an internal script can be defined in the <body> (usually near the bottom) of our index.html file between an opening <script> tag and a closing </script> tag. And we will see examples of this in the very near future.

Lastly, it is important to mention that JavaScript can be invoked inline as part of almost any tagged HTML element. For instance, if you hover your mouse pointer over the image on the left, a JavaScript alert will be triggered. Try it! In fact, we are using both inline CSS and inline JS in this example. Notice that the cursor changes to a pointer as you hover your mouse over the spinning globe, which in turn also triggers the alert. This happens without the need to include code in a separate external script file or in an internal script area of this HTML file. And the CSS that changes the cursor does not need to be included in an external or internal stylesheet either. This is the beauty of being able to include CSS and JS inline.
Our JavaScript Example Projects
If you took both the HTML Crash Course and the CSS Coding Course, you should have two folders of projects inside your computer's Documents folder: one called HTML Crash Course and one called CSS Coding Course. In keeping with this organizing tradition, we'd like you to create another folder inside your Documents folder called JavaScript Coding Course. Keeping all of your JavaScript example projects in this one folder will make them easier to find and help you to stay organized.
We would also like you to download this template project zip file into the new JavaScript Coding Course folder in your Documents folder that you just created. Then, you can unzip that my-template project, and make copies of it anytime you need to start a new project. Yes, we could create a new project folder each and every time we needed to start a new blank project. After all, we already know how to do that, and Emmet will happily help us. But using a template saves time, so why not use a new project template to save time?
Our First JavaScript Project → JS Hello World
Once you have created the JavaScript Coding Course folder in your Documents folder, and downloaded and unzipped the my-template project, it is time to download, unzip, and open in VS Code our very first JavaScript example project. Oh yes! It is true that you've probably already seen this hello-world project before. But in this example project, we've added a twist. It's the same twist we used in the spinning globe example above. When you hover your mouse over the image, the cursor changes to a pointer, and an alert is produced. You can look at line 16 of the index.html file to see how this is done inline in both JS and in CSS. The JavaScript event that triggers the alert is the onmouseover event and it is actually rather easy to see what happens after the equal sign that follows the JS event onmouseover keyword. What follows the equal sign is pure inline JavaScript. Similarly, what follows the equal sign after the CSS style keyword is pure inline CSS. Notice that we always follow each line of CSS with a semicolon. In CSS, it is (almost always) required. We also try to do that in JavaScript, even though the semicolon is (almost always) considered to be optional. Nevertheless, we think that these JavaScript semicolons are simply good programming style, so we recommend that you get in the habit of always including them. When we get into JavaScript arrow functions, it will become abundantly clear why we insisted upon doing this religiously.

Lastly, and before we move on to the next project, we would like to present this challenge: change the onmouseover keyword to onclick, and then reload the web page and run it again. Now we are using the onclick JavaScript event rather than the onmouseover event, and it requires that you actually left-click your mouse button on the image rather than merely hover your mouse over it. And there are other JS mouse events we could try here as well. If you use a onmouseout event instead of a onmouseover event, then the alert is not triggered until after you move your hovered mouse away from the image. Are we having fun yet?
Our Second JavaScript Website → One-File Website
In our first JS website, we learned how to invoke an inline JavaScript event from inside a tagged HTML element. As a bonus, we also saw how we could add a CSS styling rule from inside a tagged HTML element as well. Neither of these inline commands required any outside JavaScript or CSS files to accomplish these feats. Yes, there was an external CSS stylesheet involved in styling the webpage, but changing the cursor was not one of its CSS rules. That proves that inline CSS rules take a higher priority than other CSS rules, whether those rules are internal, external, or default.
For our second JS website, we will see how we can create an entire website on one page using only one file: the index.html file. You already know how to download, unzip, and open this one-file-website project in VS Code, so please do that next. Are you shocked that there is only one file inside the ZIP file? And if you look closely at the code, you will see that it looks very messy and poorly structured! And in fact, it is. In reality, you would seldom choose to do something like this, but our goal here was to show you that it is completely possible to create a one-page website complete with a favicon, CSS, and JavaScript using only one file. Below is an illustration of just the code in the document head.
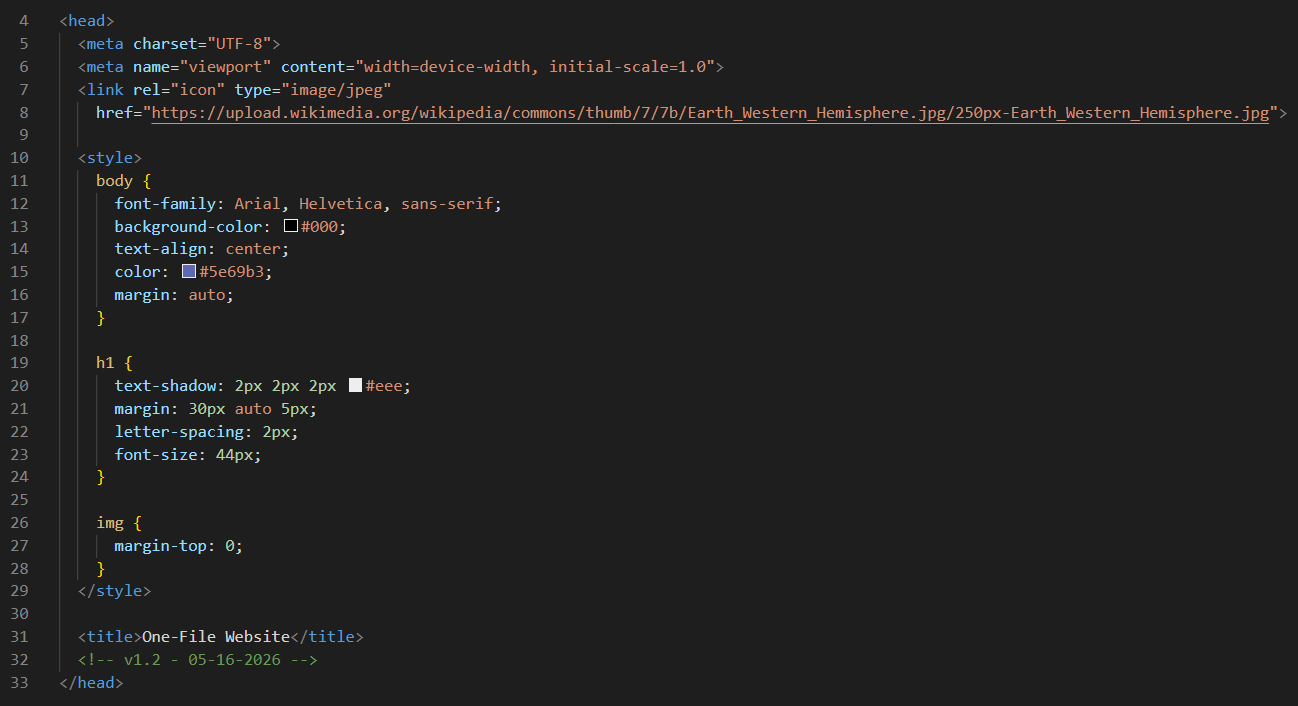
Notice that we have a favicon that we link in from an outside source on lines 7 and 8. That long URL takes up a lot of space and that's why we most often just store a favicon image file locally on our website. Also, please notice that all of our CSS rules are contained inside the <head> section of our index.html file as an internal stylesheet, as seen on lines 10 through 29. Luckily for us, our web browser is trilingual so it knows that everything that appears between the two <style></style> tags is written entirely in CSS.
The image below is an illustration of just the code in the document body. Notice that we also used the same image link in the document body as we used for the favicon in our document head. That code can be seen on lines 37 and 38 below. And likewise, the JavaScript event we are invoking is stored inside of an internal script near the bottom of the <body> section of this one-file document. That code can be found on lines 40 through 42. And once again, thanks to our trilingual JavaScript interpreter, our web browser recognizes everything between the two <script></script> tags as pure JavaScript.

But wait! What happens when we launch this webpage in Live Server? Does it seem odd to you that the alert happens before the rest of webpage loads? That seems to contradict what we said earlier when we said that the web browser reads the web page in order from the top to the bottom. And in reality, it actually does do that, but it chooses to execute alerts and prompts (which we will cover shortly) first. Think about this for a moment. How would you like it if it first displayed all the content on the web page, then changed all of the default CSS styling afterwards to styles contained in your stylesheet, and then it executed any scripts after that? What if one of those scripts asked you to type in your name and age after loading the content, and then it stated that your name was null and that your age was null as well? The main point we are making here is that the web browser is smart enough to know the correct order required to execute our code properly. And as programmers and web developers, we must also understand the correct order of code execution.
Our Third JavaScript Website → Multi-File Website
In the previous project, we learned how to invoke a JavaScript event from an internal script that was embedded inside the document <body>. We also saw how we could add an internal stylesheet inside the document <head> as well. But the result was messy and our code seemed mostly unreadable.
In this multi-file website project, we will produce the same result using the much more familiar one-page, multi-file format that we used in almost all previous projects. This arrangement has several advantages over other ways of doing things. For one thing, it segregates all three of our coding languages into three separate files, and that makes the code easier to read and understand. Another big advantage is that external CSS stylesheets take a lower priority than internal and inline CSS rules. And this arrangement gives us the option of overriding external CSS rules with internal and inline style rules. And it allows for JavaScript files to be linked directly from the HTML document as well. Anyway, download, unzip, and open this project in VS Code and please understand why we needed to learn all three of these options that are available to us as programmers.
We won't show the code here because it is pretty simple to understand if you examine it on your own. However, we will quickly explain how it works. This favicon and img are both the same ones that were in the previous project, but we downloaded the image from the external source and saved it with a simple name like earth.jpg. The link to the favicon is on line 6 and the img tag in the document body is on line 15. As for the CSS stylesheet, we used all of the same CSS rules as in the previous project, but rather than cluttering up the document head with CSS rules, we put all of them in our style.css external stylesheet, and then we linked the stylesheet to our HTML document on line 8. Similarly, we used the same JavaScript as in the previous project, but here again we moved that code to our external script file called script.js, and we linked it to our HTML document on line 17. The only other two changes we made were to the document title which we changed from "One-File Website" to "Multi-File Website", and we of course changed the message of the alert from "Welcome to a one-page / one-file website!" to "Welcome to a multi-page / multi-file website!". Otherwise, everything else is exactly the same, only this time it was done in a more organized and intelligent manner.
Alerts & Prompts
We already saw three different ways to send an alert. We sent one from an external script, we sent one from an internal script, and we sent one from an event that was triggered by mouse movements and/or mouse clicks. An alert is a function that is built-in to JavaScript. It allows us to output messages to the user easily without the need to write a whole lot of code to make the alert happen. Similarly, a prompt is a function that is also built-in to JavaScript that allows us to easily get input from the user without writing a lot of extra code. "Sounds great," you say, "but show me an example."
Well OK then. You can download this alerts-and-prompts project now to your JavaScript Coding Course folder, and then you can unzip the project, and open it with VS Code. Go ahead and look at the four lines of JavaScript code in the script.js file before you launch it with Live Server. This script contains two prompts and two alerts. After you launch it with Live Server, you can provide normal answers for your name and your age. The script will then send alerts to say hello to you, and remind you of your age. But it still works if you simply press enter at both of the prompts, except that it says hello without adding your name to the greeting, and it tells you that you are "years old" without giving you a number. Now let's run it a third time, and notice that each prompt has two buttons: an OK button, and a Cancel button. Whether you type answers or not, the OK button accepts your input by default when you press the enter key. And of course, you can just click it as well. But what happens if you click the Cancel button instead? This is one of the strange quirks about prompts. We will eventually get into why this happens. And in the next section, you will be introduced to data types including strings, which is what JavaScript was expecting you to enter, even if that string was an empty string (i.e. — ""). But when you canceled the two inputs, JavaScript created two null data types, and the two alerts wanted to tell you about that. So before we go on to the next series of lessons, we just wanted to mention that prompts can sometimes be dangerous. What happens in the event that your prompt asks the user for something like a password, and then asks them repeatedly for the password, even when and if they don't know it, and/or can't get it right? This situation is called an infinite loop and it is the dread of every programmer. Fixing an issue like this requires intelligent programming.
But let's not worry about that right now. Don't worry! Be happy! In the next part, we will get a chance to do something fun. How long has it been since you let your inner child out to play in a sandbox? That's where we are going next!