HTML Crash Course
HTML 101
Part 4. The Document Head
DOCTYPE Declarations
Oh, but wait! What was that blurb about DOCTYPE declarations in the part about code comments? Actually, an in-depth discussion about DOCTYPE declarations is almost unavoidable. In HTML5, there are actually three modes that a web browser will use to interpret and render HTML code: quirks mode, no-quirks mode, and limited-quirks mode. And from there, the discussion can get very deep.
For our purposes, and to keep the discussion as simple as possible, we will only be talking about HTML5 DOCTYPE declarations for no-quirks mode. The way to tell if you are using an HTML5 DOCTYPE declaration is if the very first line of code in the HTML document source code is <!DOCTYPE html>. Most of the web pages you will find on the internet use HTML5 DOCTYPE declarations. And since we want to learn how to be as professional as possible, this will always be the first line of source code from now on. Yes, we know that we didn't have any DOCTYPE declarations in our code until now, but we did that so that you would learn about the structure of a typical web page and its six essential tags first.
From now on, we will be using a no-quirks mode HTML5 DOCTYPE declaration as the first line in our HTML document, which we will be discussing in great detail next.
A Proper Document Head
Now that Pandora's Box is open, we should explain more about the information contained in the document head of a typical web page. Once this is fully explained, we will start working from HTML templates in the future, and we will seldom mention these things again.
Listed below is some simple and yet typical HTML code that we will use as an HTML template file in the very near future. Below this code listing, we will explain what each line of code does for us and why we need it.
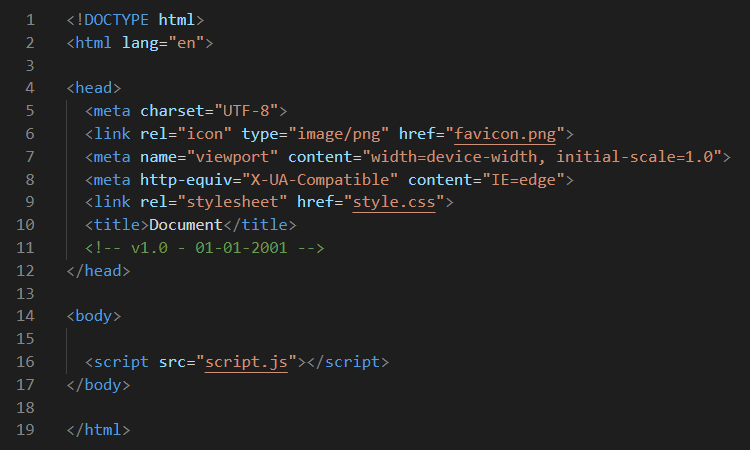
On line 1, we have the HTML5 DOCTYPE declaration we explained above. Your HTML code will always behave predictably if you always include this line of code first. Enough said on that. On line 2 is the opening html tag we know so well by now, but with one small modification: we declare English as the language we will be using on this web page. That is what the last part of the tag <html lang="en"> is telling us.
Line 4 is your typical opening head tag. Line 5 is something new to us. This is what is commonly referred to as a meta tag. This meta tag is telling us to use the Unicode character set. Why is that important? Because Unicode Version 16.0.0 contains almost 155,000 characters. So even if we are doing our entire website in English, we may want to display some text in a foreign language, or use some mathematics symbols, or even an emoji. Unicode will display those these characters properly on our web page as long as we include this simple line of code.
And that brings us to line 6. In Lesson 1, we mentioned that both the title and the favicon are the only two items in the document head that you ever see displayed. But they are displayed on the browser tab, not on the actual web page. Look at the little world globe on the browser tab for this web page. That is a favicon!
On line 7 we have another meta tag, but this one establishes a viewport for this web page. Viewports allow us to make web pages are mobile device responsive if properly coded. This can be tricky business sometimes, but without defining a viewport, developing a mobile responsive web page is completely impossible. We will learn more about that later as well.
Important Note: Newer versions of VS Code do not create line 8 through Emmet as shown above. This line was once there to override a user's "Compatibility View" settings in Microsoft's Internet Explorer web browser versions 8, 9, and 10, and to tell it to behave as if it was Microsoft's Chromium-based Edge browser. However, all versions of Internet Explorer are no longer supported, and even Microsoft had to eventually admit that developers writing new web code no longer need to include this line of code in the document head. That took a while, mostly because Microsoft stupidly made it part of their legacy Windows operating systems. Bottom Line: Simply ignore this line of code if and when you see it.
On a happier note, line 9 is how you link your external CSS stylesheet to your HTML document. And we will be doing that ourselves when we dive into CSS here shortly! Line 10 is the title. We already talked about the title. It appears on the browser tab next to the favicon. On line 11, we have a comment. We personally like to include a version number and the date it was last modified. And although this is completely optional, we consider this type of commenting to be a best practice and good habit to get into. Line 12 is of course the closing head tag, which marks where the document head ends.
The Rest of the HTML Document
You are already very familiar with the tags on lines 14, 17, and 19, so we won't bother to explain them all over again. However, you might be wondering what line 16 is all about. That is how you link your external JavaScript file to your HTML document. And even if you don't have any JavaScript files to link at this point, it doesn't hurt anything to include this link.
Before continuing on to the next part of this lesson, you should probably take a look at this side tutorial (linked below) on Titles and Favicons even though we have not discussed image file formats yet. Having a title and a favicon on each web page will make your web pages look a lot more attractive and professional.