Blog Post #6
AWD
Author: Tom Frye
Updated: 07-15-2026
Graphics Editors
News Flash!

We've been working hard on this blog for months now. And we've been doing research as we've tried out numerous different graphics editors in an attempt to find one that had:
- True ease-of-use, even for beginners.
- A robust and yet extensive feature set.
- A price tag that almost anyone could afford.
- True compatibility with all operating systems.
And amazingly enough, we finally found the one that we were searching for all along. It was hidden right under our noses, because we refused to acknowledge that an almost free online graphics editor could be just as powerful, and yet easy enough to learn and use, as an expensive standalone desktop application. That level of ignorance set us back months. But the search is now over! We are now happy to report that we strongly recommend Photopea as the best and least expensive graphics editor for anyone who is just starting out as a beginning web developer. And if you are new to to the fine art of editing graphics images, then hopefully you will find this Photopea Learning Guide helpful to you as well. And you should also know that there is a well-supported community of Photopea Users who have produced lots of YouTube How-To Videos out there as well.
Of course Photopea has a 100% Free Basic plan, so you can start using all of its features right now today, without incurring any out-of-pocket expenses. You may have to tolerate a few ads if you do not have a good ad-blocker installed on your default web browser. And if you later decide that you would like to upgrade to their Premium plan, for a single user, it can costs as little as:
- 8 € (or ~ $9.15 USD) per month
- 15 € (or ~ $17.16 USD) per quarter
- 50 € (or ~ $57.21 USD) per year
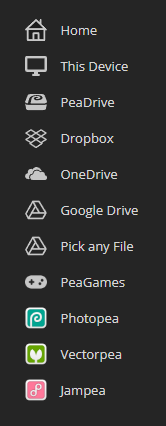
The feature set that is included with this web app is nothing short of phenomenal. Let's take a quick look at this Photopea menu as shown on the left. Even as a free user, you are given 0.5 GB of free cloud storage on PeaDrive, if you have no other cloud storage to use. But there are also links to other popular cloud storage solutions as well, including Dropbox (our personal favorite), OneDrive, and Google Drive as well. And besides providing you will the best possible raster graphics editor, you also have links to Vectorpea, a vector graphics editor, and Jampea, an app that lets you compose music files online. And if you are still unimpressed, PeaGames exists for you in those moments when you are bored and need a break to play games.
But wait! There's more! Photopea was developed by a young Ukrainian, who is now living in Prague, by the name of Ivan Kutskir. And as amazing it this might sound, Kutskir developed Photopea in 100% Pure Vanilla JavaScript. He did not use React, Vue, Angular, or any heavy front-end frameworks. Every UI element, the layer stack, and the blending modes are handled by custom JavaScript algorithms that he wrote from scratch. Photopea also does No Server-Side Processing. Despite being a website, Photopea does not upload images to a server to process edits. It utilizes the client's local CPU/GPU. You can literally open the page, unplug your internet connection entirely, and keep editing fully offline (more on that in as moment). And lastly, Kutskir remains the sole developer and maintainer of this app. By bypassing the bloat of frameworks and keeping the code highly optimized, his single-person app handles millions of active users while pulling in over $2.8 million annually in profits. And if you don't find these facts to be the ultimate inspiration to become a front-end web developer, then there probably isn't anything else we can do or say to inspire you.
And the irony of ironies is something that we just discovered today. On any Chromium-based web browser, Photopea can be installed as a Progressive Web App (PWA). That means that the robust standalone desktop application that we were searching for all along actually exists, and can be installed with only a few quick mouse clicks from the Photopea website. And what makes that so special? Well for one thing, it means that you can edit images offline as easily as online. When you have no connection to the Internet, you can still do your work. And that was one of the biggest reason why we were searching for a standalone graphics editor app. But now that reason is entirely moot.
Installing the Photopea PWA on Chrome
- Open the Photopea website in Chrome.
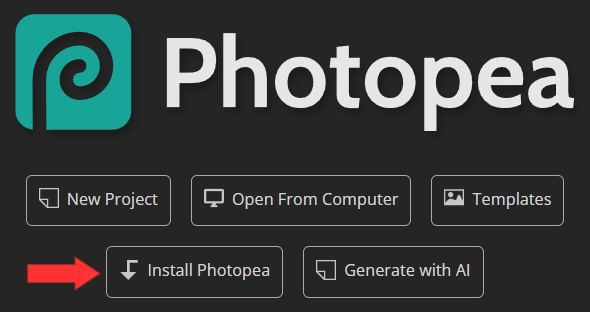
- There might be an Install Photopea button on the web page.
- If so, then click on that button to install the Photopea PWA.
- If not, click on the 3 dots in the upper right corner of the window.
- Select Cast, save, and share from the pulldown menu.
- About halfway down the menu you will see Install Photopea…
- Click on that option, and it will be installed for you.
Installing the Photopea PWA on Brave
- Open the Photopea website in Chrome.
- There might be an Install Photopea button on the web page.
- If so, then click on that button to install the Photopea PWA.
- If not, click on the 3 lines (hamburger menu) in the upper right corner of the window.
- Select Save and share from the pulldown menu.
- About halfway down the menu you will see Install Photopea…
- Click on that option, and it will be installed for you.
Other Online Tools
Converting images from one file format to another has always been tricky business, and graphics image file formats are no exception. All modern graphics editors support the basic image file types of GIF, JPG, and PNG. Of course, animated GIFs cannot be edited as single-frame images for all of the obvious reasons. And care must be taken with PNG files that have transparent backgrounds.
However, the WebP image file type, and especially the AVIF file format type, may or may not be supported by your chosen graphics editor program. And if that is the case, then it's not the end of the world. Help is definitely available through a couple of different online file conversion websites. We rely heavily on Convertio, and in some cases, Cloud Convert as well.
Another task that seems to cause some of us a lot of grief is removing the background from an image, and then converting it to a PNG file with a transparent background. We have found that we prefer to use Remove BG for that task. And this service is free, as long as the size of your images are not huge, and that you aren't doing more than a few images each day. But you can always try this free Background Remover as well.
And there are times when the transparent PNG needs to be cropped down to a reasonable size, and if your editor does not have that as a feature, then you will need to find some online resource for that as well. Luckily, we just happen to have friend in the business who created his own PNG Cropper out of necessity. So if you also have the same need, please check out his very own free PNG Cropper.
But what happens in the event that your image files are so huge that they cause your web pages to load too slowly? This used to be a much bigger problem before Internet connection speeds increased their bandwidths. Nevertheless, if you ever find that your image files are ever too large, we strongly recommend that you reduce their image file sizes by using Tinify. This website can reduce the file size of many image formats as well. And surprisingly, a reduction in image file size does not necessarily mean a reduction in image quality. So feel free to try this solution if you ever have the need for it.
Please feel free to read the rest of this blog. There is a lot of great information here. But many of the other product endorsements found below are now almost obsolete.
About Digital Images
It is difficult to become a good web developer without knowing how to edit and manipulate digital images. In essence, a major in web development also requires a minor in graphic arts. And to properly evaluate your needs in this area, there is a lot to consider. Will you mostly be editing and retouching photographic images? Or will you also be drawing your own graphics images? And will you also need to have the ability to convert digital images from one file format to another? Some graphics editors perform all of these tasks within the same application, and some do not. All graphics editors have strengths and weaknesses in certain areas. But always remember that we are web developers, not graphic artists. So purchasing an expensive application that it difficult to learn and use is a mistake that we want you to avoid. And even if you find a free application that has great capabilities, it might also be difficult to learn and use as well. We are here primarily to teach you web development, not graphic arts, even though skill and knowledge in graphic arts is also a requirement. For these reasons, this blog will attempt to guide you in the selection and perhaps purchase of graphics editing solutions that will hopefully work well for you.
There is a lot to know about images, and hopefully the information presented in this website explains it well. In most cases, you will only need to manipulate or change raster images because vector images are a whole other ballgame entirely.
Vector images are quite different than raster images. To work with vector images, you sometimes need to understand the SVG code behind the vector image. Remember that vector images are actually drawn, not rendered. And they can be scaled up or scaled down to any size needed without compromising image quality.
On the other hand, raster images are rendered, not drawn. They are maps of colored pixels, sometimes referred to as bitmaps. But there are a few hard and fast rules about scaling raster images. For instance, you can generally take a larger raster image and reduce its size to a smaller image without losing image quality. But that is not the case for smaller raster images. If you increase the size of a smaller raster image, like a thumbnail image, and then attempt to display it with dimensions that are larger than they were in the original image, then your image will lose quality. The result will be an image that looks more grainy or blurry because your web browser has to fill in the blanks by guessing what colors of pixels are needed to render this smaller image in a larger size. For this reason in web development, we always try to start with the largest images that we can find. But we can edit or modify them as needed using a good raster graphics editor program. This program can be on an online website, or it can be a standalone program that you install on your computer. And of course you can always reduce the displayed dimensions of any raster image by using CSS. But always remember that when reducing the size of any raster image using CSS, that you can scale down either the width of an image, or the height of an image, but never both. We try to never to do both at the same time because doing that distorts the image by stretching it.
And besides having both raster image editors and vector graphics editors, there are also 2D graphics editors and there are 3D graphics editors as well. Probably the best-known 3D graphics editor is called Blender. All 3D graphics editors are vector graphics editors because they are used to produce 3D images for animations and video games. And while there are a couple of raster graphics editors that also support editing vector images, we don't believe that is a necessary requirement for web developers who usually only have simple and basic graphics editing needs. For these reasons, we will focus mostly on only 2D raster graphics editors.
TL;DR
While there are lots of free options available, and we will list many of them here for you, we truly believe that professional results can only be accomplished using professional tools. So in the end, you might find that you cannot avoid spending money for a good 2D raster graphics editor. Sometimes there really is no easy way around this fact.
- For Windows users, we strongly recommend buying Corel PaintShop Pro 2023 Ultimate for $99.99 USD (and sometimes on sale for much less) as a one-time purchase. Yes, the 2023 version is the most recent one and it only supports Windows, not Macs or Linux. But we have been using it for decades, so we can definitely help you with it, if you take one of our online classes.
- For Mac and Linux users, we have two recommended options that are both free. The first of these is Krita, which is a little bit easier to learn, thanks to their online documentation. The second option is GIMP (GNU Image Manipulation Program), which is a very powerful graphics editor that can be somewhat more difficult to learn, but it also has its own online documentation.
- Windows users also have the option of downloading and using GIMP and Krita, but we believe that Paintshop Pro will serve you better in the long run.
- Otherwise, there are many other factors to consider when selecting a 2D raster graphics editior.
Many Factors To Consider
When selecting a good 2D raster graphics editing program to install on your computer, there are several things to consider. And so, you should ask yourself these questions:
- Can I install it on my computer? Does it support my Operating System of Windows, Mac, or Linux?
- What are the essential tasks that my graphics editor program needs to perform?
- How powerful does this program have to be, especially if I only have basic needs?
- How expensive is it? Can I actually afford it? Most of my web development tools so far have been completely free to download, install, and use.
- How difficult is it to learn and use? Ease-of-use is a primary concern of mine. I don't want to spend more time learning graphic arts than web development.
- How modern is the technology that it uses? For instance, does it support the latest image format types like WEBP and AVIF? And if not, can I find other resources of help online?
We believe that in most cases, for beginning web developers especially, it is completely unnecessary and entirely too expensive to consider using Adobe Photoshop for editing raster images. Photoshop is very difficult to learn and often very complicated use. And we are web developers, not graphics artists by trade. Of course Adobe does have Corel as its strongest competitor. But competition usually means that the pricing is often similar.
However, we believe that the power of the program called GIMP (GNU Image Manipulation Program) for editing raster images is just as good as their Adobe and Corel equivalents. GIMP supports all OS platforms while Adobe's and Corel's products do not. And GIMP is completely free to install and use. So basically, that part of the equation is a no brainer. The only downside is that GIMP has a steep learning curve, so you could spend a lot of your time learning how to use it. But you would also need to do the same thing with the premium products from Adobe and Corel.
After having taken several free products for a test drive, we have also concluded that Krita is almost as powerful as GIMP, and it's a whole lot easier to learn, thanks to the online documentation that comes with it. Krita appears to be a favorite for graphic artists who like to draw and paint, but the tasks you will be performing most often will usually be simple tasks like photo editing.
Knowing how to efficiently use any of these editing programs will be the key to your success. The main advantages to FOSS programs like GIMP and Krita is that they are completely free to download and install. If you decide later that they are too complicated to learn and use, then you only lost a little bit of your time, not your money.
Essential Tasks and Features:
Regardless of which graphics editor you choose, it must be able to perform the essential tasks listed here.
- resize images (smaller)
- crop images (trim edges)
- draw (using the pen tool)
- paint (using the paintbrush tool)
- select areas of the image (and copy)
- paste selected areas of the image as a new image
- paste selected areas of the image as a new selection
- paste selected areas of the image as a transparent selection
- paste selected areas of the image as a new layer
- save recently used colors (for use later)
- rotate images (90 degrees left or right)
- flip images (both vertically and horizontally)
- sample colors (using the eyedropper tool)
- flood fill areas with color (using the paint bucket tool)
- convert images to and from other file formats (JPG, GIF, PNG, WEBP)
- create transparent backgrounds on images (and export as such)
- adjust the level of transparency (reduce leftover outlines)
- edit the color palette (the list of all colors used)
- reduce or increase the color depth of the palette
- create and edit separate layers on your image
- flatten or merge separate layers into one image
Optional Tasks and Features:
Although not essential, these are nice features to have as well.
- whiten teeth in photos
- reduce red eye in photos
- blur, sharpen, or soften images
- add or remove noise in images (extra pixels)
- rotate images (in angles less than 90 degrees)
- add borders to images (optional thanks to CSS)
- additional filters and special effects you can use
Of course these are just preliminary lists. In most cases, more is not always better. Your goal is to select an application that is easy enough for you to learn and use without adding a number of complexities that make it difficult and unwieldy to learn and use. Some of the best graphics editors that cost money actually offer free trial periods. And many of these apps have sale prices around Black Fridays. So please take the time to fully evaluate any graphics editing program before deciding to buy it outright as a one-time purchase, or before deciding to subscribe by using it through a monthly rental price. There are obviously advantages and disadvantages to each of these options. But if you use your free trial period wisely, you can make the best possible choice.
We admit openly here that we have tried to keep your costs low while you are learning. So far, almost every tool we have recommended (except for your computer) has been free. However, you need to realize that professionals in any field need to use professional tools. And while we are not graphics artists, good web development requires coding skills tempered with a good eye for aesthetics. Presentation is everything when creating professional websites and having pleasing and attractive images on your website can make all the difference.
However, not all beginners have unlimited funds to buy or rent expensive graphics tools. And for that reason, we need to mention free software products that are available on all platforms. As mentioned previously, GIMP and Inkscape are both excellent programs that are available for free, and they support all platforms of Windows, Mac, and Linux. But they are somewhat difficult to learn and use until you get used to them. Some distros of Linux bundle GIMP and Inkscape with the distro you install. But Windows and Mac computers don't really bundle any good graphics editing programs with their operating systems, so we are forced to look elsewhere for good tools to use on this platforms. Yes, Windows still bundles the Paint and Photo apps with the OS, but both are far too primitive and amateurish for the tasks that you will require.
For Mac users, the best, simplest, and most feature-rich graphics editor might be Pixelmator Pro. This software product is now owned by Apple and can be purchased through the Apple Store for $49.99. Once again, Adobe and Corel products are available for the Mac, but they are very expensive and we consider them to be overkill for your daily required tasks. And the only apps that come bundled with macOS right out of the box are called Preview and Photos, and you will actually need something more powerful than either of those to do good work.
For Windows users, the best paid option for the price is still Corel PaintShop Pro 2023 Ultimate for $99.99 (unless you can find it on sale, sometimes for much less). We have been using this program for decades and we highly recommend it. It is far cheaper than Adobe Photoshop, but almost as powerful, and much easier to learn and use.
Originally, it was developed by a company called JASC, but it was purchased by Corel, probably because they saw that it competed with their own products and they wanted to profit from its popularity. Yes, there is a $20 cheaper Standard version as well as the Ultimate version, but we don't recommend that option. The $20 savings is not worth the frustration of finding out later that it does not have some feature that you actually require. But both versions do include a 30-day free trial, so you do have the option to try it before you buy it.
Affinity is now completely free to download and use, but with a catch. Affinity is made by Canva, and once you start using Affinity, you will undoubtedly realize that you need more features that are only available to you through their cheapest Canva plan called Canva Pro which costs $120 per year.
Adobe pulls a similar trick by offering you Adobe Express Free with no monthly costs. But similarly you find that you need more editing features, so your options are Adobe Express Premium for $9.99 per month or Adobe Firefly Pro for $19.99 per month, which gives you the ability to edit images with an online version of Photoshop. And soon you realize that you need more Adobe products like Lightroom, Illustrator, and/or Adobe Stock Photos. The price for several of these software products exceeds the cost of simply paying for Creative Cloud monthly. So now they've got you, and you end up paying over $50 per month for a Creative Cloud plan! Adobe is the master when it comes to siphoning money out of your pocketbook.
And there are other free graphics editors out there. We have tried Krita, LazPaint, and PixiEditor, to name a few. Krita actually looks pretty good, as long as you don't mind taking the time to learn the product. Luckily, they have a good online library of useful documentation. But we found that some of these others were not as robust as other products that actually cost money. If you want professional results, you need professional tools in your toolbox. There really is no easy way around this fact.